Setting your own training pattern
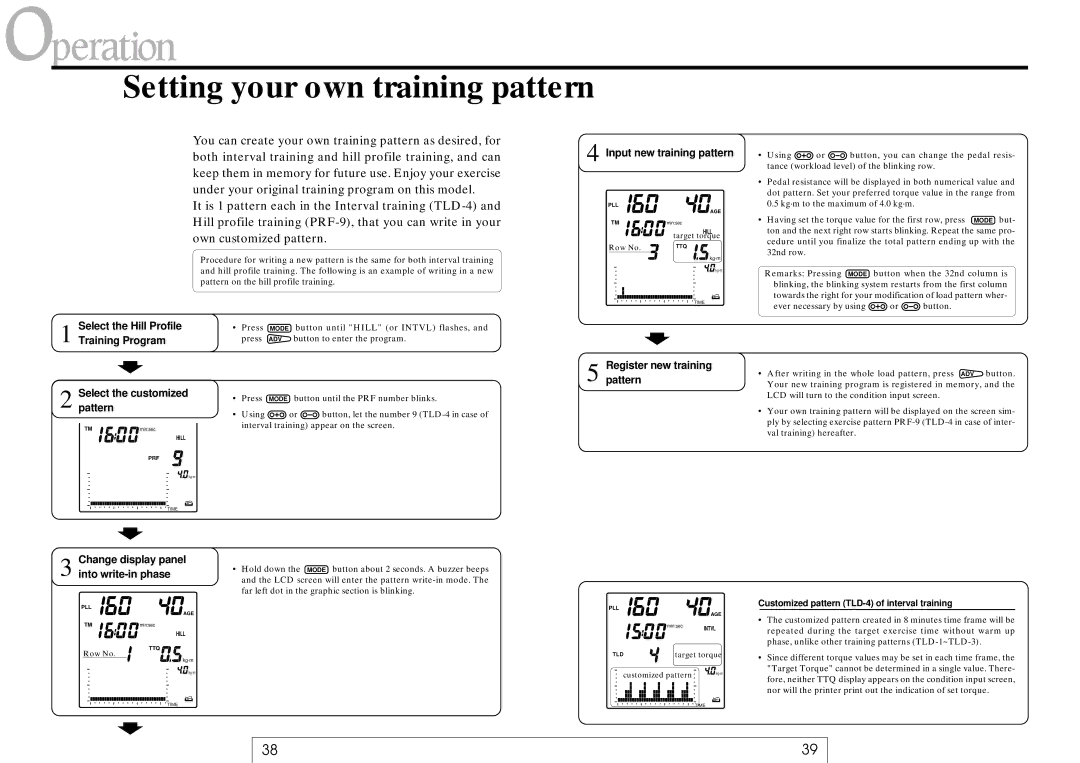
You can create your own training pattern as desired, for both interval training and hill profile training, and can keep them in memory for future use. Enjoy your exercise under your original training program on this model.
It is 1 pattern each in the Interval training
4 Input new training pattern
PLL
| AGE |
TM | min:sec |
| HILL |
| target torque |
Row No. | TTQ |
•Using ![]() or
or ![]() button, you can change the pedal resis- tance (workload level) of the blinking row.
button, you can change the pedal resis- tance (workload level) of the blinking row.
•Pedal resistance will be displayed in both numerical value and dot pattern. Set your preferred torque value in the range from 0.5 kg·m to the maximum of 4.0 kg·m.
• Having set the torque value for the first row, press MODE but- ton and the next right row starts blinking. Repeat the same pro- cedure until you finalize the total pattern ending up with the 32nd row.
Select the Hill Profile
1 Training Program
2 Select the customized pattern
TM ![]()
![]()
![]()
![]()
![]()
![]() min:sec
min:sec
HILL
PRF
Procedure for writing a new pattern is the same for both interval training and hill profile training. The following is an example of writing in a new pattern on the hill profile training.
•Press MODE button until "HILL" (or INTVL) flashes, and press ADV button to enter the program.
•Press MODE button until the PRF number blinks.
•Using ![]() or
or ![]() button, let the number 9
button, let the number 9
kg·m |
kg·m |
TIME |
5 Registerpattern new training
Remarks: Pressing MODE button when the 32nd column is blinking, the blinking system restarts from the first column towards the right for your modification of load pattern wher-
ever necessary by using ![]() or
or ![]() button.
button.
• After writing in the whole load pattern, press ADV button. Your new training program is registered in memory, and the LCD will turn to the condition input screen.
•Your own training pattern will be displayed on the screen sim- ply by selecting exercise pattern
![]()
![]() kg·m
kg·m
TIME
Change display panel
3 into write-in phase
PLL
|
|
|
|
|
| AGE | ||
TM |
|
| min:sec | |||||
|
|
|
|
|
| HILL | ||
Row No. |
|
|
| TTQ | ||||
|
|
|
| kg·m | ||||
|
|
|
|
|
| |||
|
|
|
|
|
|
| kg·m | |
|
|
|
|
|
|
|
|
|
|
|
|
|
|
| TIME | ||
•Hold down the MODE button about 2 seconds. A buzzer beeps and the LCD screen will enter the pattern
PLL
|
| AGE |
| min:sec | INTVL |
|
| |
TLD | target torque | |
customized pattern | kg·m | |
TIME
Customized pattern (TLD-4) of interval training
•The customized pattern created in 8 minutes time frame will be repeated during the target exercise time without warm up phase, unlike other training patterns
•Since different torque values may be set in each time frame, the "Target Torque" cannot be determined in a single value. There- fore, neither TTQ display appears on the condition input screen, nor will the printer print out the indication of set torque.
38 | 39 |
