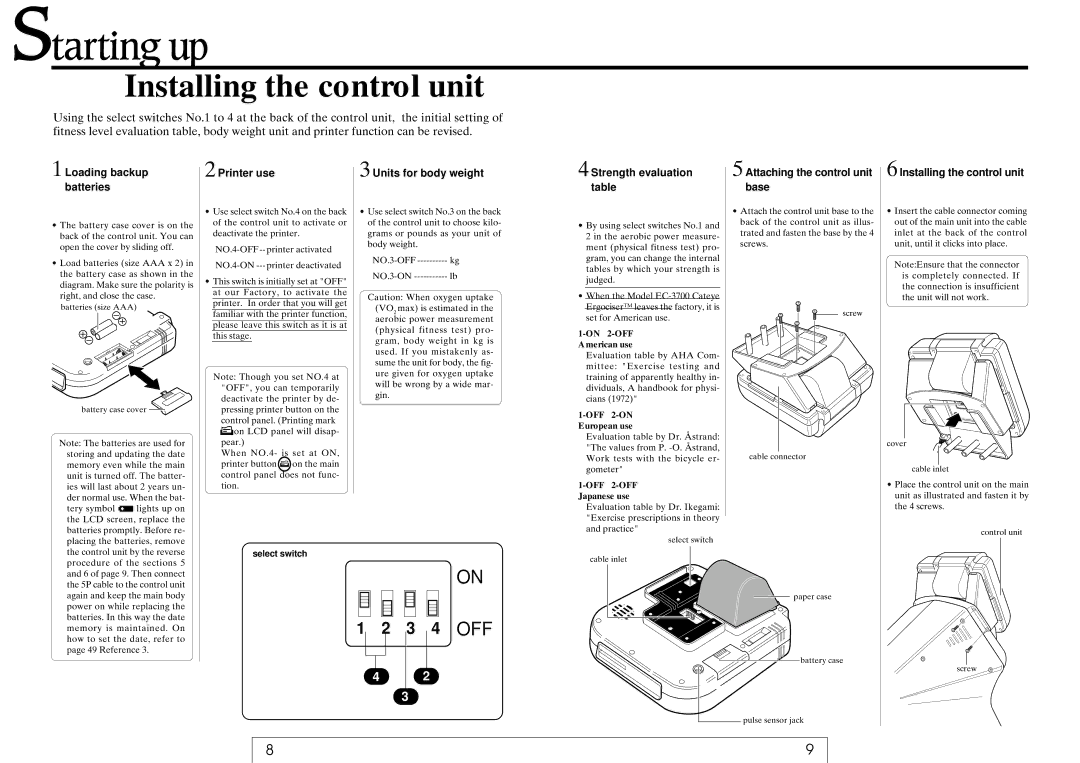
Installing the control unit
Using the select switches No.1 to 4 at the back of the control unit, the initial setting of fitness level evaluation table, body weight unit and printer function can be revised.
1Loading backup batteries
•The battery case cover is on the back of the control unit. You can open the cover by sliding off.
•Load batteries (size AAA x 2) in the battery case as shown in the diagram. Make sure the polarity is right, and close the case. batteries (size AAA)
battery case cover ![]()
Note: The batteries are used for storing and updating the date memory even while the main unit is turned off. The batter- ies will last about 2 years un- der normal use. When the bat-
2Printer use
•Use select switch No.4 on the back of the control unit to activate or deactivate the printer.
•This switch is initially set at "OFF" at our Factory, to activate the printer. In order that you will get familiar with the printer function, please leave this switch as it is at this stage.
Note: Though you set NO.4 at "OFF", you can temporarily deactivate the printer by de- pressing printer button on the
control panel. (Printing mark ![]() on LCD panel will disap- pear.)
on LCD panel will disap- pear.)
When NO.4- is set at ON,
printer button![]() on the main control panel does not func- tion.
on the main control panel does not func- tion.
3Units for body weight
•Use select switch No.3 on the back of the control unit to choose kilo- grams or pounds as your unit of body weight.
Caution: When oxygen uptake (VO2 max) is estimated in the aerobic power measurement (physical fitness test) pro- gram, body weight in kg is used. If you mistakenly as- sume the unit for body, the fig- ure given for oxygen uptake will be wrong by a wide mar- gin.
4Strength evaluation table
•By using select switches No.1 and 2 in the aerobic power measure- ment (physical fitness test) pro- gram, you can change the internal tables by which your strength is judged.
•When the Model
1-ON 2-OFF American use
Evaluation table by AHA Com- mittee: "Exercise testing and training of apparently healthy in- dividuals, A handbook for physi- cians (1972)"
1-OFF 2-ON European use
Evaluation table by Dr. Åstrand: "The values from P.
5Attaching the control unit base
•Attach the control unit base to the back of the control unit as illus- trated and fasten the base by the 4 screws.
screw
cable connector
6Installing the control unit
•Insert the cable connector coming out of the main unit into the cable inlet at the back of the control unit, until it clicks into place.
Note:Ensure that the connector is completely connected. If the connection is insufficient the unit will not work.
cover
cable inlet
• Place the control unit on the main |
unit as illustrated and fasten it by |
tery symbol![]() lights up on the LCD screen, replace the batteries promptly. Before re- placing the batteries, remove the control unit by the reverse procedure of the sections 5 and 6 of page 9. Then connect the 5P cable to the control unit again and keep the main body power on while replacing the batteries. In this way the date memory is maintained. On how to set the date, refer to page 49 Reference 3.
lights up on the LCD screen, replace the batteries promptly. Before re- placing the batteries, remove the control unit by the reverse procedure of the sections 5 and 6 of page 9. Then connect the 5P cable to the control unit again and keep the main body power on while replacing the batteries. In this way the date memory is maintained. On how to set the date, refer to page 49 Reference 3.
select switch
1
ON
2 3 4 OFF
42
3
Evaluation table by Dr. Ikegami: "Exercise prescriptions in theory and practice"
select switch
cable inlet
paper case
battery case
pulse sensor jack
the 4 screws. |
control unit
screw
8 | 9 |
