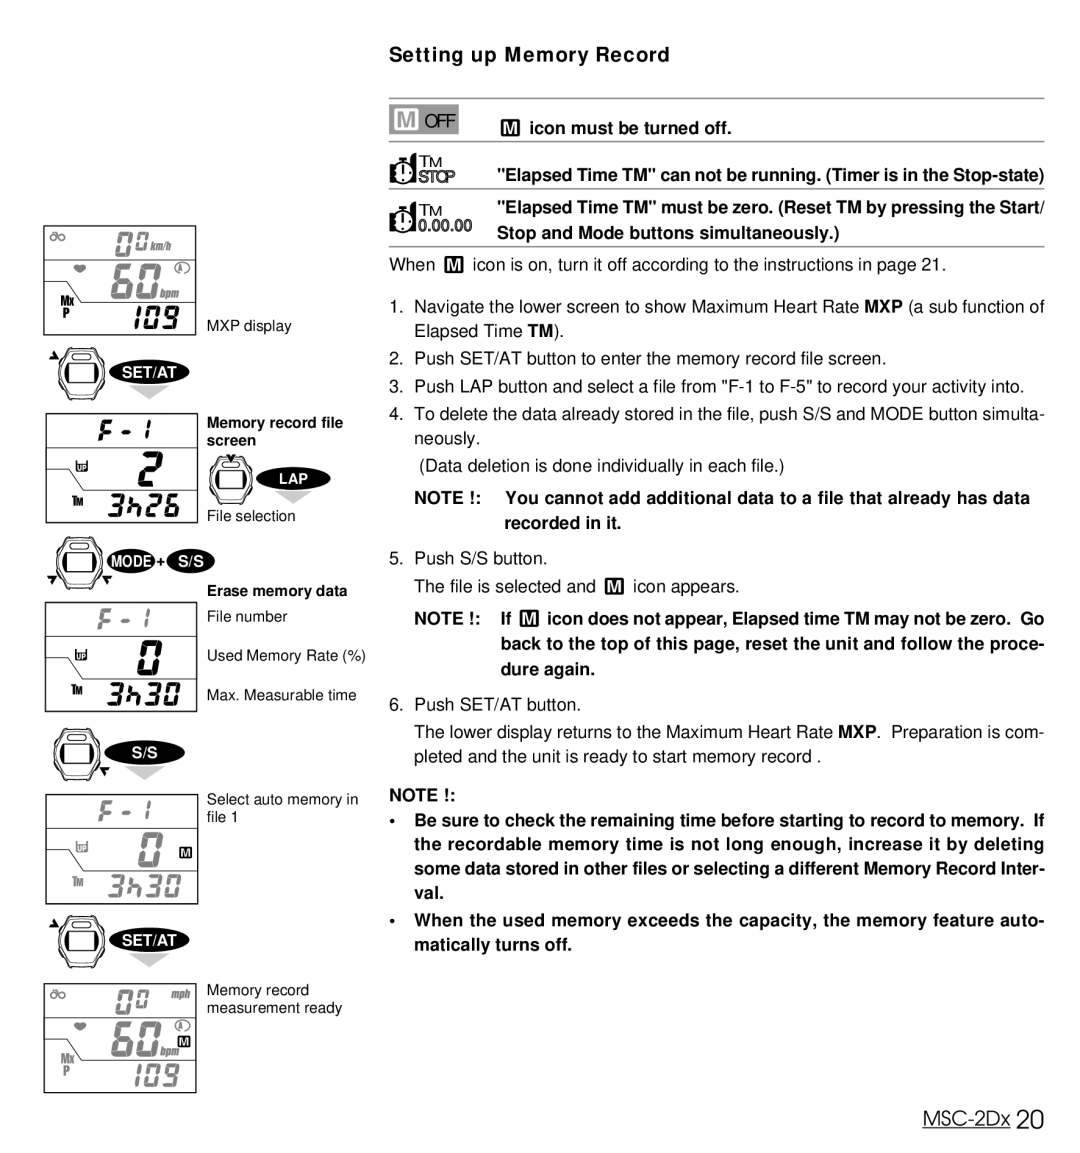
MXP display
SET/AT
Memory record file screen
LAP
File selection
MODE + S/S
Erase memory data
File number
Used Memory Rate (%)
Max. Measurable time
S/S
Select auto memory in file 1
SET/AT
Memory record measurement ready
Setting up Memory Record
|
|
| OFF |
| icon must be turned off. |
|
|
|
|
|
|
|
|
| TM |
| |
|
|
| STOP | "Elapsed Time TM" can not be running. (Timer is in the | |
|
|
| |||
|
|
| TM | "Elapsed Time TM" must be zero. (Reset TM by pressing the Start/ | |
|
| 0.00.00 | Stop and Mode buttons simultaneously.) | ||
| |||||
|
|
|
|
| |
|
|
|
|
|
|
When ![]() icon is on, turn it off according to the instructions in page 21.
icon is on, turn it off according to the instructions in page 21.
1.Navigate the lower screen to show Maximum Heart Rate MXP (a sub function of Elapsed Time TM).
2.Push SET/AT button to enter the memory record file screen.
3.Push LAP button and select a file from
4.To delete the data already stored in the file, push S/S and MODE button simulta- neously.
(Data deletion is done individually in each file.)
NOTE !: You cannot add additional data to a file that already has data recorded in it.
5.Push S/S button.
The file is selected and ![]() icon appears.
icon appears.
NOTE !: If ![]() icon does not appear, Elapsed time TM may not be zero. Go back to the top of this page, reset the unit and follow the proce- dure again.
icon does not appear, Elapsed time TM may not be zero. Go back to the top of this page, reset the unit and follow the proce- dure again.
6.Push SET/AT button.
The lower display returns to the Maximum Heart Rate MXP. Preparation is com- pleted and the unit is ready to start memory record .
NOTE !:
•Be sure to check the remaining time before starting to record to memory. If the recordable memory time is not long enough, increase it by deleting some data stored in other files or selecting a different Memory Record Inter- val.
•When the used memory exceeds the capacity, the memory feature auto- matically turns off.
