Note In this example, West router voice port 1/0 has two separate POTS dial peers associated with it. Dial peer 201 matches calls beginning with the digit 9 and handles PSTN calls originating from the West router. Dial peer 601 matches calls beginning with the digit 7 and handles calls to the PSTN originating from the East router.

Checking the FXO Configuration

If you configured your FXO interface according to the example described in the “Configuring FXO Interfaces” section on page 23, you can place outgoing calls over the PSTN. If you have trouble placing calls, use the show voice port command to make sure that the VIC is installed correctly. Use the show dial-peer voice command to make sure that the data you configured is correct, and test the PSTN by connecting a handset directly to the PSTN outlet and placing a call.

Note See the “Configuring Quality of Service” section on page 31 if you need to improve the quality of voice connections.

Configuring E&M Interfaces

If you have more than a few voice users at each location, the cost of voice ports and routers and the effort needed to configure dial peers for all the combinations of origins and destinations increases rapidly. In this situation, it might be more efficient to use a PBX at each location to switch local traffic and direct incoming calls and then use E&M VICs to connect the PBXs over an IP network.

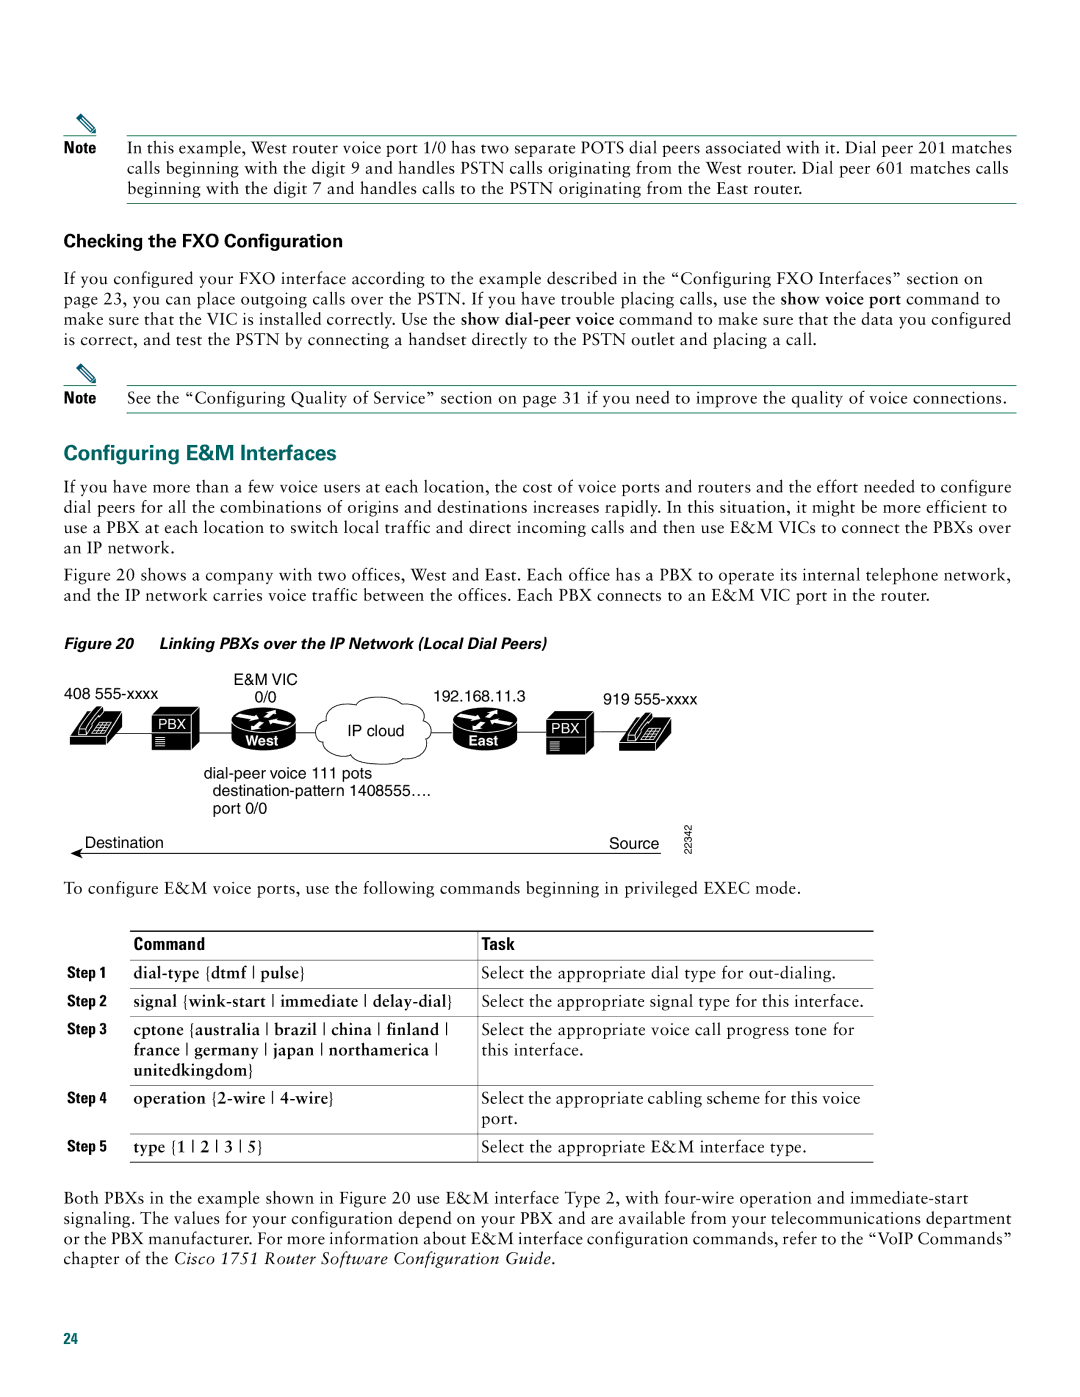
Figure 20 shows a company with two offices, West and East. Each office has a PBX to operate its internal telephone network, and the IP network carries voice traffic between the offices. Each PBX connects to an E&M VIC port in the router.

Figure 20 Linking PBXs over the IP Network (Local Dial Peers)

408 555-xxxx

PBX

E&M VIC

0/0192.168.11.3

West

IP cloud

East

919 555-xxxx

PBX

dial-peer voice 111 pots destination-pattern 1408555….

port 0/0

Destination

Source

22342

To configure E&M voice ports, use the following commands beginning in privileged EXEC mode.


Command

Task


Step 1

dial-type {dtmf pulse}

Select the appropriate dial type for out-dialing.


Step 2

signal {wink-start immediate delay-dial}

Select the appropriate signal type for this interface.


Step 3

cptone {australia brazil china finland

Select the appropriate voice call progress tone for


france germany japan northamerica

this interface.


unitedkingdom}


Step 4

operation {2-wire 4-wire}

Select the appropriate cabling scheme for this voice


port.


Step 5

type {1 2 3 5}

Select the appropriate E&M interface type.


Both PBXs in the example shown in Figure 20 use E&M interface Type 2, with four-wire operation and immediate-start signaling. The values for your configuration depend on your PBX and are available from your telecommunications department or the PBX manufacturer. For more information about E&M interface configuration commands, refer to the “VoIP Commands” chapter of the Cisco 1751 Router Software Configuration Guide.

24

Page 24
Image 24
Cisco Systems 1760 quick start Configuring E&M Interfaces, Checking the FXO Configuration, Command Task

1760 specifications

The Cisco Systems 1760 series routers are part of Cisco’s popular line of integrated services routers, designed primarily for small to medium-sized businesses and branch offices. The 1760 series was introduced to provide robust connectivity and routing solutions that facilitate secure and reliable networking. Aimed at offering flexibility, these routers integrate multiple functionalities to enhance operational performance.

One of the main features of the Cisco 1760 router is its modularity. It supports various interface and service modules that allow for customization based on specific networking needs. This modular design enables businesses to expand their networking capabilities over time without necessitating a complete hardware overhaul. The router typically comes equipped with two WAN slots and numerous interface options, including Fast Ethernet and serial interfaces.

The 1760 series routers also support advanced security features, providing businesses with a secure environment for their data transmissions. Built-in firewall capabilities, along with support for Virtual Private Network (VPN) protocols, ensure that sensitive information remains protected. Furthermore, the integration of IPsec and MPLS security features assists organizations in maintaining secure and scalable connections across diverse networks.

Another characteristic of the Cisco 1760 is its support for various technologies, including Quality of Service (QoS). QoS functionality allows network administrators to prioritize traffic, ensuring that critical applications receive the bandwidth they require while minimizing latency. This ability is particularly valuable in environments where voice, video, and essential data applications compete for resources.

The router’s ease of management is also noteworthy. With Cisco’s IOS (Internetwork Operating System), the 1760 provides a user-friendly interface allowing for straightforward configuration and monitoring. The simplicity in managing the network devices helps reduce the burden on IT personnel and enhances overall operational efficiency.

Further enhancing the router’s capabilities is its support for voice over IP (VoIP) applications, making it an ideal choice for organizations looking to implement modern telephony solutions. The ability to support multiple voice channels while maintaining adequate data throughput positions the 1760 as an attractive option for businesses transitioning to unified communications.

In summary, the Cisco Systems 1760 series routers exhibit a harmonious blend of modularity, robust security, traffic management, and VoIP support. They effectively meet the demands of modern networking environments, making them a reliable choice for organizations aiming to streamline operations while ensuring secure connectivity. With their adaptable design, these routers can serve as a powerful backbone for enterprise networking needs.