Working Inside the Blade Server
C o m m e n t s t o u c s - d o c f e e d b a ck @ c i s c o . c o m
Working Inside the Blade Server
This section describes how to perform the following tasks within a blade server:
•Removing a CPU or Heat Sink, page 17
•Installing a CPU or Heat Sink, page 19
•Installing a Motherboard CMOS Battery, page 21
•Installing an Adapter Card, page 22
•Installing Memory, page 24
Removing a CPU or Heat Sink
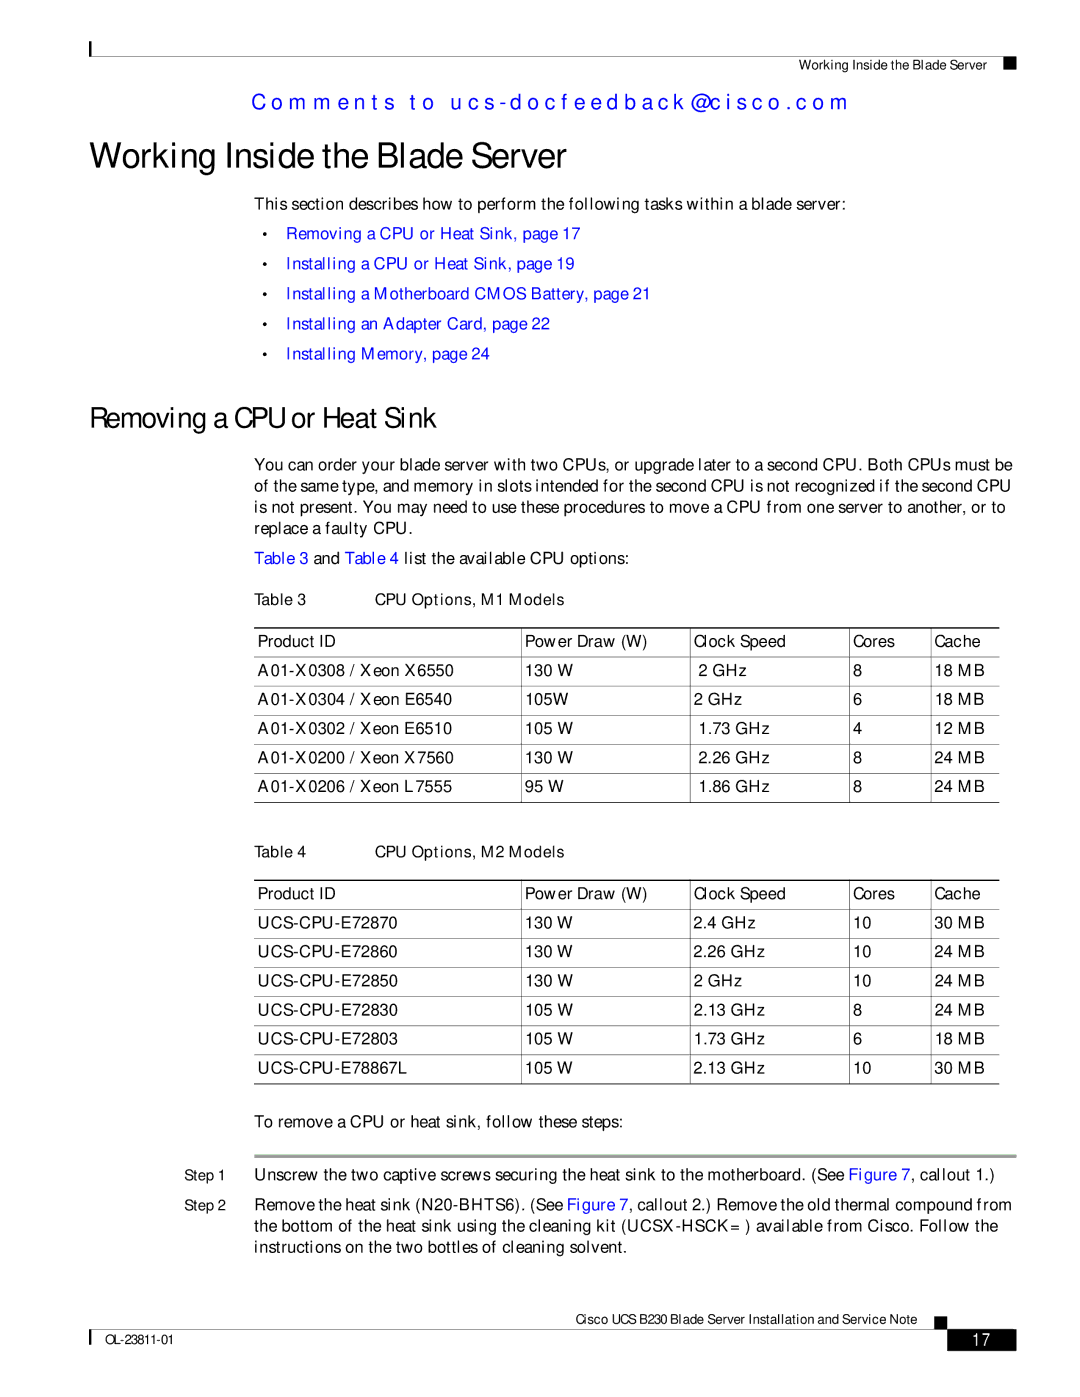
You can order your blade server with two CPUs, or upgrade later to a second CPU. Both CPUs must be of the same type, and memory in slots intended for the second CPU is not recognized if the second CPU is not present. You may need to use these procedures to move a CPU from one server to another, or to replace a faulty CPU.
Table 3 and Table 4 list the available CPU options:
Table 3 | CPU Options, M1 Models |
|
|
| |
|
|
|
|
|
|
Product ID |
| Power Draw (W) | Clock Speed | Cores | Cache |
|
|
|
|
| |
130 W | 2 GHz | 8 | 18 MB | ||
|
|
|
|
| |
105W | 2 GHz | 6 | 18 MB | ||
|
|
|
|
| |
105 W | 1.73 GHz | 4 | 12 MB | ||
|
|
|
|
| |
130 W | 2.26 GHz | 8 | 24 MB | ||
|
|
|
|
| |
95 W | 1.86 GHz | 8 | 24 MB | ||
|
|
|
|
|
|
Table 4 | CPU Options, M2 Models |
|
|
| |
|
|
|
|
|
|
Product ID |
| Power Draw (W) | Clock Speed | Cores | Cache |
|
|
|
|
| |
130 W | 2.4 GHz | 10 | 30 MB | ||
|
|
|
|
| |
130 W | 2.26 GHz | 10 | 24 MB | ||
|
|
|
|
| |
130 W | 2 GHz | 10 | 24 MB | ||
|
|
|
|
| |
105 W | 2.13 GHz | 8 | 24 MB | ||
|
|
|
|
| |
105 W | 1.73 GHz | 6 | 18 MB | ||
|
|
|
|
| |
105 W | 2.13 GHz | 10 | 30 MB | ||
|
|
|
|
|
|
To remove a CPU or heat sink, follow these steps:
Step 1 Unscrew the two captive screws securing the heat sink to the motherboard. (See Figure 7, callout 1.)
Step 2 Remove the heat sink
Cisco UCS B230 Blade Server Installation and Service Note
| 17 |
| |
|
|
