292043-UIM-B-0707

6.

When an evaporator coil is installed in an attic or above a finished


ceiling, an auxiliary drain pan should be provided under the coil as


is specified by most local building codes.

7.

Proper electrical supply must be available.

8.

Clearances must also be taken into consideration, and provided


for as follows:


A. Refrigerant piping and connections are located in the front.

If electric heat is used, a minimum clearance of 1” must be main- tained on all sides of the supply air duct and/or plenum continuously for up to 3’ (See Figure 1).

B.

Maintenance and servicing through the front or access side


of unit with both sides and rear of unit having zero inch clear-


ance.

C.

Condensate drain lines are connected in the front (clear of fil-


ter).

D.

Filter removal.

E.

When no electric heat is used, the unit as well as all duct


work and plenum are designed for zero clearance to combus-


tible materials.

FLEXIBLE DUCT COLLAR

MINIMUM CLEARANCE

OF 1” ALL SIDES

3’


FIGURE 1: Plenum Clearances

POWER WIRING

SUPPLY


TO MAIN

POWER WIRING

AIR

POWER SOURCE


CONTROL


WIRING

REFRIGERANT


THERMOSTAT

LINES


TO

CONDENSATE

DRAINFILTER ACCESS

LOUVERED

ELECTRIC HOT WATER HEATER

(Must comply with water heater installation instructions)

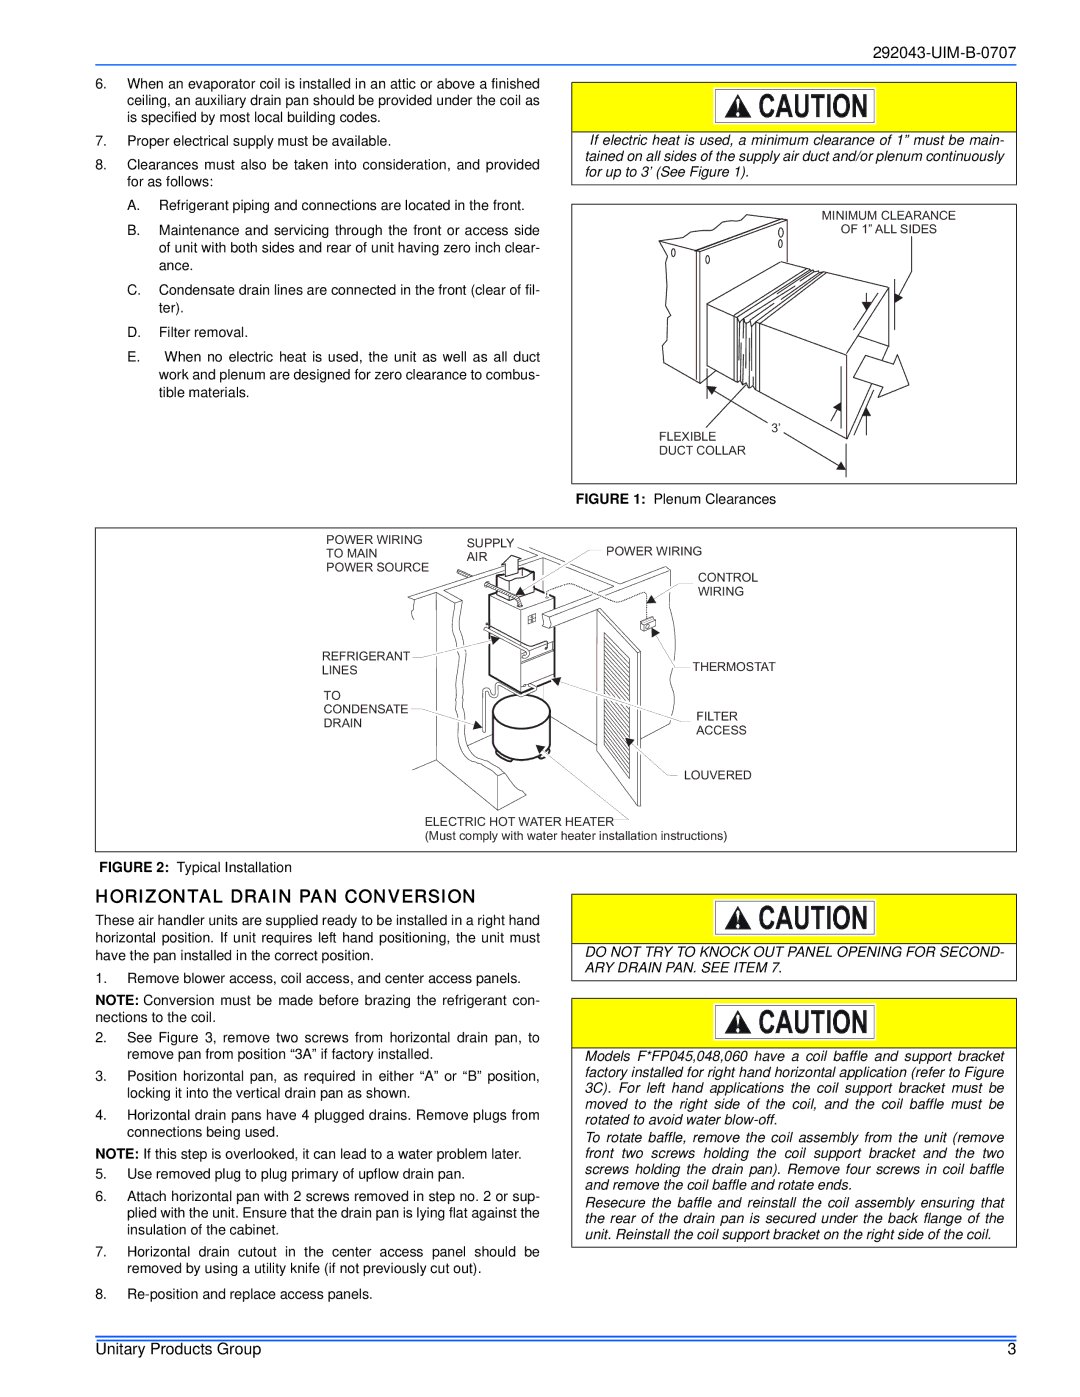
FIGURE 2: Typical Installation

HORIZONTAL DRAIN PAN CONVERSION

These air handler units are supplied ready to be installed in a right hand horizontal position. If unit requires left hand positioning, the unit must have the pan installed in the correct position.

1.Remove blower access, coil access, and center access panels.

NOTE: Conversion must be made before brazing the refrigerant con- nections to the coil.

2.See Figure 3, remove two screws from horizontal drain pan, to remove pan from position “3A” if factory installed.

3.Position horizontal pan, as required in either “A” or “B” position, locking it into the vertical drain pan as shown.

4.Horizontal drain pans have 4 plugged drains. Remove plugs from connections being used.

NOTE: If this step is overlooked, it can lead to a water problem later.

5.Use removed plug to plug primary of upflow drain pan.

6.Attach horizontal pan with 2 screws removed in step no. 2 or sup- plied with the unit. Ensure that the drain pan is lying flat against the insulation of the cabinet.

7.Horizontal drain cutout in the center access panel should be removed by using a utility knife (if not previously cut out).

8.Re-position and replace access panels.

DO NOT TRY TO KNOCK OUT PANEL OPENING FOR SECOND- ARY DRAIN PAN. SEE ITEM 7.

Models F*FP045,048,060 have a coil baffle and support bracket factory installed for right hand horizontal application (refer to Figure 3C). For left hand applications the coil support bracket must be moved to the right side of the coil, and the coil baffle must be rotated to avoid water blow-off.

To rotate baffle, remove the coil assembly from the unit (remove front two screws holding the coil support bracket and the two screws holding the drain pan). Remove four screws in coil baffle and remove the coil baffle and rotate ends.

Resecure the baffle and reinstall the coil assembly ensuring that the rear of the drain pan is secured under the back flange of the unit. Reinstall the coil support bracket on the right side of the coil.

Unitary Products Group

3

Page 3
Image 3
Coleman F*FP installation manual Horizontal Drain PAN Conversion

F*FP specifications

The Coleman F*FP, an innovative product from the renowned outdoor gear manufacturer Coleman, represents a significant leap forward in portable lighting solutions. Designed for outdoor enthusiasts, campers, and emergency preparedness, this compact device merges functionality with cutting-edge technology.

One of the standout features of the Coleman F*FP is its impressive brightness, which can easily illuminate small campsites or provide adequate light for activities such as cooking or reading after sunset. With adjustable brightness settings, users can customize the light output according to their specific needs, effectively conserving battery life when full brightness isn’t necessary.

The Coleman F*FP incorporates advanced LED technology, ensuring longevity and efficiency. Unlike traditional incandescent bulbs, the LEDs offer a much longer lifespan and consume significantly less power, making them an ideal choice for outdoor use where access to electricity may be limited. This energy-efficient design makes the F*FP not only cost-effective but also environmentally friendly.

Portability is another key characteristic of the Coleman F*FP. The device is lightweight and compact, making it easy to pack and transport, whether you're heading on a weekend camping trip or preparing for an emergency situation. It typically features a built-in handle or a hook for easy hanging, allowing for versatile placement in tents, trees, or outdoor structures.

Durability is paramount when it comes to outdoor equipment, and the Coleman F*FP does not disappoint. Constructed with weather-resistant materials, it can withstand various environmental conditions, from rain to dust, ensuring reliable performance and longevity. This rugged construction makes it a trustworthy companion for any outdoor adventure.

The F*FP also includes user-friendly features such as easy-to-navigate controls and battery indicators. Some models may offer rechargeable options, reducing the need for disposable batteries and enhancing sustainability.

In summary, the Coleman F*FP stands out in the realm of outdoor lighting solutions. Its impressive brightness, energy-efficient LED technology, portability, and durable construction make it an essential tool for adventurers and a sensible choice for emergency preparedness. With the Coleman F*FP in tow, users can enjoy peace of mind and a well-lit experience in the great outdoors.