CHEST TOP INSTALLATION AND REMOVAL
(With task light)
DRAWER AND WORK SURFACE
INSTALLATION AND REMOVAL
• Unplug work surface cord from back of |
Tools Required:
3/8" Wrench
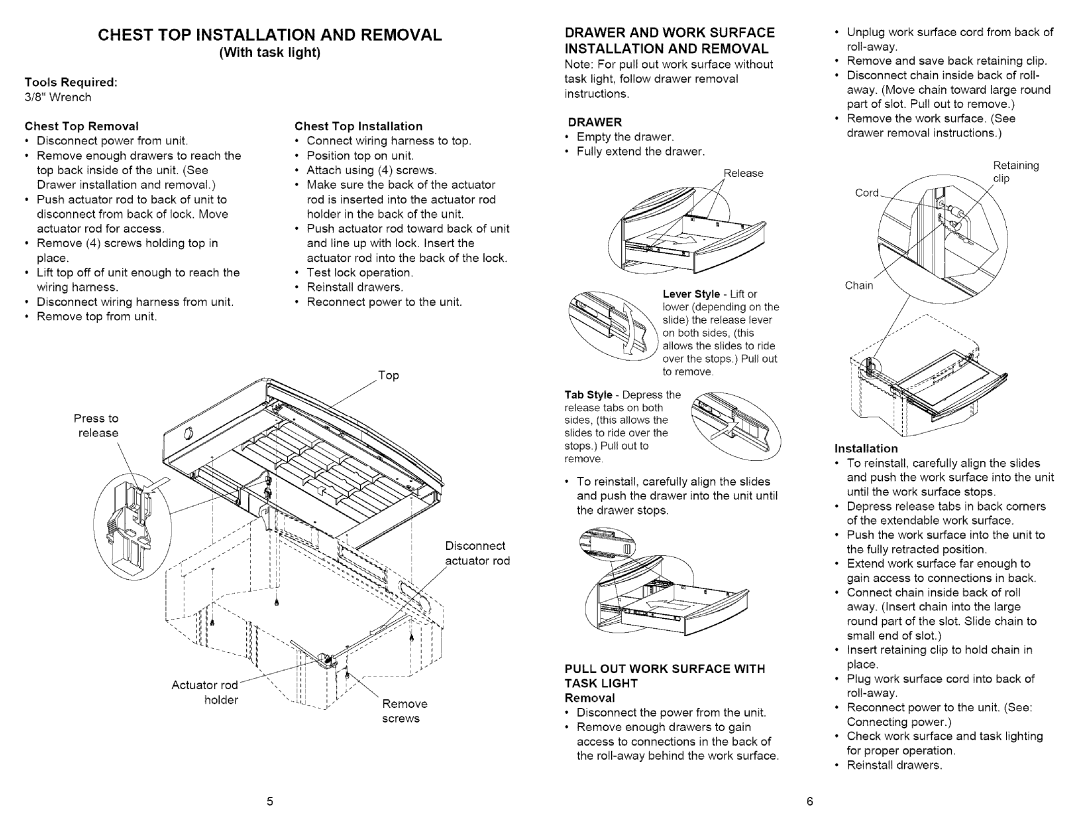
Chest Top Removal
•Disconnect power from unit.
•Remove enough drawers to reach the top back inside of the unit. (See Drawer installation and removal.)
•Push actuator rod to back of unit to disconnect from back of lock. Move actuator rod for access.
•Remove (4) screws holding top in place.
•Lift top off of unit enough to reach the wiring harness.
•Disconnect wiring harness from unit.
•Remove top from unit.
Press to
release
Chest Top Installation
•Connect wiring harness to top.
•Position top on unit.
•Attach using (4) screws.
•Make sure the back of the actuator rod is inserted into the actuator rod holder in the back of the unit.
•Push actuator rod toward back of unit and line up with lock. Insert the actuator rod into the back of the lock.
•Test lock operation.
•Reinstall drawers.
•Reconnect power to the unit.
Top
Note: For pull out work surface without task light, follow drawer removal instructions.
DRAWER
•Empty the drawer.
•Fully extend the drawer.
Release
Lever Style - Lift or lower (depending on the slide) the release lever
on both sides, (this allows the slides to ride
over the stops.) Pull out to remove.
Tab Style - Depress the release tabs on both
sides, (this allows the slides to ride over the
stops.) Pull out to remove.
•To reinstall, carefully align the slides and push the drawer into the unit until the drawer stops.
• Remove and save back retaining clip. |
• Disconnect chain inside back of roll- |
away. (Move chain toward large round |
part of slot. Pull out to remove.) |
• Remove the work surface. (See |
drawer removal instructions.) |
Retaining
Chain
Installation
• To reinstall, carefully align the slides | ||
and push the work surface into the unit | ||
until the work surface stops. | ||
• Depress release tabs in back corners | ||
of the extendable | work | surface. |
• Push the work surface | into the unit to | |
Actuator rod holder
Disconnect actuator rod
Remove screws
PULL OUT WORK SURFACE WITH
TASK LIGHT
Removal
•Disconnect the power from the unit.
•Remove enough drawers to gain access to connections in the back of the
the fully retracted | position. |
| |
• Extend work surface far enough to | |||
gain access to connections | in back. | ||
• Connect chain inside back of roll | |||
away. (Insert chain into the large | |||
round part of the slot. Slide chain to | |||
small end | of slot.) |
|
|
• Insert retaining clip to hold chain in | |||
place. |
|
|
|
• Plug work surface cord into back of | |||
|
|
| |
• Reconnect | power | to the unit. (See: | |
Connecting | power.) |
| |
• Check work surface and task lighting | |||
for proper | operation. |
| |
• Reinstall | drawers. |
|
|
5 | 6 |