INFORMATION CENTER INSTALLATION
AND REMOVAL
FAClA INSTALLATION AND REMOVAL
Tools Required:
Tools Required:
Screwdriver, Crosstip
Tape
Removal |
|
|
|
| Installation |
|
| ||
• | Disconnect | power | from | the | unit. | • | Plug in | information | center. |
• | Remove | enough | drawers | to | reach the | • | Position | information | center in unit. |
3/8" Wrench drill
5/32" drill bit
Rivet gun
Pliers
To remove facia
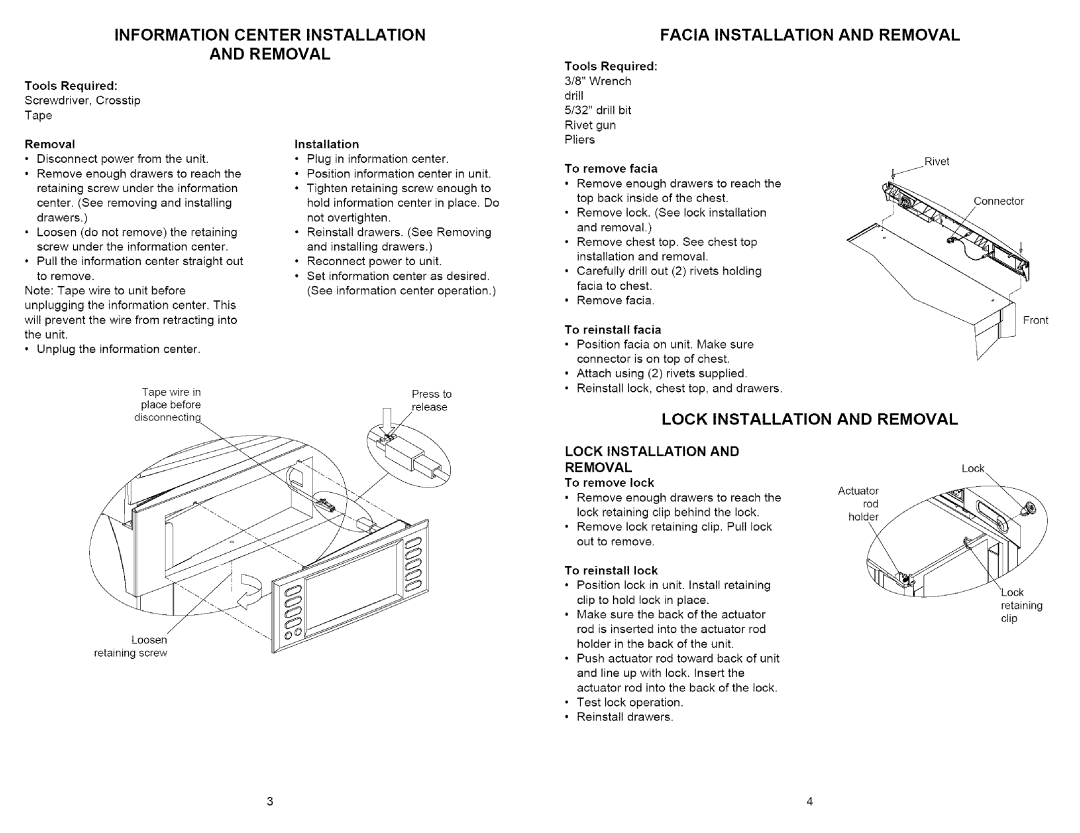
Rivet
| retaining | screw | under | the information | • | Tighten retaining | screw | enough | to | ||||||||
| center. | (See | removing | and | installing |
| hold | information |
| center | in place. | Do | |||||
| drawers.) |
|
|
|
|
|
|
| not | overtighten. |
|
|
|
| |||
• | Loosen |
| (do not | remove) | the | retaining | • | Reinstall | drawers. | (See | Removing |
| |||||
| screw | under | the | information | center. |
| and | installing | drawers.) |
|
| ||||||
|
|
|
|
|
|
|
|
|
|
|
|
| |||||
• | Pull | the | information | center | straight out | • | Reconnect | power | to unit. |
| |||||||
| to remove. |
|
|
|
|
| • | Set | information | center | as desired. |
| |||||
Note: | Tape | wire | to unit | before |
|
| (See | information | center | operation.) | |||||||
unplugging |
| the | information | center. This |
|
|
|
|
|
|
|
| |||||
will prevent the wire from retracting into |
|
|
|
|
|
|
|
| |||||||||
the unit. |
|
|
|
|
|
|
|
|
|
|
|
|
|
|
| ||
•Unplug the information center.
Tape | wire in | Press to |
place | before | release |
•Remove enough drawers to reach the top back inside of the chest.
•Remove lock. (See lock installation and removal.)
•Remove chest top. See chest top installation and removal.
•Carefully drill out (2) rivets holding facia to chest.
•Remove facia.
To reinstall facia
•Position facia on unit. Make sure connector is on top of chest.
•Attach using (2) rivets supplied.
•Reinstall lock, chest top, and drawers.
Connector
Front
disconnectin(
Loosen retaining screw
LOCK INSTALLATION
LOCK INSTALLATION AND
REMOVAL
To remove lock
•Remove enough drawers to reach the lock retaining clip behind the lock.
•Remove lock retaining clip. Pull lock out to remove.
To reinstall lock
•Position lock in unit. Install retaining clip to hold lock in place.
•Make sure the back of the actuator rod is inserted into the actuator rod holder in the back of the unit.
•Push actuator rod toward back of unit
and line up with lock. insert the actuator rod into the back of the lock.
•Test lock operation.
•Reinstall drawers.
AND REMOVAL
Lock
Actuator rod holder
'Lock retaining clip
3 | 4 |
