ACTUATORROD BRACKET
INSTALLATION AND REMOVAL
Removal
LOCK BAR INSTALLATION AND
REMOVAL
Removal
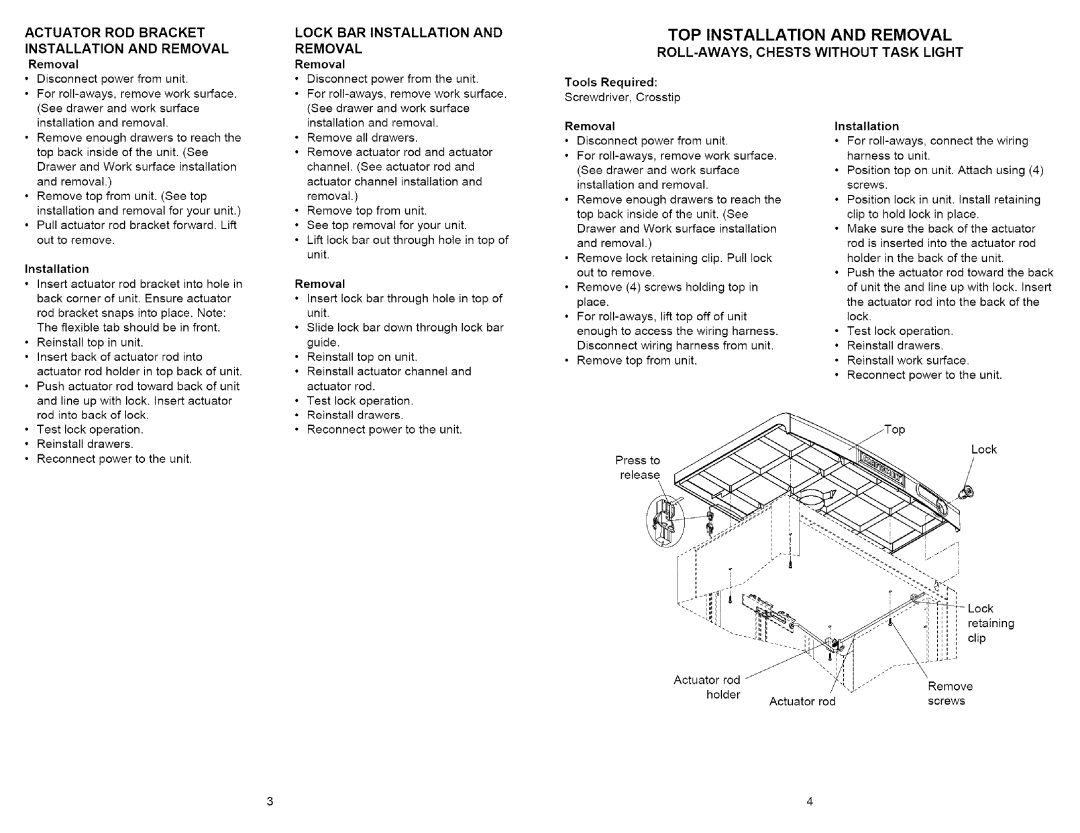
TOP INSTALLATION AND REMOVAL
ROLL-AWAYS, CHESTS WITHOUT TASK LIGHT
•Disconnect power from unit.
•For
(See drawer and work surface installation and removal.
•Remove enough drawers to reach the top back inside of the unit. (See Drawer and Work surface installation and removal.)
•Remove top from unit. (See top installation and removal for your unit.)
•Pull actuator rod bracket forward. Lift out to remove.
Installation
•insert actuator rod bracket into hole in back corner of unit. Ensure actuator rod bracket snaps into place. Note: The flexible tab should be in front.
•Reinstall top in unit.
•insert back of actuator rod into
actuator rod holder in top back of unit.
•Push actuator rod toward back of unit
and line up with lock. Insert actuator rod into back of lock.
•Test lock operation.
•Reinstall drawers.
•Reconnect power to the unit.
•Disconnect power from the unit.
•For
(See drawer and work surface installation and removal.
•Remove all drawers.
•Remove actuator rod and actuator channel. (See actuator rod and actuator channel installation and removal.)
•Remove top from unit.
•See top removal for your unit.
•Lift lock bar out through hole in top of unit.
Removal
•Insert lock bar through hole in top of unit.
•Slide lock bar down through lock bar guide.
•Reinstall top on unit.
•Reinstall actuator channel and actuator rod.
•Test lock operation.
•Reinstall drawers.
•Reconnect power to the unit.
Tools Required:
Screwdriver, Crosstip
Removal
•Disconnect power from unit.
•For
•Remove enough drawers to reach the
top back inside of the unit. (See Drawer and Work surface installation
and removal.)
•Remove lock retaining clip. Pull lock out to remove.
•Remove (4) screws holding top in place.
•For
•Remove top from unit.
Press to
release
Actuator rod holder
Actuator
Installation
•For
•Position top on unit. Attach using (4) screws.
•Position lock in unit. install retaining clip to hold lock in place.
•Make sure the back of the actuator rod is inserted into the actuator rod holder in the back of the unit.
•Push the actuator rod toward the back of unit the and line up with lock. Insert the actuator rod into the back of the lock.
•Test lock operation.
•Reinstall drawers.
•Reinstall work surface.
•Reconnect power to the unit.
Lock
retaining clip
• JL;
Remove
rodscrews
3 | 4 |