
CPB-300 specifications
The Cuisinart CPB-300 is a versatile and compact blender designed to cater to the needs of modern consumers who are looking for convenience and efficiency in their kitchen appliances. This standout model combines power with portability, making it an excellent choice for those who lead busy lifestyles but still want to prepare fresh, healthy drinks and meals.One of the key features of the CPB-300 is its powerful 350-watt motor, which ensures that blending tasks are completed quickly and effectively. Whether you're preparing smoothies, sauces, or even grinding spices, this blender can handle a variety of tasks with ease. The motor's strength, combined with its stainless-steel blade assembly, enables users to achieve a consistent blend, ensuring that no chunks are left behind.
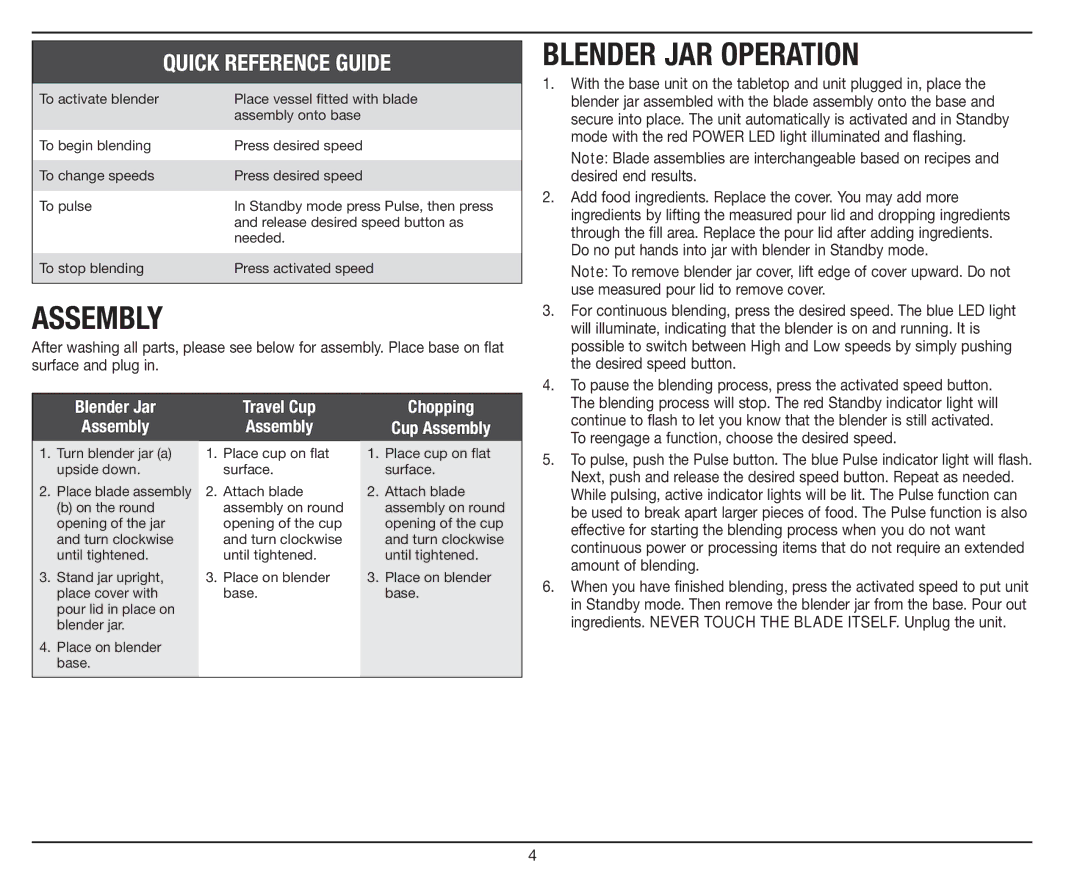
The CPB-300 utilizes a unique blending system designed for efficiency. Its robust motor works seamlessly with the well-designed blending containers, which include a 32-ounce blending jar, two 16-ounce travel cups with lids, and a convenient 8-ounce chopper cup. This flexibility allows for both large quantities and single-serving options, making it ideal for everything from breakfast smoothies to midday snacks.
One of the standout technologies incorporated into the Cuisinart CPB-300 is the auto-stop feature. This safety mechanism automatically shuts off the blender when it reaches the desired consistency, preventing over-processing and ensuring that your ingredients maintain their freshness and flavor. The easy-to-use control panel features just a few buttons, streamlining the blending process.
Additionally, the CPB-300 is equipped with a 4-cup chopper, allowing users to chop vegetables or herbs quickly and effortlessly. The blender's blade assembly is detachable, making it easy to clean after use. All blending containers are BPA-free, ensuring that you can prepare food without any health concerns regarding harmful chemicals.
The compact design of the CPB-300 makes it easy to store in small kitchens or even bring along on trips. Its sleek construction and modern finish give it an attractive aesthetic, allowing it to blend seamlessly with any kitchen décor.
The Cuisinart CPB-300 is an ideal choice for anyone who desires a powerful, convenient blending solution. With its user-friendly design, robust features, and safety technologies, it proves to be a valuable addition to both novice cooks and experienced chefs alike. Whether you’re preparing healthy shakes or gourmet sauces, this versatile blender rises to the occasion.