ENGLISH |
|
|
|
|
|
| |
Getting | Part Names and Functions |
|
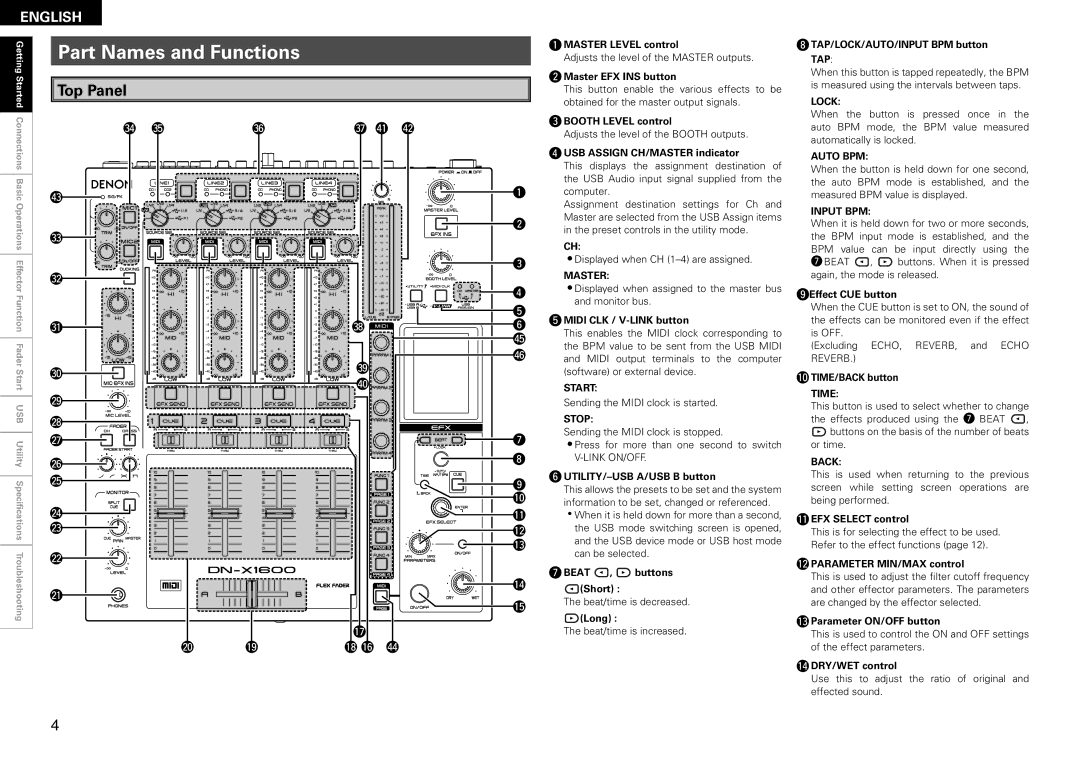
| qMASTER LEVEL control | |||
|
| Adjusts the level of the MASTER outputs. | |||||
|
|
|
| wMaster EFX INS button | |||
Started | Top Panel |
|
|
| |||
|
|
| This button enable the various effects to be | ||||
|
|
| obtained for the master output signals. | ||||
Connections | E4 E5 | E6 | E7R1R2 |
| eBOOTH LEVEL control | ||
| Adjusts the level of the BOOTH outputs. | ||||||
|
|
|
| ||||
|
|
|
| rUSB ASSIGN CH/MASTER indicator | |||
|
|
|
| This displays the assignment destination of | |||
Basic |
|
|
|
| the USB Audio input signal supplied from the | ||
R3 |
|
| q | computer. |
| ||
|
|
| Assignment destination settings for Ch and | ||||
Operations |
|
|
| ||||
|
|
|
| ||||
|
|
| w | Master are selected from the USB Assign items | |||
|
|
| in the preset controls in the utility mode. | ||||
E3 |
|
|
| ||||
|
|
| CH: |
|
| ||
|
|
|
|
|
| ||
Effector |
|
|
| e | • Displayed when CH | ||
|
|
| MASTER: |
|
| ||
E2 |
|
|
|
|
| ||
|
|
| • Displayed when assigned to the master bus | ||||
|
|
| r | ||||
Function |
|
|
| t | and monitor bus. | ||
|
|
| tMIDI CLK / | ||||
E1 |
| E8 | y | ||||
|
|
|
| R5 | This enables the MIDI clock corresponding to | ||
Fader |
|
|
| the BPM value to be sent from the USB MIDI | |||
|
|
| R6 | ||||
|
|
| and MIDI |
| output terminals to the computer | ||
|
| E9 |
|
| |||
|
|
| (software) or external device. | ||||
Start | E0 |
|
| ||||
| R0 |
| |||||
|
|
| START: |
|
| ||
|
|
|
|
|
|
| |
USB | W9 |
|
|
| Sending the MIDI clock is started. | ||
W8 |
|
|
| STOP: |
|
| |
|
|
|
| Sending the MIDI clock is stopped. | |||
| W7 |
|
| u | |||
Utility |
|
| • Press for more than one second to switch | ||||
W6 |
|
| i | ||||
|
|
|
|
|
| ||
|
|
|
|
|
|
| |
Specifi | W5 |
|
| o |
| ||
|
| This allows the presets to be set and the system | |||||
|
|
| |||||
|
|
| Q0 | ||||
|
|
| information to be set, changed or referenced. | ||||
cations | W4 |
|
| Q1 | • When it is held down for more than a second, | ||
W3 |
|
| Q2 | the USB mode switching screen is opened, | |||
|
|
| Q3 | and the USB device mode or USB host mode | |||
|
|
|
| ||||
Troubleshooting |
|
|
| can be selected. | |||
W2 |
|
|
| ||||
|
|
|
|
|
| ||
|
|
| Q4 | uBEAT | , | buttons | |
W1 |
|
| (Short) : | ||||
|
|
| |||||
|
| Q5 | The beat/time is decreased. | ||||
|
|
| |||||
|
|
| (Long) : | ||||
|
|
|
| ||||
|
|
| Q7 |
| The beat/time is increased. | ||
| W0 | Q9 | Q8Q6R4 |
|
|
|
|
iTAP/LOCK/AUTO/INPUT BPM button TAP:
When this button is tapped repeatedly, the BPM is measured using the intervals between taps.
LOCK:
When the button is pressed once in the auto BPM mode, the BPM value measured automatically is locked.
AUTO BPM:
When the button is held down for one second, the auto BPM mode is established, and the measured BPM value is displayed.
INPUT BPM:
When it is held down for two or more seconds, the BPM input mode is established, and the BPM value can be input directly using the
uBEAT ![]()
![]() ,
, ![]()
![]() buttons. When it is pressed again, the mode is released.
buttons. When it is pressed again, the mode is released.
oEffect CUE button
When the CUE button is set to ON, the sound of the effects can be monitored even if the effect is OFF.
(Excluding ECHO, REVERB, and ECHO REVERB.)
Q0TIME/BACK button
TIME:
This button is used to select whether to change
the effects produced using the u BEAT ![]()
![]() ,
, ![]()
![]() buttons on the basis of the number of beats
buttons on the basis of the number of beats
or time.
BACK:
This is used when returning to the previous screen while setting screen operations are being performed.
Q1EFX SELECT control
This is for selecting the effect to be used. Refer to the effect functions (page 12).
Q2PARAMETER MIN/MAX control
This is used to adjust the filter cutoff frequency and other effector parameters. The parameters are changed by the effector selected.
Q3Parameter ON/OFF button
This is used to control the ON and OFF settings of the effect parameters.
Q4DRY/WET control
Use this to adjust the ratio of original and effected sound.
4