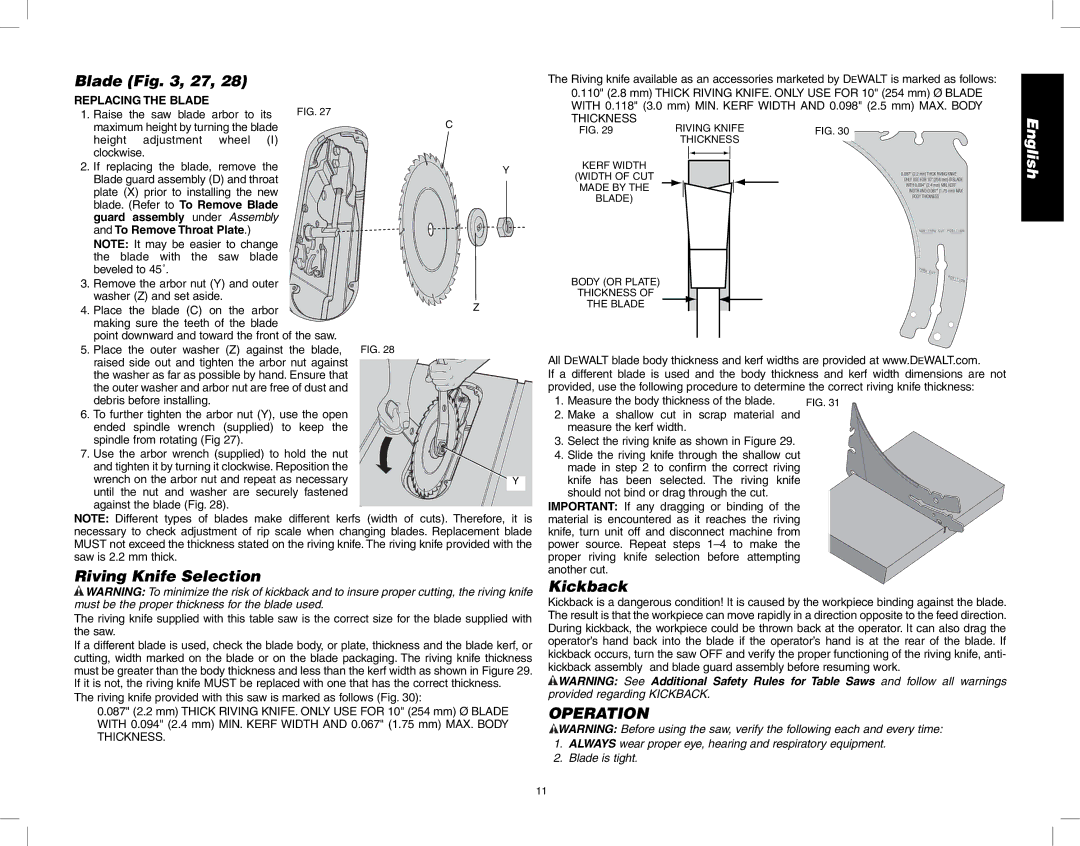
Blade (Fig. 3, 27, 28)
REPLACING THE BLADE | FIG. 27 | ||
1. | Raise the saw blade arbor to its | ||
| maximum height by turning the blade | C | |
| height | adjustment wheel (I) |
|
| clockwise. |
| |
2. | If replacing the blade, remove the | Y | |
| Blade guard assembly (D) and throat |
| |
| plate (X) prior to installing the new |
| |
| blade. (Refer to To Remove Blade |
| |
| guard | assembly under Assembly |
|
| and To Remove Throat Plate.) |
| |
| NOTE: It may be easier to change |
| |
| the blade with the saw blade |
| |
| beveled to 45˚. |
| |
3. | Remove the arbor nut (Y) and outer |
| |
| washer (Z) and set aside. | Z | |
4. | Place the blade (C) on the arbor | ||
| making sure the teeth of the blade |
| |
point downward and toward the front of the saw. |
|
5. Place the outer washer (Z) against the blade, | FIG. 28 |
raised side out and tighten the arbor nut against |
|
the washer as far as possible by hand. Ensure that |
|
the outer washer and arbor nut are free of dust and |
|
debris before installing. |
|
6. To further tighten the arbor nut (Y), use the open |
|
ended spindle wrench (supplied) to keep the |
|
spindle from rotating (Fig 27). |
|
7. Use the arbor wrench (supplied) to hold the nut |
|
and tighten it by turning it clockwise. Reposition the |
|
wrench on the arbor nut and repeat as necessary | Y |
until the nut and washer are securely fastened |
|
against the blade (Fig. 28). |
|
NOTE: Different types of blades make different kerfs (width of cuts). Therefore, it is | |
necessary to check adjustment of rip scale when changing blades. Replacement blade | |
MUST not exceed the thickness stated on the riving knife. The riving knife provided with the | |
saw is 2.2 mm thick. |
|
Riving Knife Selection
![]() WARNING: To minimize the risk of kickback and to insure proper cutting, the riving knife must be the proper thickness for the blade used.
WARNING: To minimize the risk of kickback and to insure proper cutting, the riving knife must be the proper thickness for the blade used.
The riving knife supplied with this table saw is the correct size for the blade supplied with the saw.
If a different blade is used, check the blade body, or plate, thickness and the blade kerf, or cutting, width marked on the blade or on the blade packaging. The riving knife thickness must be greater than the body thickness and less than the kerf width as shown in Figure 29. If it is not, the riving knife MUST be replaced with one that has the correct thickness.
The riving knife provided with this saw is marked as follows (Fig. 30):
0.087" (2.2 mm) THICK RIVING KNIFE. ONLY USE FOR 10" (254 mm) Ø BLADE WITH 0.094" (2.4 mm) MIN. KERF WIDTH AND 0.067" (1.75 mm) MAX. BODY THICKNESS.
The Riving knife available as an accessories marketed by DEWALT is marked as follows: 0.110" (2.8 mm) THICK RIVING KNIFE. ONLY USE FOR 10" (254 mm) Ø BLADE WITH 0.118" (3.0 mm) MIN. KERF WIDTH AND 0.098" (2.5 mm) MAX. BODY THICKNESS
FIG. 29 | RIVING KNIFE |
|
FIG. 30 | ||
| THICKNESS |
|
|
|
KERF WIDTH
(WIDTH OF CUT
MADE BY THE
BLADE)
BODY (OR PLATE)
THICKNESS OF
THE BLADE
All DEWALT blade body thickness and kerf widths are provided at www.DEWALT.com.
If a different blade is used and the body thickness and kerf width dimensions are not provided, use the following procedure to determine the correct riving knife thickness:
1. Measure the body thickness of the blade.
2.Make a shallow cut in scrap material and measure the kerf width.
3.Select the riving knife as shown in Figure 29.
4.Slide the riving knife through the shallow cut made in step 2 to confirm the correct riving knife has been selected. The riving knife should not bind or drag through the cut.
IMPORTANT: If any dragging or binding of the material is encountered as it reaches the riving knife, turn unit off and disconnect machine from power source. Repeat steps
Kickback
Kickback is a dangerous condition! It is caused by the workpiece binding against the blade. The result is that the workpiece can move rapidly in a direction opposite to the feed direction. During kickback, the workpiece could be thrown back at the operator. It can also drag the operator’s hand back into the blade if the operator’s hand is at the rear of the blade. If kickback occurs, turn the saw OFF and verify the proper functioning of the riving knife, anti- kickback assembly and blade guard assembly before resuming work.
![]() WARNING: See Additional Safety Rules for Table Saws and follow all warnings provided regarding KICKBACK.
WARNING: See Additional Safety Rules for Table Saws and follow all warnings provided regarding KICKBACK.
OPERATION
![]() WARNING: Before using the saw, verify the following each and every time:
WARNING: Before using the saw, verify the following each and every time:
1.ALWAYS wear proper eye, hearing and respiratory equipment.
2.Blade is tight.
English
11