in alignment with the saw blade and the
d.Plastic and composite (like hardboard) materials may be cut on your saw. However, since these are usually quite hard and slippery, the
e.Use saw blade guard assembly,
f.Push the workpiece past the saw blade prior to release.
g.NEVER rip a workpiece that is twisted or warped, or does not have a straight edge to guide along the fence.
h.NEVER saw a large workpiece that cannot be controlled.
i.NEVER use the fence as a guide or length stop when crosscutting.
j.NEVER saw a workpiece with loose knots, flaws, nails or other foreign objects.
k.NEVER rip a workpiece shorter than 10" (254 mm).
l.NEVER use a dull blade – replace or have resharpened.
![]() WARNING: Some dust created by power sanding, sawing, grinding, drilling, and other construction activities contains chemicals known to the State of California to cause cancer, birth defects or other reproductive harm. Some examples of these chemicals are:
WARNING: Some dust created by power sanding, sawing, grinding, drilling, and other construction activities contains chemicals known to the State of California to cause cancer, birth defects or other reproductive harm. Some examples of these chemicals are:
•lead from
•crystalline silica from bricks and cement and other masonry products, and
•arsenic and chromium from
Your risk from these exposures varies, depending on how often you do this type of work. To reduce your exposure to these chemicals: work in a
•Avoid prolonged contact with dust from power sanding, sawing, grinding, drilling and other construction activities. Wear protective clothing and wash exposed areas with soap and water. Allowing dust to get into your mouth, eyes or lay on the skin may promote absorption of harmful chemicals.
![]() WARNING: Use of this tool can generate and/or disburse dust, which may cause
WARNING: Use of this tool can generate and/or disburse dust, which may cause
Open the box and slide the saw out, as shown in Figure 1. Carefully unpack the table saw and all loose items from the carton. Examine all parts to make sure that parts have not been damaged during shipping. If any parts are missing or damaged, contact your dealer to replace them before attempting to assemble the tool.
Refer to Figure 2 for the loose items and hardware included with the saw:
1.Rip fence
2.Arbor wrench and spindle wrench (attached to saw base)
3.Blade guard assembly
4.Miter gauge
5.Push stick (attached to rip fence)
![]() WARNING: To reduce the risk of serious personal injury, have push stick ready to use before starting cut.
WARNING: To reduce the risk of serious personal injury, have push stick ready to use before starting cut.
FIG. 1 | FIG. 2 |
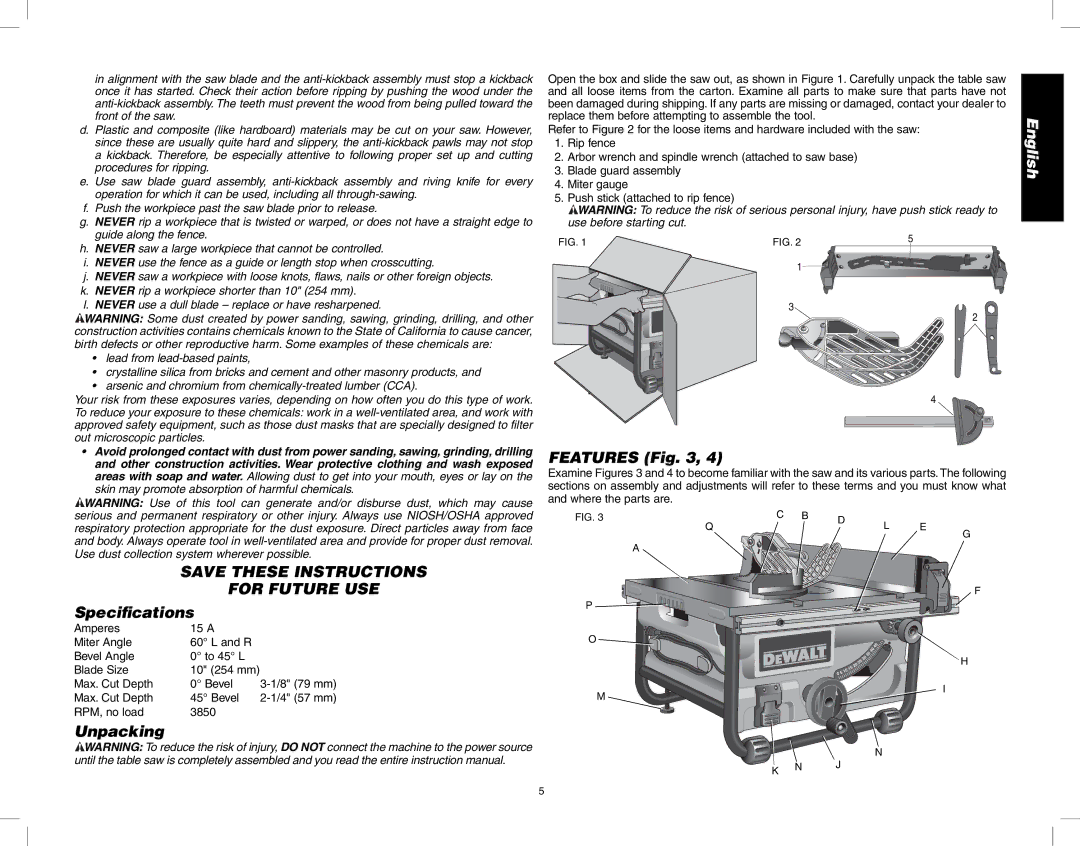
FEATURES (Fig. 3, 4)
Examine Figures 3 and 4 to become familiar with the saw and its various parts. The following sections on assembly and adjustments will refer to these terms and you must know what and where the parts are.
English
serious and permanent respiratory or other injury. Always use NIOSH/OSHA approved respiratory protection appropriate for the dust exposure. Direct particles away from face and body. Always operate tool in
SAVE THESE INSTRUCTIONS
FOR FUTURE USE
Specifications
Amperes | 15 A |
|
Miter Angle | 60° L and R |
|
Bevel Angle | 0° to 45° L |
|
Blade Size | 10" (254 mm) |
|
Max. Cut Depth | 0° Bevel | |
Max. Cut Depth | 45° Bevel | |
RPM, no load | 3850 |
|
Unpacking
![]() WARNING: To reduce the risk of injury, DO NOT connect the machine to the power source until the table saw is completely assembled and you read the entire instruction manual.
WARNING: To reduce the risk of injury, DO NOT connect the machine to the power source until the table saw is completely assembled and you read the entire instruction manual.
FIG. 3 | C B |
| Q |
A
P ![]()
![]()
![]()
![]()
![]()
O ![]()
![]()
M
K N
D | L | E |
| ||
|
| G |
F
H
I
N
J
5