English
2. Using a crescent wrench or 1/2 inch open end wrench, tighten the | FIG. 13 |
|
| ||
screw securely. |
|
| AA |
| |
3. Repeat for the other cord wrap. |
|
|
| ||
FIG. 11 | FIG. 12 |
|
|
| |
| Z |
|
|
| |
| X | BB | A | BB | |
|
| ||||
| X |
| AA |
| |
|
|
|
| ||
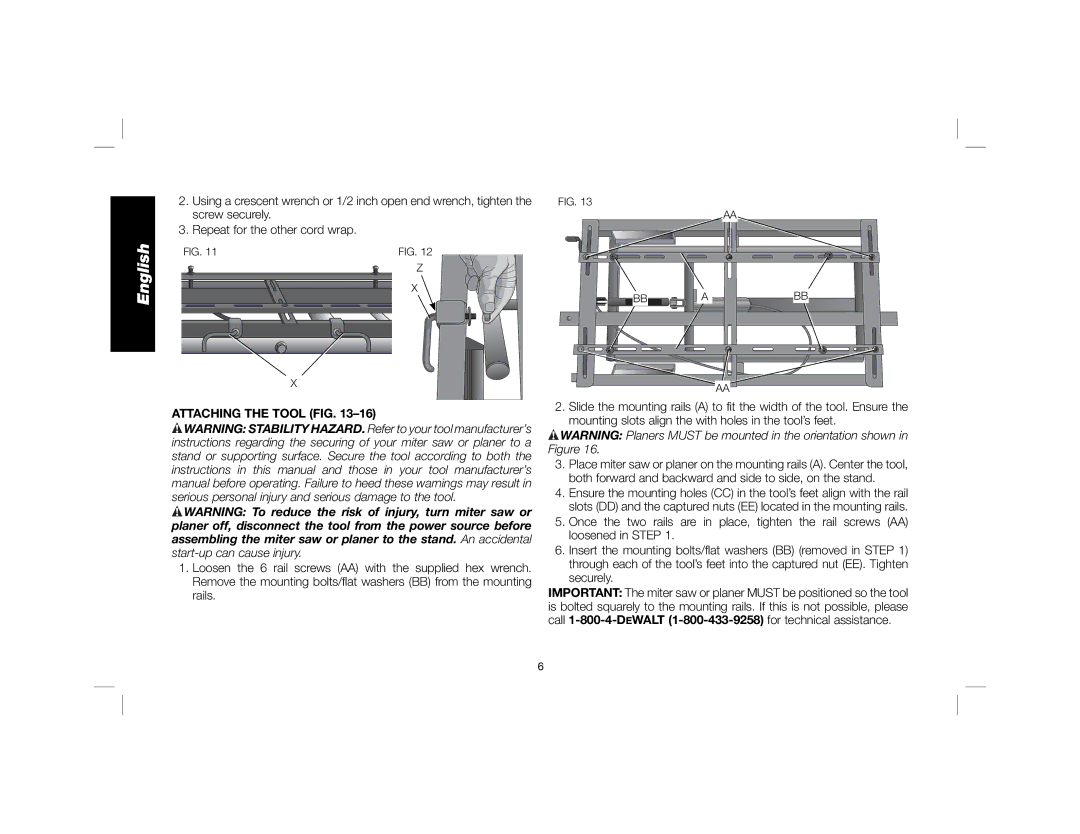
ATTACHING THE TOOL (FIG. | 2. Slide the mounting rails (A) to fit the width of the tool. Ensure the | ||||
mounting slots align the with holes in the tool’s feet. | |||||
WARNING: STABILITY HAZARD. Refer to your tool manufacturer’s | |||||
WARNING: Planers MUST be mounted in the orientation shown in | |||||
instructions regarding the securing of your miter saw or planer to a | |||||
Figure 16. |
|
| |||
stand or supporting surface. Secure the tool according to both the |
|
| |||
3. Place miter saw or planer on the mounting rails (A). Center the tool, | |||||
instructions in this | manual and those in your tool manufacturer’s | ||||
both forward and backward and side to side, on the stand. | |||||
manual before operating. Failure to heed these warnings may result in | |||||
4. Ensure the mounting holes (CC) in the tool’s feet align with the rail | |||||
serious personal injury and serious damage to the tool. | |||||
slots (DD) and the captured nuts (EE) located in the mounting rails. | |||||
WARNING: To reduce the risk of injury, turn miter saw or | |||||
5. Once the two rails | are in place, | tighten the rail screws (AA) | |||
planer off, disconnect the tool from the power source before | |||||
loosened in STEP 1. |
|
| |||
assembling the miter saw or planer to the stand. An accidental |
|
| |||
6. Insert the mounting bolts/flat washers (BB) (removed in STEP 1) | |||||
| |||||
1. Loosen the 6 | rail screws (AA) with the supplied hex wrench. | through each of the tool’s feet into the captured nut (EE). Tighten | |||
securely. |
|
| |||
Remove the mounting bolts/flat washers (BB) from the mounting |
|
| |||
IMPORTANT: The miter saw or planer MUST be positioned so the tool | |||||
rails. |
| ||||
|
| is bolted squarely to the mounting rails. If this is not possible, please | |||
|
| call | |||
6