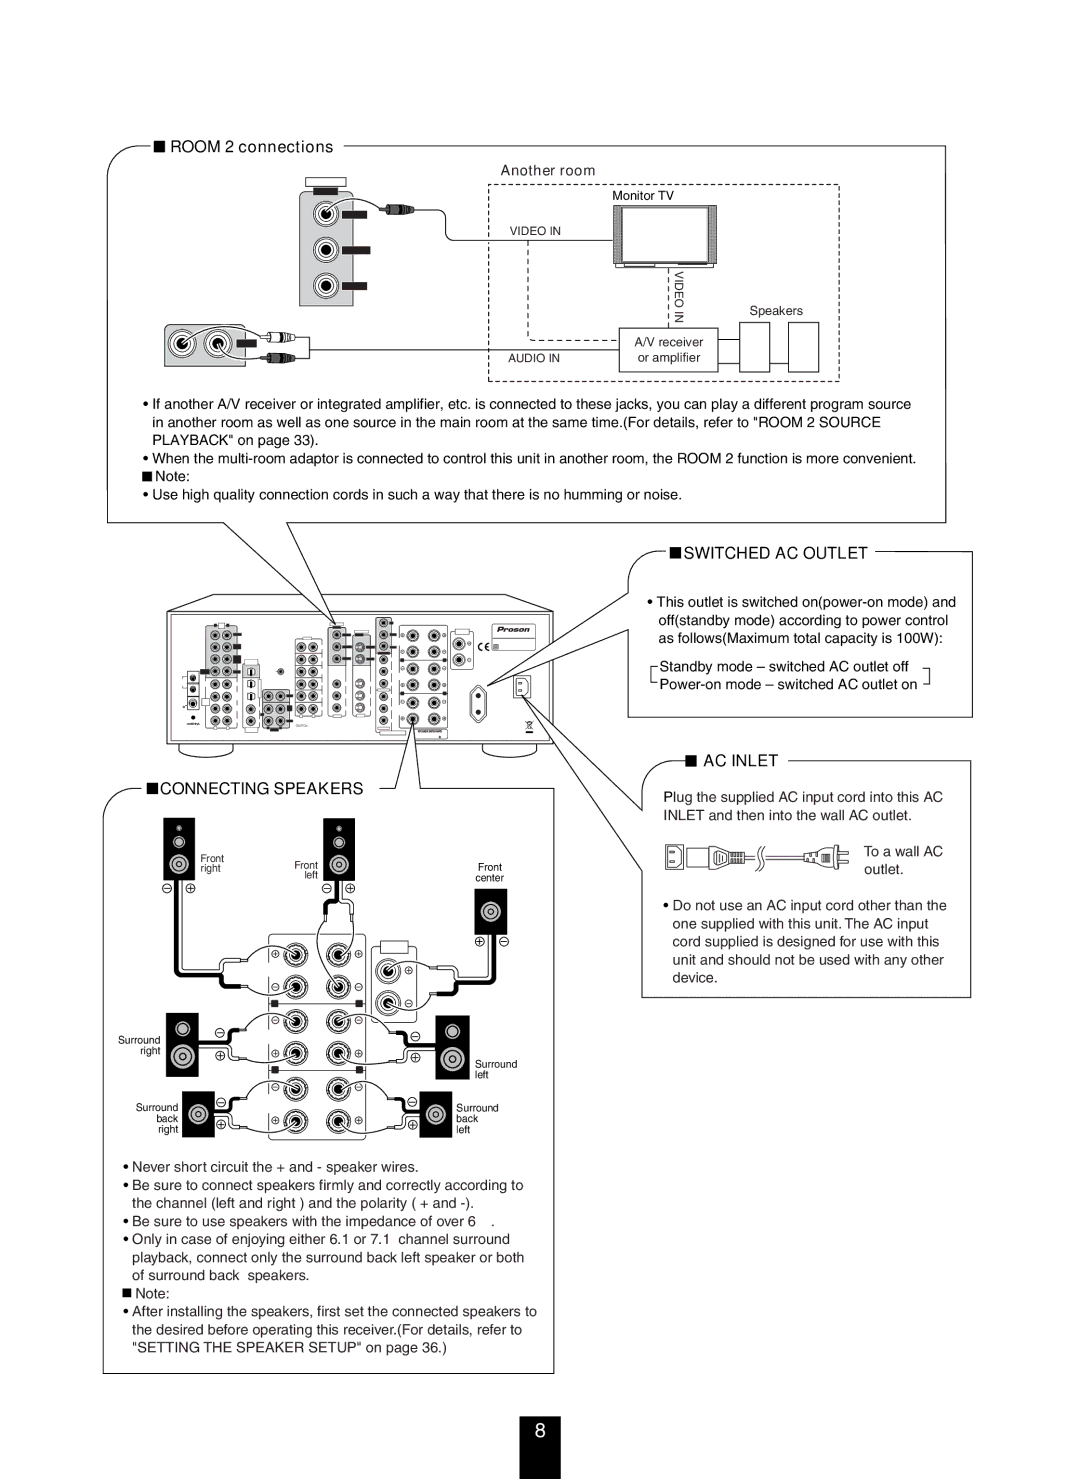
ROOM 2 connections
ROOM 2
Another room |
|
|
VIDEO |
|
|
OUT | Monitor TV |
|
|
| |
ROOM 2 |
|
|
VIDEO IN |
|
|
MONITOR | VIDEO |
|
VIDEO 1 |
| |
| IN | Speakers |
|
| |
| A/V receiver |
|
AUDIO IN | or amplifier |
|
•If another A/V receiver or integrated amplifier, etc. is connected to these jacks, you can play a different program source in another room as well as one source in the main room at the same time.(For details, refer to "ROOM 2 SOURCE PLAYBACK" on page 33).
•When the ![]() Note:
Note:
•Use high quality connection cords in such a way that there is no humming or noise.
L PRE R |
| Manufactured under license from Digital Theater System, Inc. U.S. Pat. No's. | VIDEO |
| Y |
| |
OUT |
| 5,451,942; 5,956,674; 5,974,380; 5,978,762; | 6,487,535 and other U.S. and | OUT |
|
|
|
|
| issued and pending. "DTS" and " |
|
| CENTER | ||
| FRONT | Digital Theater Systems, Inc. Copyright 1996, 2003 Digital Theater Systems, Inc. | ROOM 2 | P C | SPEAKER | ||
| All Rights Reserved. | IN | OUT | MODEL NO. RV4700 | |||
|
|
|
|
| FRONT | AUDIO/VIDEO RECEIVER |
SUR- | Manufactured under license from |
|
|
| SPEAKERS |
|
ROUND | Dolby Laboratories. “Dolby”, “Pro Logic”, | CD | MONITOR | MONITOR | P C | ASSEMBLED IN KOREA |
| and the |
|
|
| MONITOR | SER. NO |
| trademarks of Dolby Laboratories. |
|
|
|
|
| SUR- |
|
|
|
|
| AUX | VIDEO 1 | VIDEO 1 | Y |
|
|
|
|
| ROUND | OPTICAL |
|
|
|
|
| R | L | ||||
|
| BACK | OUT |
|
|
|
|
|
|
|
|
|
|
|
| SUB | CENTER |
|
|
| MULTI |
| TAPE |
|
| P | C |
|
|
| WOOFER |
|
|
|
| MON. |
|
| SURR. |
| ||||
|
|
|
|
|
|
|
|
|
|
|
| SPEAKERS | AC OUTLET | |
AM | SUB |
| OPT 1 | OPTICAL |
|
|
|
|
| VIDEO 1 | VIDEO 1 |
|
|
|
LOOP | WOOFER | CENTER |
|
|
|
|
| VIDEO 1 | VIDEO 1 | P C |
|
| ||
|
| SUR- |
| IN |
| ROOM 2 |
| VIDEO 2 | VIDEO 2 | VIDEO 2 | Y |
| R | L |
|
| ROUND |
|
|
|
|
|
| ||||||
| 7.1CH | BACK | OPT 2 |
|
|
|
|
|
|
|
|
|
| AC INLET |
FM | DIRECT |
|
|
|
|
|
|
|
|
|
|
| ||
INPUT |
|
|
|
|
|
|
|
|
|
|
|
| 230V~50Hz | |
75 |
| SUR- |
| COAX1 |
| TAPE |
| VIDEO 3 | VIDEO 3 | VIDEO 3 | P | C | SURR. | 370W |
|
| ROUND |
|
| MON. |
| BACK |
| ||||||
|
|
|
| REC |
|
| L | R |
| IN |
| SPEAKERS |
| |
|
|
|
|
|
| IN |
|
|
|
| ||||
|
| FRONT |
| COAX2 |
| VIDEO 1 |
|
|
|
| P C |
|
| |
| L | R |
|
| L | R | CAUTION : TO PREVENT ELECTRIC SHOCK, DO NOT REMOVE COVER. |
|
|
| SWITCHED | |||
| COAXIAL |
| NO | VIDEO 2 |
|
| 230V~50Hz | |||||||
|
|
| IN |
|
| OUT |
|
|
| 100W MAX | ||||
|
|
|
|
|
|
| SERVICE PERSONNEL. |
|
| COMPONENT | FRONT , CENTER , SURROUND, | |||
SURROUND BACK : 6 OHMS( ) MIN.
 SWITCHED AC OUTLET
•This outlet is switched
Standby mode – switched AC outlet off
 AC INLET
 CONNECTING SPEAKERS
Front
rightFront left
Front
center
Plug the supplied AC input cord into this AC INLET and then into the wall AC outlet.
To a wall AC outlet.
Surround right
Surround back right
CENTER
SPEAKER
FRONT
SPEAKERS
RL
SURR.
SPEAKERS
RL
SURR.
BACK
SPEAKERS
Surround left
Surround back left
•Do not use an AC input cord other than the one supplied with this unit. The AC input cord supplied is designed for use with this unit and should not be used with any other device.
•Never short circuit the + and - speaker wires.
•Be sure to connect speakers firmly and correctly according to the channel (left and right ) and the polarity ( + and
•Be sure to use speakers with the impedance of over 6 Ω.
•Only in case of enjoying either 6.1 or 7.1 channel surround playback, connect only the surround back left speaker or both of surround back speakers.
![]() Note:
Note:
•After installing the speakers, first set the connected speakers to the desired before operating this receiver.(For details, refer to "SETTING THE SPEAKER SETUP" on page 36.)
8