MULTIMEDIA PROJECTOR
MODEL LC-VC1
SAFETY PRECAUTIONS
TO THE OWNER
SAFETY INSTRUCTIONS
AC POWER CORD REQUIREMENT
COMPLIANCES
Federal Communication Commission Notice
AC Power Cord for the United States and Canada
TABLE OF CONTENTS
FEATURES AND DESIGN PREPARATION
CONNECTING PROJECTOR
SETTING
FEATURES AND DESIGN
Page
CONNECTING AC POWER CORD
PREPARATION
POSITIONING THE PROJECTOR
LENS SHIFT ADJUSTMENT
RECOMMENDATION
MOVING PROJECTOR
ADJUSTABLE FEET
CAUTION IN CARRYING OR TRANSPORTING THE PROJECTOR
Page
Cables used for connection * = Cables are not
supplied with this projector Video Cable RCA x
Video Cable RCA x 3*, BNC x 1 *, BNC x 2* or BNC x S-VIDEO Cable
Audio Cable RCA x Speaker Cable Mini x 1 stereo
MAC Adapter in the case of connecting Macintosh computer
VGA Cable HDB 15 pin Video Cable BNC
Speaker Cable Mini Plug stereo
Audio Cables RCA x 2 or RCA x 1 - Mini Plug mono
Page
TOP CONTROL
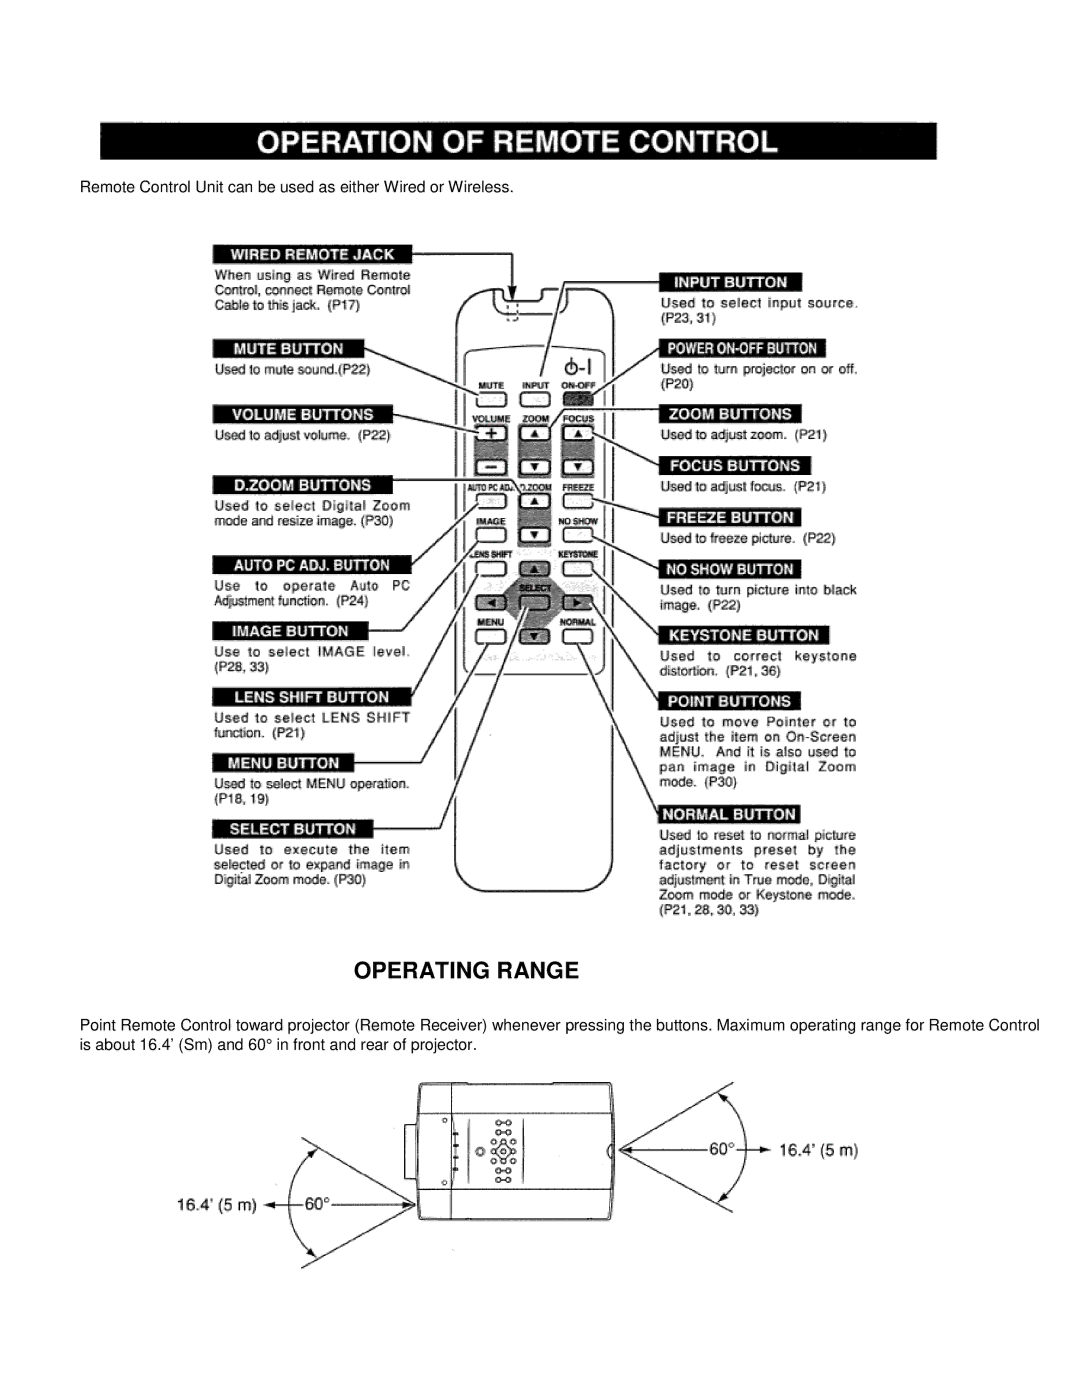
Remote Control Unit can be used as either Wired or Wireless
OPERATING RANGE
REMOTE CONTROL BATTERIES INSTALLATION
WIRED REMOTE CONTROL
OPERATIONS
FLOW OF ON-SCREEN MENU OPERATION
HOW TO OPERATE ON-SCREEN MENU
MENU BAR
Press MENU BUTTON for PC input source
TURNING ON PROJECTOR
TURNING OFF THE PROJECTOR
ZOOM ADJUSTMENT
FOCUS ADJUSTMENT
LENS SHIFT ADJUSTMENT
KEYSTONE ADJUSTMENT
NO SHOW FUNCTION
MUTE SETTING
PICTURE FREEZE FUNCTION
MENU OPERATION
DIRECT OPERATION
AUTO PC ADJUSTMENT
SELECT COMPUTER SYSTEM MANUALLY
MANUAL PC ADJUSTMENT
Adjusts clamp level. When the image has a dark bars, try this
whenever you use it
The number of total dots in one horizontal period. Press POINT
Adjustment of horizontal area displayed with this projector. Press
COMPATIBLE COMPUTER SPECIFICATIONS
NOTE Specifications are subject to change without notice
IMAGE LEVEL SELECT DIRECT
IMAGE LEVEL SELECT MENU
IMAGE LEVEL ADJUSTMENT
Press POINT LEFT button to decrease contrast, and POINT RIGHT
Press POINT LEFT button to lighten red tone and POINT RIGHT button
Press POINT LEFT button to lighten green tone and POINT RIGHT
Compress function
Expand function
Panning function
MENU OPERATION
source through MENU OPERATION see below
Y, Pb/Cb, Pr/Cr JACKS
VIDEO JACK, YIC JACKS OR S-VIDEO JACK
VIDEO MODE
IMAGE LEVEL SELECT DIRECT
IMAGE LEVEL SELECT MENU
IMAGE LEVEL ADJUSTMENT
3 aspect ratio at wide video aspect ratio of 16
This function decides whether to display the On-Screen Displays
Press both MENU and NORMAL buttons on the Remote Control
To change the code of the Remote Control
To change the code of Projector
WARNING TEMP INDICATOR
AIR FILTER CARE AND CLEANING
CLEANING THE PROJECTION LENS
Follow these steps to clean the projection lens
ORDER REPLACEMENT LAMP
LAMP REPLACEMENT
LAMP REPLACE COUNTER
6.If the problem still exists, check the following chart
3. Verify that all power is switched on
4.If projector still does not produce an image, re-start the computer
Page
The specifications are subject to change without notice
RGB TERMINAL
CONFIGURATIONS OF TERMINALS
SERIAL TERMINAL
Audio Visual/Video Products EIKI INTERNATIONAL, INC
EIKI CANADA
EIKI DEUTSCHLAND GMBH
EIKI CZECH SPOL. S.R.O