BROWN
BLUE

S O N A T A 5 5 G L X a

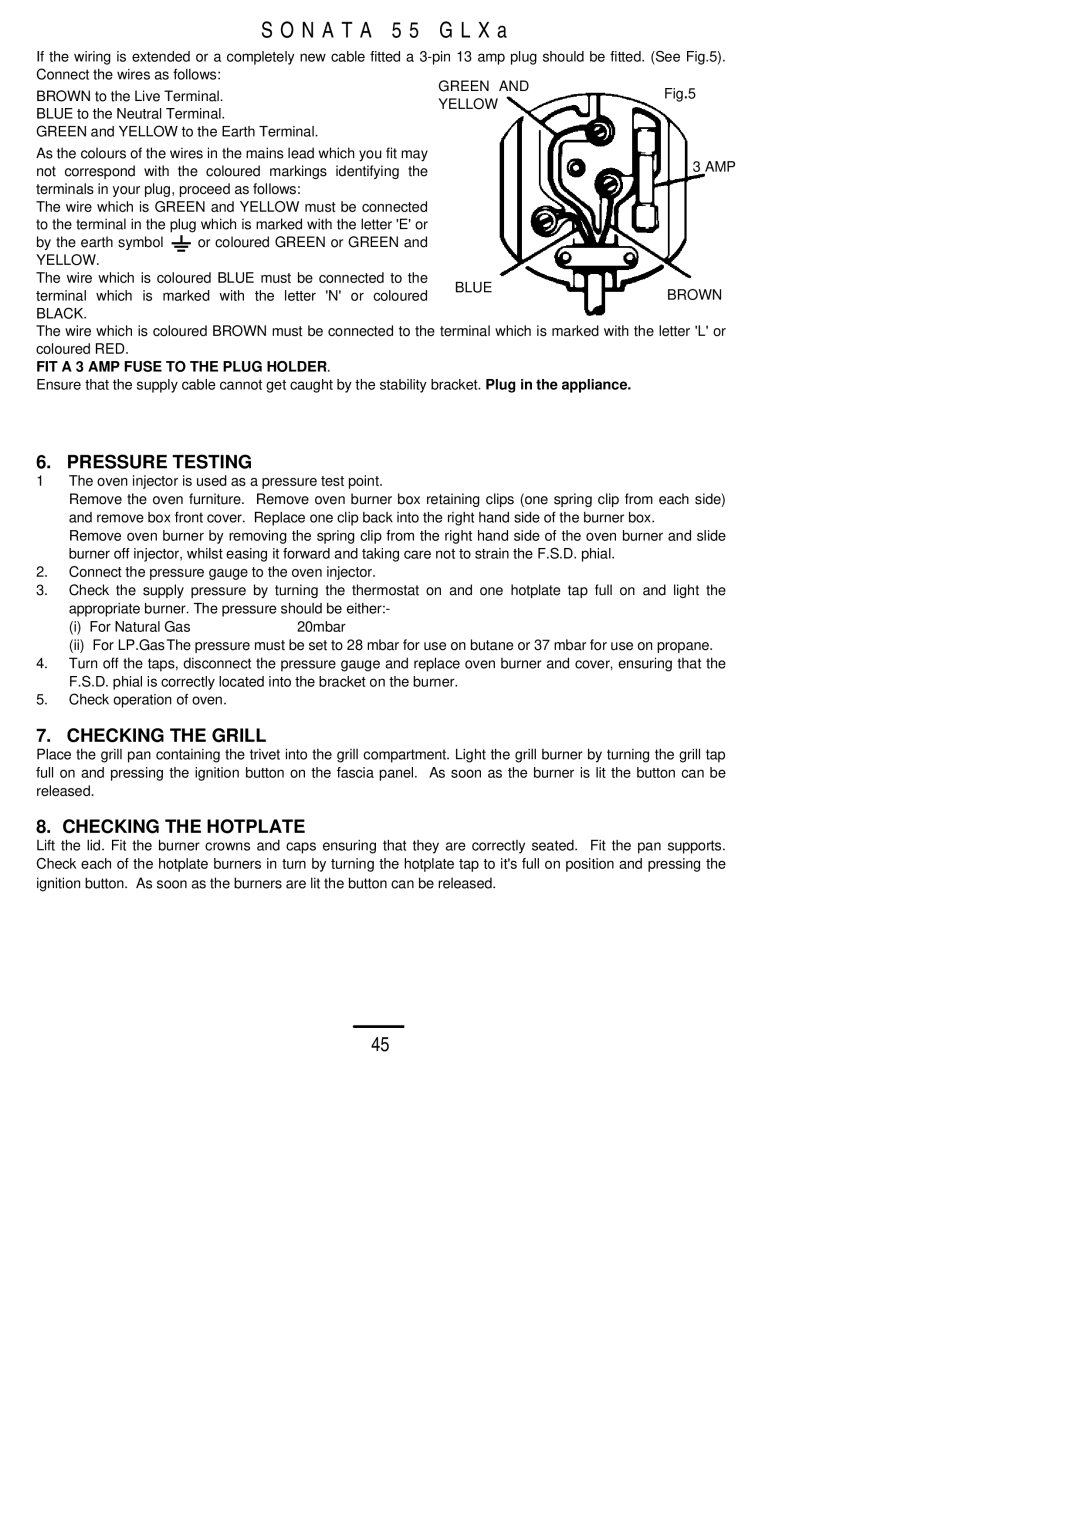
If the wiring is extended or a completely new cable fitted a 3-pin 13 amp plug should be fitted. (See Fig.5).

Connect the wires as follows:

GREEN AND

Fig.5

BROWN to the Live Terminal.

YELLOW

BLUE to the Neutral Terminal.


GREEN and YELLOW to the Earth Terminal.


As the colours of the wires in the mains lead which you fit may


3 AMP

not correspond with the coloured markings identifying the


terminals in your plug, proceed as follows:


The wire which is GREEN and YELLOW must be connected


to the terminal in the plug which is marked with the letter 'E' or


by the earth symbol

or coloured GREEN or GREEN and


YELLOW.


The wire which is coloured BLUE must be connected to the terminal which is marked with the letter 'N' or coloured

BLACK.

The wire which is coloured BROWN must be connected to the terminal which is marked with the letter 'L' or coloured RED.

FIT A 3 AMP FUSE TO THE PLUG HOLDER.

Ensure that the supply cable cannot get caught by the stability bracket. Plug in the appliance.

6. PRESSURE TESTING

1The oven injector is used as a pressure test point.

Remove the oven furniture. Remove oven burner box retaining clips (one spring clip from each side) and remove box front cover. Replace one clip back into the right hand side of the burner box.

Remove oven burner by removing the spring clip from the right hand side of the oven burner and slide burner off injector, whilst easing it forward and taking care not to strain the F.S.D. phial.

2.Connect the pressure gauge to the oven injector.

3.Check the supply pressure by turning the thermostat on and one hotplate tap full on and light the

appropriate burner. The pressure should be either:-

(i) For Natural Gas

20mbar

(ii)For LP.GasThe pressure must be set to 28 mbar for use on butane or 37 mbar for use on propane.

4.Turn off the taps, disconnect the pressure gauge and replace oven burner and cover, ensuring that the F.S.D. phial is correctly located into the bracket on the burner.

5.Check operation of oven.

7. CHECKING THE GRILL

Place the grill pan containing the trivet into the grill compartment. Light the grill burner by turning the grill tap full on and pressing the ignition button on the fascia panel. As soon as the burner is lit the button can be released.

8. CHECKING THE HOTPLATE

Lift the lid. Fit the burner crowns and caps ensuring that they are correctly seated. Fit the pan supports. Check each of the hotplate burners in turn by turning the hotplate tap to it's full on position and pressing the ignition button. As soon as the burners are lit the button can be released.

45

Page 45
Image 45
Electrolux 55 GLXA installation instructions Pressure Testing, Checking the Grill, Checking the Hotplate

55 GLXA specifications

The Electrolux 55 GLXA is a standout model in the world of household appliances, particularly known for its combination of functionality, design, and innovative technology. This refrigerator has made a significant mark, thanks to its user-friendly features and efficient storage solutions.

One of the main features of the Electrolux 55 GLXA is its spacious interior. With an impressive capacity, it allows for ample storage of groceries, making it ideal for families or individuals who appreciate having a well-stocked fridge. The adjustable shelving and door bins provide customizable configurations, enabling users to maximize space according to their needs.

Another significant technology found in the 55 GLXA is the TwinTech cooling system. This advanced technology maintains optimal humidity levels in the fridge and freezer compartments, ensuring that fruits and vegetables stay fresher for longer. The temperature management system prevents freezer burn and keeps food at its ideal temperature, enhancing food preservation.

In terms of energy efficiency, the Electrolux 55 GLXA stands out with its high energy rating. By utilizing innovative insulation and energy-saving technology, it minimizes power consumption, making it environmentally friendly and cost-effective. This feature is increasingly important in today's eco-conscious society.

The sleek and modern design of the Electrolux 55 GLXA is another highlight. It features a polished stainless steel finish that complements contemporary kitchen aesthetics. Additionally, the reversible doors offer flexibility in installation, making it suitable for various kitchen layouts.

Convenience is further enhanced by the fridge's advanced digital controls. Users can easily adjust temperatures, monitor energy usage, and even activate features such as quick chill or vacation settings through a user-friendly interface.

Moreover, the Electrolux 55 GLXA is equipped with advanced filtration systems that ensure cleanliness and freshness. The antibacterial panels and the easy-to-clean interiors contribute to maintaining a hygienic environment without much effort from the user.

In conclusion, the Electrolux 55 GLXA combines style, efficiency, and innovative technology to deliver a superior refrigeration experience. Its spacious design, advanced cooling technologies, energy efficiency, and user-friendly features make it a top choice for those looking to upgrade their kitchen appliances. Whether for daily use or special occasions, the 55 GLXA proves to be an invaluable addition to any home.