Installation Instructions
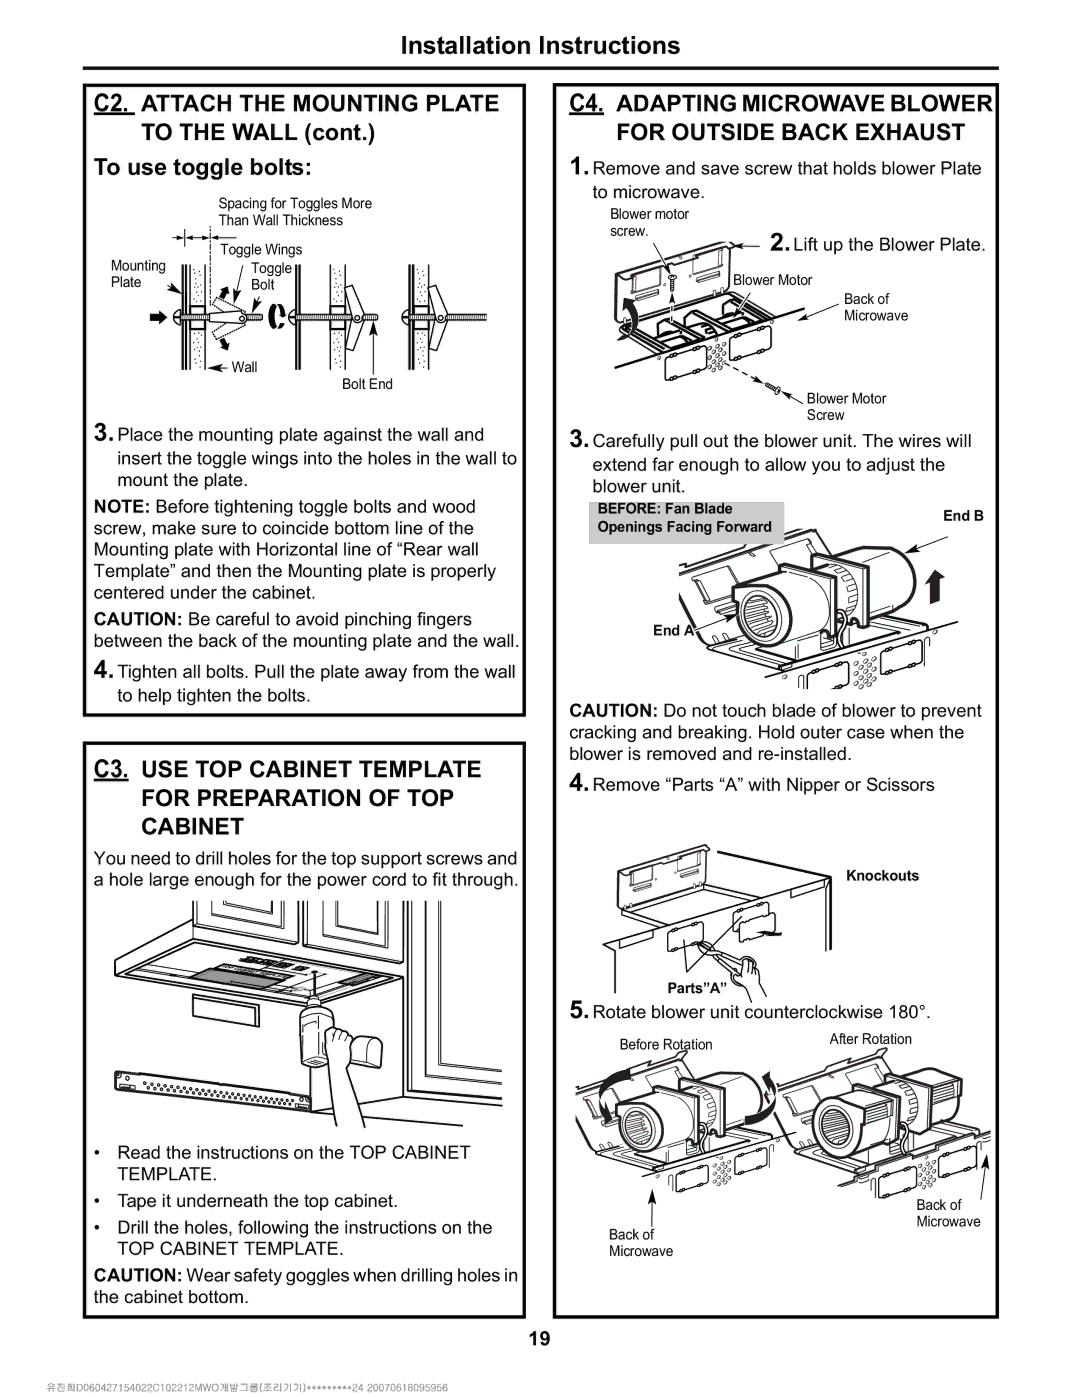
C2. ATTACH THE MOUNTING PLATE | C4. ADAPTING MICROWAVE BLOWER | ||||
TO THE WALL (cont.) | FOR OUTSIDE BACK EXHAUST | ||||
To use toggle bolts: | 1. Remove and save screw that holds blower Plate | ||||
| Spacing for Toggles More | to microwave. |
|
| |
| Blower motor |
|
| ||
| Than Wall Thickness |
|
| ||
| screw. | 2. Lift up the Blower Plate. | |||
| Toggle Wings | ||||
Mounting |
| ||||
Toggle |
| Blower Motor |
| ||
Plate | Bolt |
|
| ||
|
|
| Back of |
| |
|
|
| Microwave |
| |
| Wall |
|
|
| |
| Bolt End |
| Blower Motor |
| |
|
|
|
| ||
3. Place the mounting plate against the wall and |
| Screw |
| ||
3. Carefully pull out the blower unit. The wires will | |||||
insert the toggle wings into the holes in the wall to | extend far enough to allow you to adjust the | ||||
mount the plate. | |||||
blower unit. |
|
| |||
NOTE: Before tightening toggle bolts and wood |
|
| |||
BEFORE: Fan Blade |
| End B | |||
screw, make sure to coincide bottom line of the | Openings Facing Forward | ||||
| |||||
Mounting plate with Horizontal line of “Rear wall |
|
|
| ||
Template” and then the Mounting plate is properly |
|
|
| ||
centered under the cabinet. |
|
|
| ||
CAUTION: Be careful to avoid pinching fingers | End A |
|
| ||
between the back of the mounting plate and the wall. |
|
| |||
|
|
| |||
4. Tighten all bolts. Pull the plate away from the wall |
|
|
| ||
to help tighten the bolts. | CAUTION: Do not touch blade of blower to prevent | ||||
|
| ||||
|
| cracking and breaking. Hold outer case when the | |||
C3. USE TOP CABINET TEMPLATE | blower is removed and |
| |||
4. Remove “Parts “A” with Nipper or Scissors |
| ||||
FOR PREPARATION OF TOP |
| ||||
|
|
| |||
CABINET |
|
|
| ||
You need to drill holes for the top support screws and |
| Knockouts |
| ||
a hole large enough for the power cord to fit through. |
|
| |||
Parts”A”
5. Rotate blower unit counterclockwise 180°.
Before Rotation | After Rotation |
|
• Read the instructions on the TOP CABINET |
|
TEMPLATE. |
|
• Tape it underneath the top cabinet. | Back of |
• Drill the holes, following the instructions on the | Microwave |
Back of | |
TOP CABINET TEMPLATE. | Microwave |
CAUTION: Wear safety goggles when drilling holes in |
|
the cabinet bottom. |
|
19