Manuals
/
Elmo
/
Photography
/
Security Camera
Elmo
ESD-370
user manual
Configuration Menu, Default Camera
Models:
ESD-370
1
19
44
44
Download
44 pages
7.04 Kb
16
17
18
19
20
21
22
23
Alarm Pin Not wired
Error! Bookmark not defined
Dynamic Dome Configuration
Reset
Setup Menu
2.8 RS-485 Connector
2.3 RS-485 Setting
Default
Product Features
Switch No
Page 19
Image 19
Page 18
Page 20
Page 19
Image 19
Page 18
Page 20
Contents
User’s Manual
ESD-370
Integrated High Speed Dome Camera
Important Information
Copyright
User’s Manual
Cautions
Overview
Content
2. Connecting the High Speed Dome
Operation and Configuration
3.3.13
3.3.18 ALARM DETECT E/F/U Model Only
Error! Bookmark not defined
Appendix A Technical Specification
1. Overview
Precise and Accurate Tracking
1.1 Product Features
Day/Night Features
Perfect Contrast Solution for High Image Quality
Integrated with Web, Enhanced Internet Capability Optional
1.2 Product Application
Dynamic Dome Configuration
Privacy Mask for Privacy Protection
2.1 Package Content
2. Connecting the High Speed Dome
2.3 RS-485 Setting
2.2 Switch Definition
RS-485 Communication
Protocol
2.4 Dome ID Setting
Switch No
2.5 Dome Control Protocol
White
2.6 22-Pin Connector Definition
Color
AC24-1
Brown
Alarm Pin Not wired
Yellow
Orange
Definition
2.7 Alarm Pin Definition
2.8 RS-485 Connector
Cable Color
Function
3. Operation and Configuration
3.1 OSD Display Format
Position
3.2 OSD Menu Tree
Default
Layer
Layer
Default
Layer
Layer
Layer
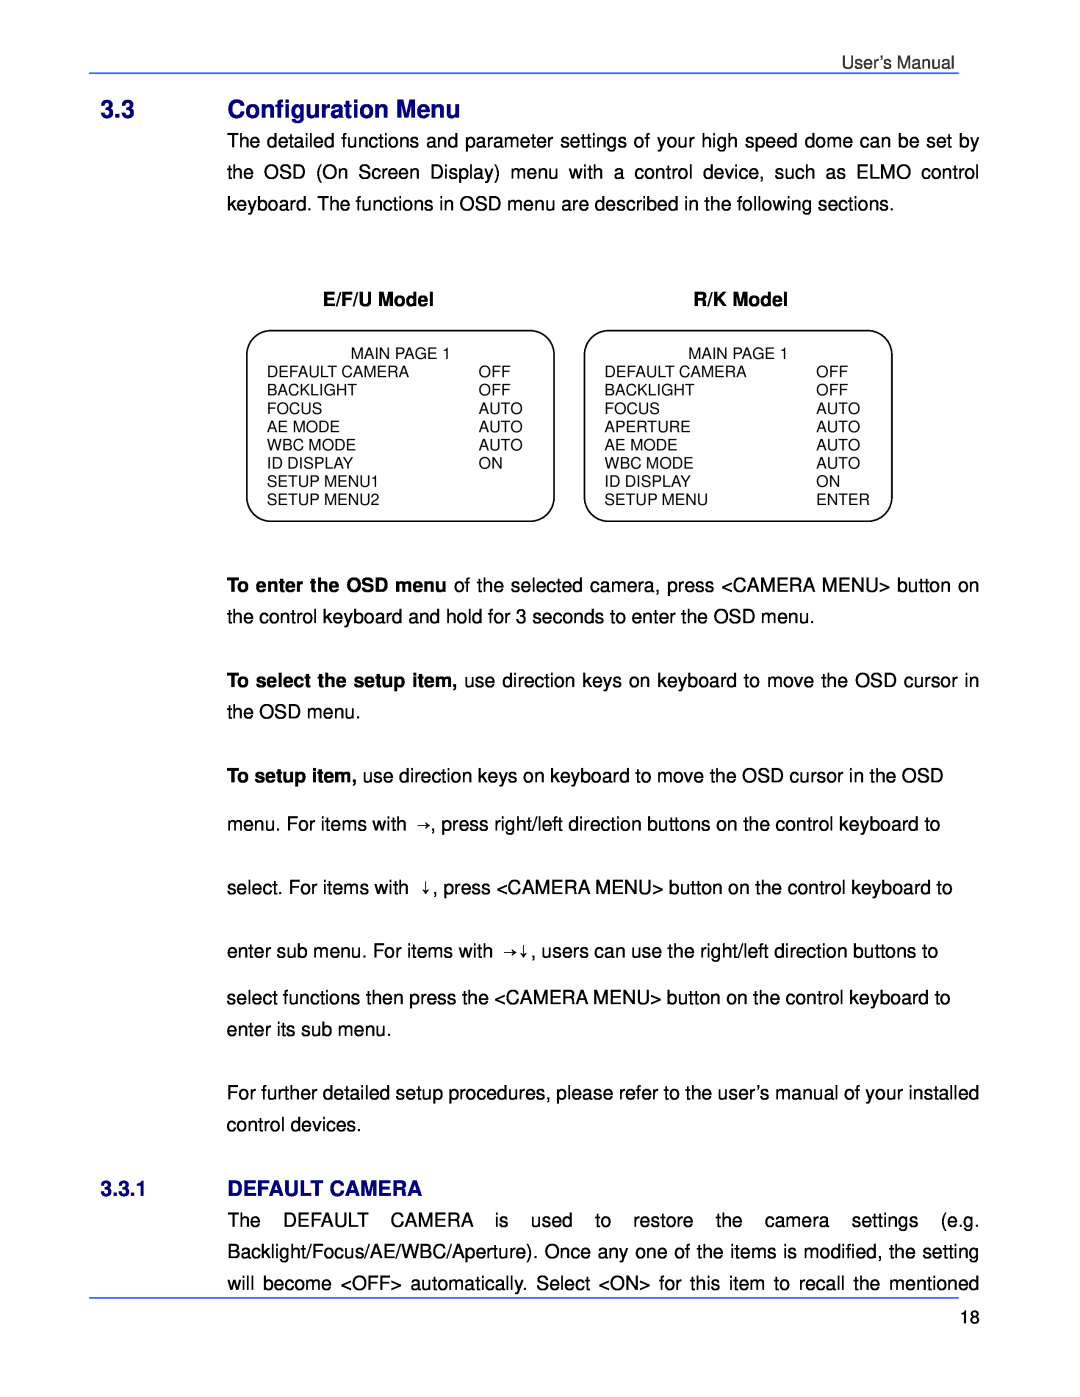
3.3.1 DEFAULT CAMERA
3.3 Configuration Menu
AUTO
3.3.2 BACKLIGHT
3.3.3 FOCUS
3.3.4 APERTURE
V APERTURE
3.3.5 AE MODE
APERTURE MENU
H APERTURE
Color Temperature in K
3.3.6 WBC MODE
3.3.7 ID DISPLAY
Light Sources
FLIP IMAGE/ME/OFF
3.3.8 SETUP MENU
DIGITAL ZOOM
ZOOM SPEED
SPEED BY ZOOM
AUTO CALIBRATION
EXIT
ANGLE ADJUSTER
RESET
SLOW SHUTTER
3.3.10 TITLE DISPLAY
3.3.11 TITLE SETTING
ALARM TYPE
3.3.12 ALARM SETTING
ALARM PIN
ALARM SWITCH
SEQUENCE
3.3.13 HOME SETTING
ALARM ACTION
PRESET
SELECT MODE
HOME FUNCTION
RETURN TIME
PAN degree/sec
3.3.14 SEQUENCE
TILT degree/sec
3.3.15 AUTOPAN
as endpoint
3.3.16 CRUISE
3.3.17 IR FUNCTION Removable IR Cut
3.3.19 WDR Setting DR Model Only
3.3.20 PRIVACY
H CENTER 000~256
PRIVACY SWITCH
SHADE
SET MASK
FIRST
3.3.21 TIME FUNCTION
MASK CLEAR+RESET
MASK DISPLAY
3.3.22 SCHEDULE FUNCTION
IR FUNCTION
3.3.23 EXIT OSD
All specifications are subject to change without notice
Appendix A Technical Specification
GENERAL
Layer
OSD Menu Notes
IR FUNCTION
WDR SETTING
AUTOPAN
CRUISE
ELMO USA Corp 1478 Old Country Rd Plainview, NY
Top
Page
Image
Contents