12User’s Guide
PRESET MODES
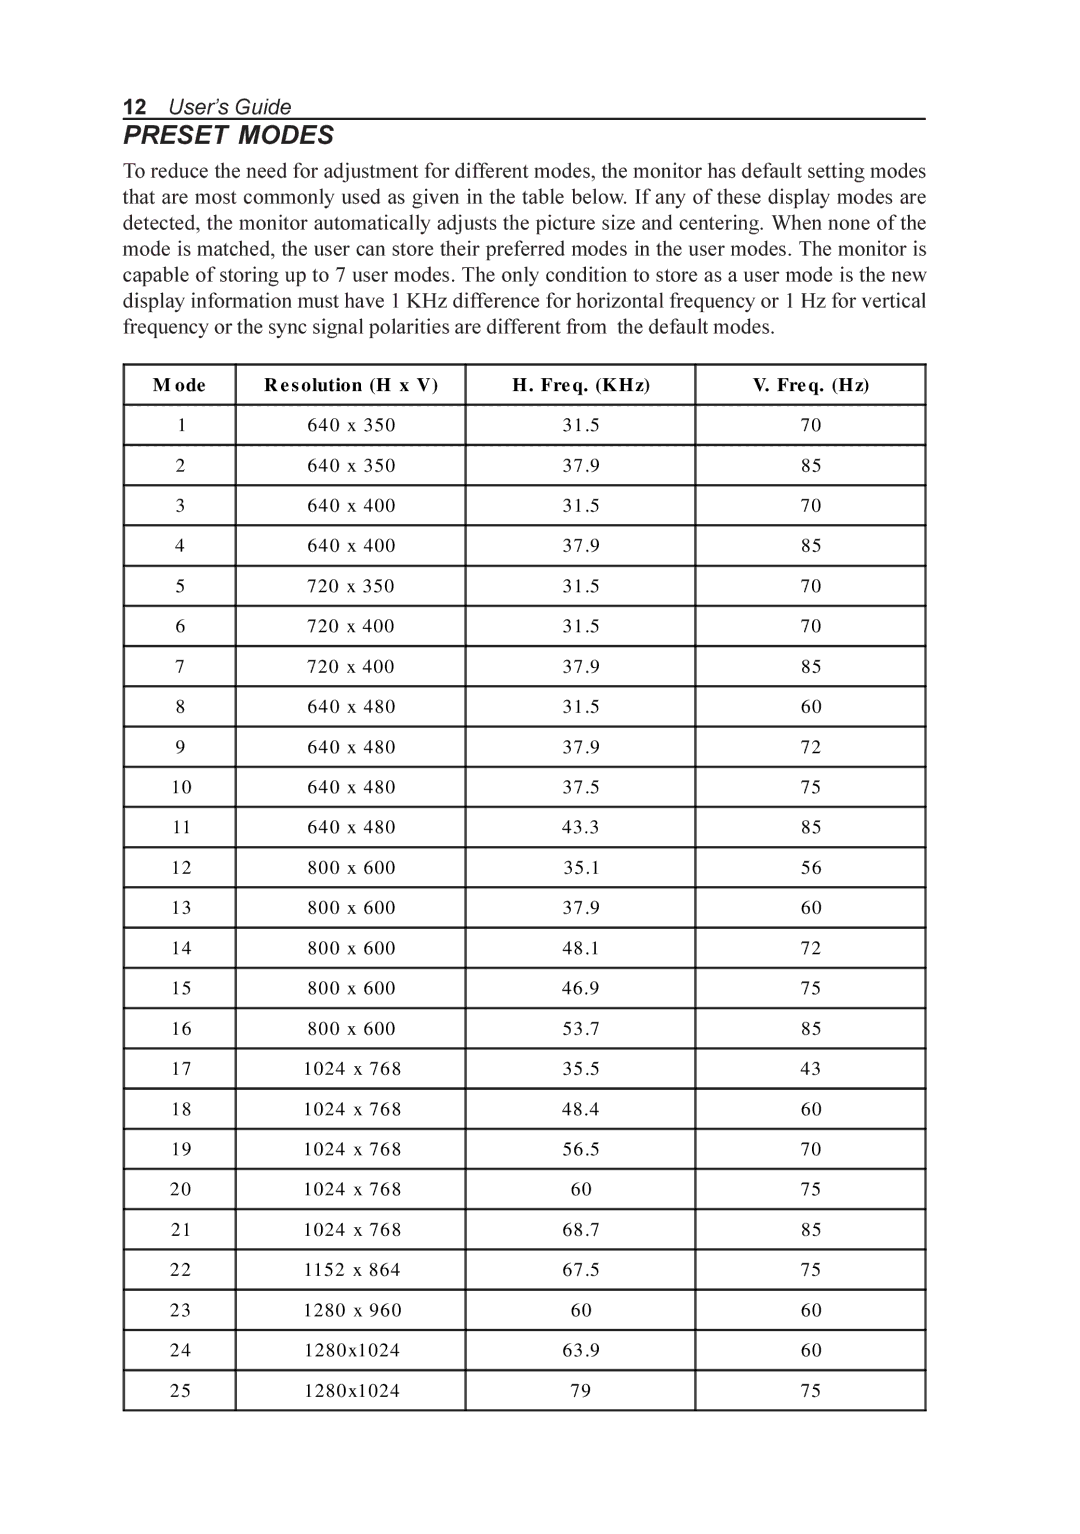
To reduce the need for adjustment for different modes, the monitor has default setting modes that are most commonly used as given in the table below. If any of these display modes are detected, the monitor automatically adjusts the picture size and centering. When none of the mode is matched, the user can store their preferred modes in the user modes. The monitor is capable of storing up to 7 user modes. The only condition to store as a user mode is the new display information must have 1 KHz difference for horizontal frequency or 1 Hz for vertical frequency or the sync signal polarities are different from the default modes.
M ode | Resolution (H x V) | H. Freq. (KHz) | V. Freq. (Hz) | |
|
|
|
|
|
1 | 640 | x 350 | 31.5 | 70 |
|
|
|
|
|
2 | 640 | x 350 | 37.9 | 85 |
|
|
|
|
|
3 | 640 | x 400 | 31.5 | 70 |
|
|
|
|
|
4 | 640 | x 400 | 37.9 | 85 |
|
|
|
| |
5 | 720 x 350 | 31.5 | 70 | |
|
|
|
| |
6 | 720 x 400 | 31.5 | 70 | |
|
|
|
| |
7 | 720 x 400 | 37.9 | 85 | |
|
|
|
|
|
8 | 640 | x 480 | 31.5 | 60 |
|
|
|
|
|
9 | 640 | x 480 | 37.9 | 72 |
|
|
|
|
|
10 | 640 | x 480 | 37.5 | 75 |
|
|
|
|
|
11 | 640 | x 480 | 43.3 | 85 |
|
|
|
|
|
12 | 800 | x 600 | 35.1 | 56 |
|
|
|
|
|
13 | 800 | x 600 | 37.9 | 60 |
|
|
|
|
|
14 | 800 | x 600 | 48.1 | 72 |
|
|
|
|
|
15 | 800 | x 600 | 46.9 | 75 |
|
|
|
|
|
16 | 800 | x 600 | 53.7 | 85 |
|
|
|
| |
17 | 1024 x 768 | 35.5 | 43 | |
|
|
|
| |
18 | 1024 x 768 | 48.4 | 60 | |
|
|
|
| |
19 | 1024 x 768 | 56.5 | 70 | |
|
|
|
| |
20 | 1024 x 768 | 60 | 75 | |
|
|
|
| |
21 | 1024 x 768 | 68.7 | 85 | |
|
|
|
| |
22 | 1152 x 864 | 67.5 | 75 | |
|
|
|
| |
23 | 1280 x 960 | 60 | 60 | |
|
|
|
| |
24 | 1280x1024 | 63.9 | 60 | |
|
|
|
| |
25 | 1280x1024 | 79 | 75 | |
|
|
|
|
|