English
3.Turn the depth adjustment crank, lowering the carriage by the desired increments, until it contacts the turret stop.
PLANING BASICS
Proper Planing Technique
![]() WARNING: DO NOT TURN THE UNIT ON WITH THE MATERIAL ALREADY INSERTED UNDER THE CAR- RIAGE. WAIT UNTIL THE ROLLERS AND CUTTER HEAD ARE UP TO FULL SPEED BEFORE FEEDING YOUR MATERIAL INTO THE MACHINE.
WARNING: DO NOT TURN THE UNIT ON WITH THE MATERIAL ALREADY INSERTED UNDER THE CAR- RIAGE. WAIT UNTIL THE ROLLERS AND CUTTER HEAD ARE UP TO FULL SPEED BEFORE FEEDING YOUR MATERIAL INTO THE MACHINE.
TO PLANE YOUR MATERIAL
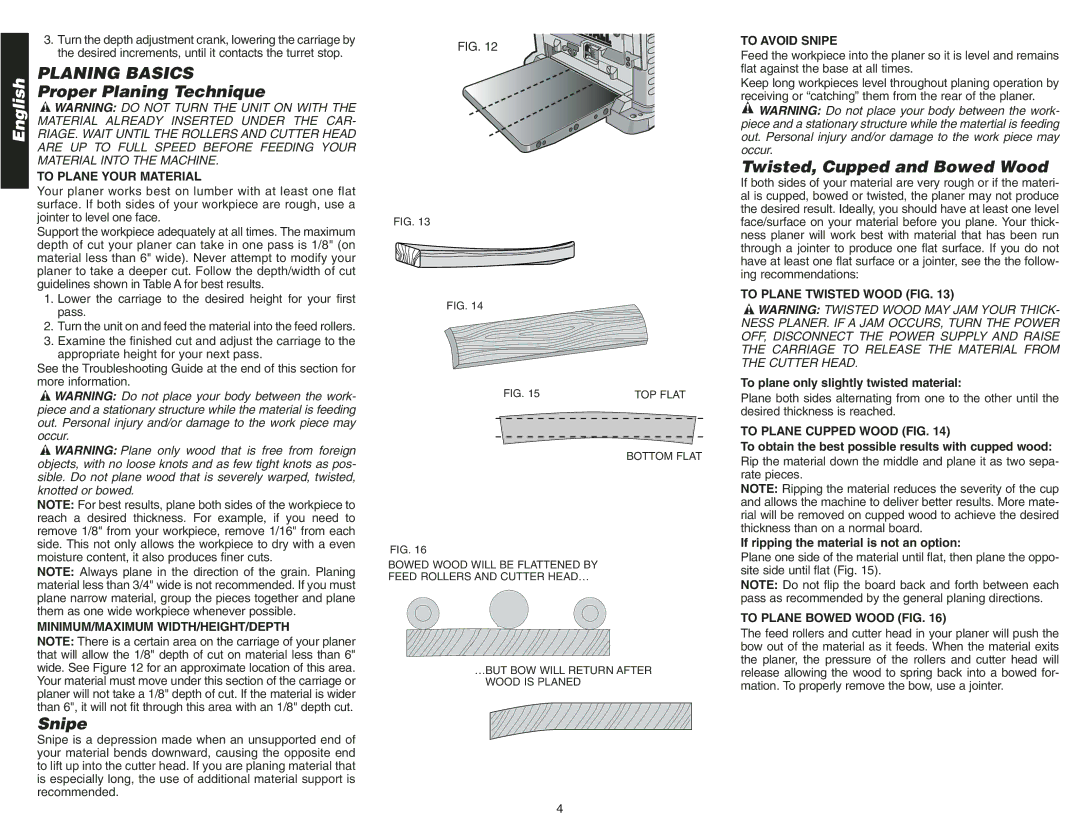
FIG. 12
TO AVOID SNIPE
Feed the workpiece into the planer so it is level and remains flat against the base at all times.
Keep long workpieces level throughout planing operation by receiving or “catching” them from the rear of the planer.
![]() WARNING: Do not place your body between the work- piece and a stationary structure while the matertial is feeding out. Personal injury and/or damage to the work piece may occur.
WARNING: Do not place your body between the work- piece and a stationary structure while the matertial is feeding out. Personal injury and/or damage to the work piece may occur.
Twisted, Cupped and Bowed Wood
If both sides of your material are very rough or if the materi-
Your planer works best on lumber with at least one flat surface. If both sides of your workpiece are rough, use a jointer to level one face.
Support the workpiece adequately at all times. The maximum depth of cut your planer can take in one pass is 1/8" (on material less than 6" wide). Never attempt to modify your planer to take a deeper cut. Follow the depth/width of cut guidelines shown in Table A for best results.
1.Lower the carriage to the desired height for your first pass.
2.Turn the unit on and feed the material into the feed rollers.
3.Examine the finished cut and adjust the carriage to the appropriate height for your next pass.
See the Troubleshooting Guide at the end of this section for more information.
![]() WARNING: Do not place your body between the work- piece and a stationary structure while the material is feeding out. Personal injury and/or damage to the work piece may occur.
WARNING: Do not place your body between the work- piece and a stationary structure while the material is feeding out. Personal injury and/or damage to the work piece may occur.
![]() WARNING: Plane only wood that is free from foreign objects, with no loose knots and as few tight knots as pos- sible. Do not plane wood that is severely warped, twisted, knotted or bowed.
WARNING: Plane only wood that is free from foreign objects, with no loose knots and as few tight knots as pos- sible. Do not plane wood that is severely warped, twisted, knotted or bowed.
NOTE: For best results, plane both sides of the workpiece to reach a desired thickness. For example, if you need to remove 1/8" from your workpiece, remove 1/16" from each side. This not only allows the workpiece to dry with a even moisture content, it also produces finer cuts.
NOTE: Always plane in the direction of the grain. Planing material less than 3/4" wide is not recommended. If you must plane narrow material, group the pieces together and plane them as one wide workpiece whenever possible.
MINIMUM/MAXIMUM WIDTH/HEIGHT/DEPTH
FIG. 13
FIG. 14
FIG. 15
FIG. 16
BOWED WOOD WILL BE FLATTENED BY FEED ROLLERS AND CUTTER HEAD…
TOP FLAT
BOTTOM FLAT
al is cupped, bowed or twisted, the planer may not produce the desired result. Ideally, you should have at least one level face/surface on your material before you plane. Your thick- ness planer will work best with material that has been run through a jointer to produce one flat surface. If you do not have at least one flat surface or a jointer, see the the follow- ing recommendations:
TO PLANE TWISTED WOOD (FIG. 13)
![]() WARNING: TWISTED WOOD MAY JAM YOUR THICK- NESS PLANER. IF A JAM OCCURS, TURN THE POWER OFF, DISCONNECT THE POWER SUPPLY AND RAISE THE CARRIAGE TO RELEASE THE MATERIAL FROM THE CUTTER HEAD.
WARNING: TWISTED WOOD MAY JAM YOUR THICK- NESS PLANER. IF A JAM OCCURS, TURN THE POWER OFF, DISCONNECT THE POWER SUPPLY AND RAISE THE CARRIAGE TO RELEASE THE MATERIAL FROM THE CUTTER HEAD.
To plane only slightly twisted material:
Plane both sides alternating from one to the other until the desired thickness is reached.
TO PLANE CUPPED WOOD (FIG. 14)
To obtain the best possible results with cupped wood:
Rip the material down the middle and plane it as two sepa- rate pieces.
NOTE: Ripping the material reduces the severity of the cup and allows the machine to deliver better results. More mate- rial will be removed on cupped wood to achieve the desired thickness than on a normal board.
If ripping the material is not an option:
Plane one side of the material until flat, then plane the oppo- site side until flat (Fig. 15).
NOTE: Do not flip the board back and forth between each pass as recommended by the general planing directions.
TO PLANE BOWED WOOD (FIG. 16)
The feed rollers and cutter head in your planer will push the
NOTE: There is a certain area on the carriage of your planer that will allow the 1/8" depth of cut on material less than 6" wide. See Figure 12 for an approximate location of this area. Your material must move under this section of the carriage or planer will not take a 1/8" depth of cut. If the material is wider than 6", it will not fit through this area with an 1/8" depth cut.
Snipe
Snipe is a depression made when an unsupported end of your material bends downward, causing the opposite end to lift up into the cutter head. If you are planing material that is especially long, the use of additional material support is recommended.
…BUT BOW WILL RETURN AFTER WOOD IS PLANED
4
bow out of the material as it feeds. When the material exits the planer, the pressure of the rollers and cutter head will release allowing the wood to spring back into a bowed for- mation. To properly remove the bow, use a jointer.