K1

K1


I


H


K2


I


E


FIG. 1


FIG. 2

ENGLISH

FRANÇAIS

ESPAÑOL


How To Assemble

CAUTION: Assemble the cleaner completely before using.

CAUTION: Moving parts, make sure the on/off switch is in the off position and stay clear of the brushroll when plugging in.

NOTE: Features may vary by model yet all parts assemble the same.

Remove all components from the carton and check that all of the parts are available from the parts list on page 6 (or see the quick start guide).

Have a Phillips screwdriver available (one is NOT provided in the package)

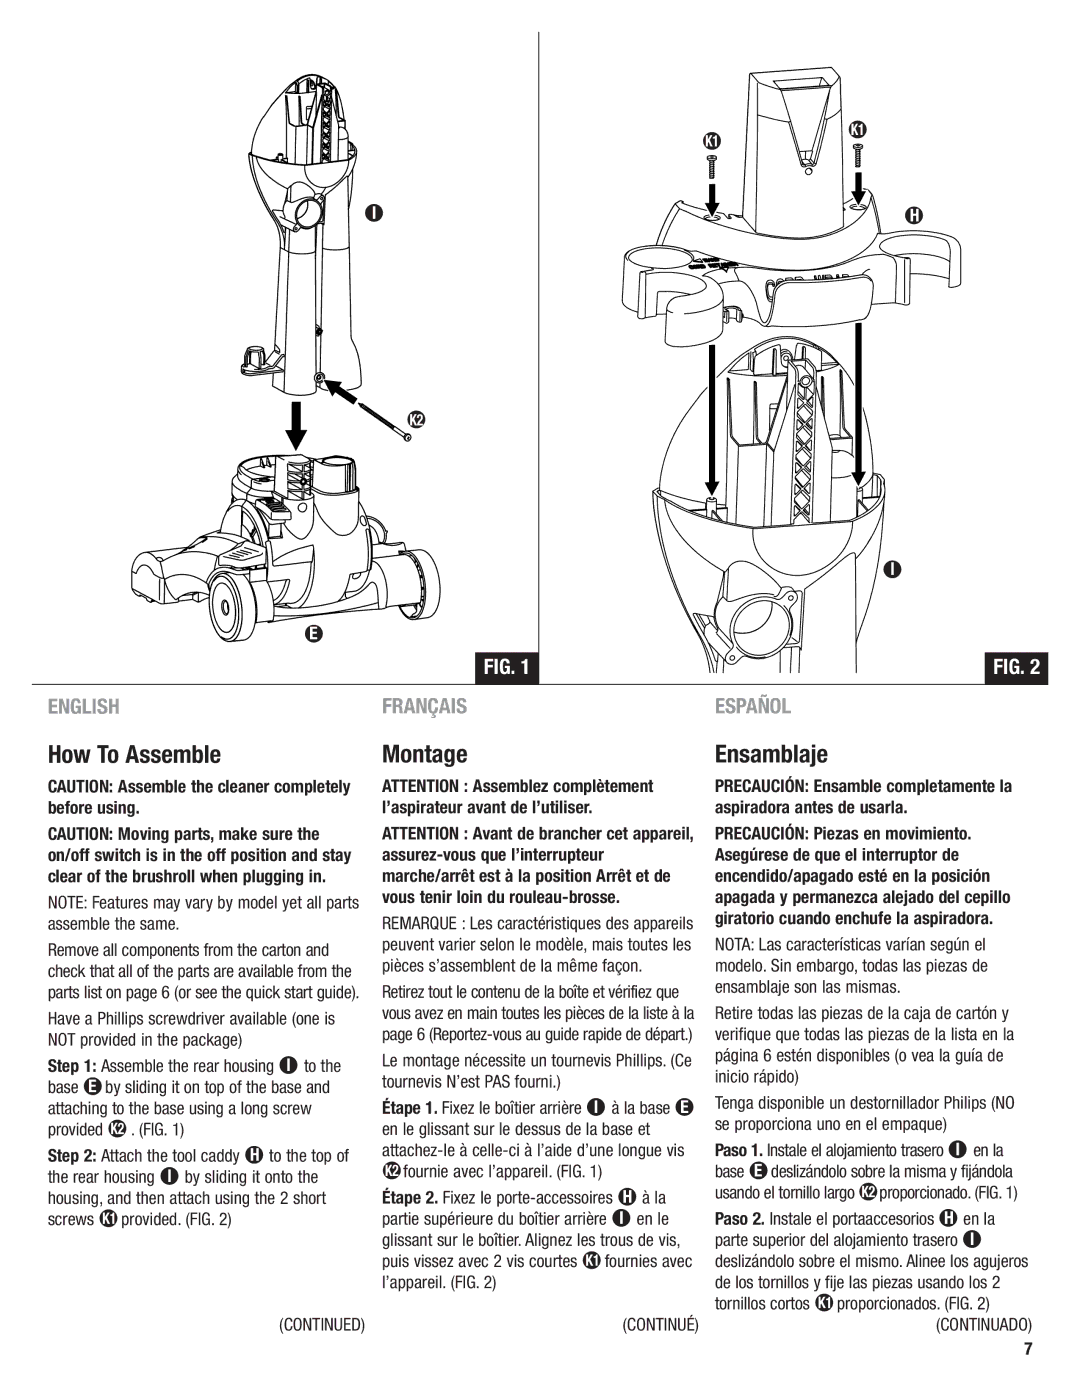
Step 1: Assemble the rear housing I to the base E by sliding it on top of the base and attaching to the base using a long screw provided K2 . (FIG. 1)

Step 2: Attach the tool caddy H to the top of the rear housing I by sliding it onto the housing, and then attach using the 2 short screws K1 provided. (FIG. 2)

(CONTINUED)

Montage

ATTENTION : Assemblez complètement l’aspirateur avant de l’utiliser.

ATTENTION : Avant de brancher cet appareil, assurez-vous que l’interrupteur marche/arrêt est à la position Arrêt et de vous tenir loin du rouleau-brosse.

REMARQUE : Les caractéristiques des appareils peuvent varier selon le modèle, mais toutes les pièces s’assemblent de la même façon.

Retirez tout le contenu de la boîte et vérifiez que vous avez en main toutes les pièces de la liste à la page 6 (Reportez-vous au guide rapide de départ.)

Le montage nécessite un tournevis Phillips. (Ce tournevis N’est PAS fourni.)

Étape 1. Fixez le boîtier arrière I à la base E en le glissant sur le dessus de la base et attachez-le à celle-ci à l’aide d’une longue vis K2 fournie avec l’appareil. (FIG. 1)

Étape 2. Fixez le porte-accessoires H à la partie supérieure du boîtier arrière I en le glissant sur le boîtier. Alignez les trous de vis, puis vissez avec 2 vis courtes K1 fournies avec l’appareil. (FIG. 2)

(CONTINUÉ)

Ensamblaje

PRECAUCIÓN: Ensamble completamente la aspiradora antes de usarla.

PRECAUCIÓN: Piezas en movimiento. Asegúrese de que el interruptor de encendido/apagado esté en la posición apagada y permanezca alejado del cepillo giratorio cuando enchufe la aspiradora.

NOTA: Las características varían según el modelo. Sin embargo, todas las piezas de ensamblaje son las mismas.

Retire todas las piezas de la caja de cartón y verifique que todas las piezas de la lista en la página 6 estén disponibles (o vea la guía de inicio rápido)

Tenga disponible un destornillador Philips (NO se proporciona uno en el empaque)

Paso 1. Instale el alojamiento trasero I en la base E deslizándolo sobre la misma y fijándola usando el tornillo largo K2 proporcionado. (FIG. 1)

Paso 2. Instale el portaaccesorios H en la parte superior del alojamiento trasero I deslizándolo sobre el mismo. Alinee los agujeros de los tornillos y fije las piezas usando los 2 tornillos cortos K1 proporcionados. (FIG. 2)

(CONTINUADO)

7

Page 7
Image 7
Eureka 4700 manual How To Assemble, Montage, Ensamblaje

4700 specifications

The Eureka 4700 is a versatile and efficient cleaning machine designed to meet the demands of both commercial and industrial environments. With its powerful performance, this model has garnered attention for its innovative features that enhance productivity and ease of use.

One of the standout characteristics of the Eureka 4700 is its robust motor, which delivers strong suction power, ensuring deep cleaning of various surfaces. This reliable motor is complemented by advanced filtration technology that captures dust and allergens, making it an excellent choice for maintaining a clean and healthy workspace.

The Eureka 4700 is equipped with a wide cleaning path, allowing users to cover larger areas in less time. This feature is particularly beneficial in settings such as hotels, offices, and schools, where efficiency is crucial. The machine also boasts a lightweight design, making it easy to maneuver and transport across different locations without fatigue.

Another significant technological innovation in the Eureka 4700 is its user-friendly control interface. The intuitive design allows operators to quickly adjust settings to suit their specific cleaning needs. Whether it's switching between carpet and hard floor cleaning modes or adjusting suction power, users can enjoy a customized experience that maximizes cleaning results.

Additionally, the Eureka 4700 features noise reduction technology, ensuring that operations remain quiet and unobtrusive. This aspect is particularly valuable in environments where maintaining a peaceful atmosphere is essential, such as during business hours in an office.

Durability is a key characteristic of the Eureka 4700, built with high-quality materials to withstand the rigors of daily use. This reliability translates into lower maintenance costs and a longer lifespan, making it a sound investment for businesses looking for a dependable cleaning solution.

In conclusion, the Eureka 4700 stands out in the cleaning equipment market with its powerful motor, wide cleaning path, lightweight design, user-friendly controls, and durability. Its advanced technologies and features make it an ideal choice for commercial and industrial cleaning tasks, ensuring an efficient and thorough cleaning experience for users across various sectors.