Maintenance

CAUTION

Raising the mower deck for service or maintenance relying solely on mechanical or hydraulic jacks could be dangerous. The mechanical or hydraulic jacks may not be enough support or may malfunction allowing the unit to fall, which could cause injury.

Do Not rely solely on mechanical or hydraulic jacks for support. Use adequate jack stands or equivalent support.

5.Remove the rear tires from the machine.

6.Remove any debris from the brake area.

7.Engage the parking brake (lever up).

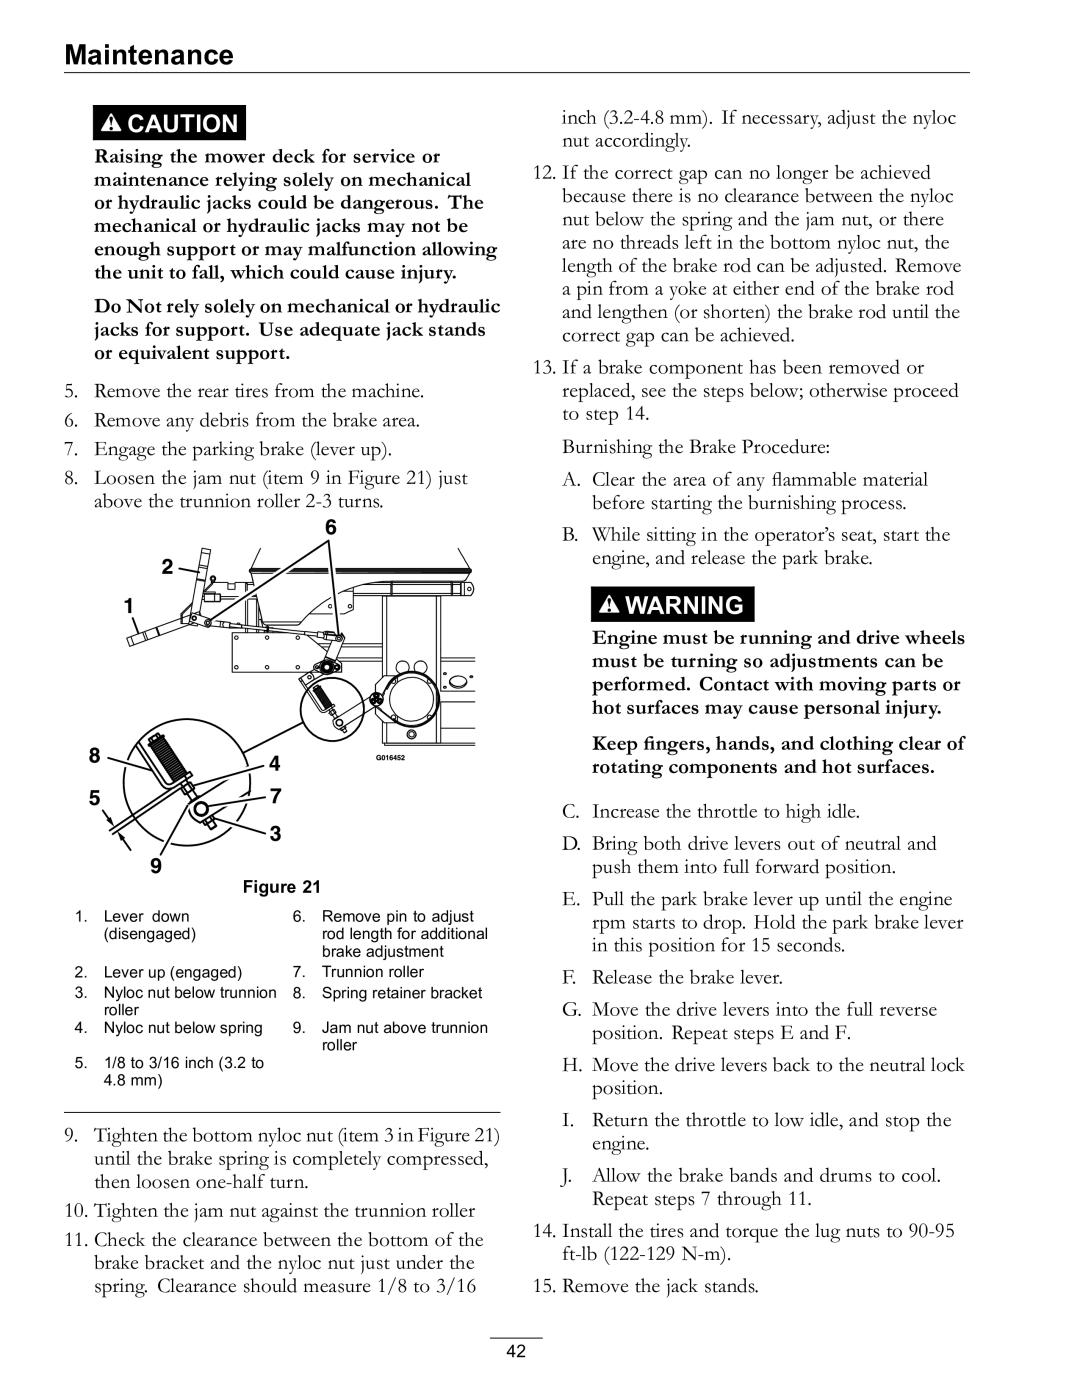
8.Loosen the jam nut (item 9 in Figure 21) just above the trunnion roller 2-3 turns.

Figure 21

1.

Lever down

6.

Remove pin to adjust


(disengaged)


rod length for additional


brake adjustment

2.

Lever up (engaged)

7.

Trunnion roller

3.

Nyloc nut below trunnion

8.

Spring retainer bracket


roller


4.

Nyloc nut below spring

9.

Jam nut above trunnion


roller

5.1/8 to 3/16 inch (3.2 to 4.8 mm)

9.Tighten the bottom nyloc nut (item 3 in Figure 21) until the brake spring is completely compressed, then loosen one-half turn.

10.Tighten the jam nut against the trunnion roller

11.Check the clearance between the bottom of the brake bracket and the nyloc nut just under the spring. Clearance should measure 1/8 to 3/16

inch (3.2-4.8 mm). If necessary, adjust the nyloc nut accordingly.

12.If the correct gap can no longer be achieved because there is no clearance between the nyloc nut below the spring and the jam nut, or there are no threads left in the bottom nyloc nut, the length of the brake rod can be adjusted. Remove a pin from a yoke at either end of the brake rod and lengthen (or shorten) the brake rod until the correct gap can be achieved.

13.If a brake component has been removed or replaced, see the steps below; otherwise proceed to step 14.

Burnishing the Brake Procedure:

A.Clear the area of any flammable material before starting the burnishing process.

B.While sitting in the operator’s seat, start the engine, and release the park brake.

WARNING

Engine must be running and drive wheels must be turning so adjustments can be performed. Contact with moving parts or hot surfaces may cause personal injury.

Keep fingers, hands, and clothing clear of rotating components and hot surfaces.

C.Increase the throttle to high idle.

D.Bring both drive levers out of neutral and push them into full forward position.

E.Pull the park brake lever up until the engine rpm starts to drop. Hold the park brake lever in this position for 15 seconds.

F.Release the brake lever.

G.Move the drive levers into the full reverse position. Repeat steps E and F.

H.Move the drive levers back to the neutral lock position.

I.Return the throttle to low idle, and stop the engine.

J.Allow the brake bands and drums to cool. Repeat steps 7 through 11.

14.Install the tires and torque the lug nuts to 90-95 ft-lb (122-129 N-m).

15.Remove the jack stands.

42

Page 42
Image 42
Exmark 000 & higher, 920 manual Lever down Remove pin to adjust Disengaged

920, 000 & higher specifications

The Exmark 920 is an exceptional piece of equipment tailored for professionals and enthusiasts alike. Designed with an emphasis on performance and reliability, this mower embodies the pinnacle of lawn care technology. Known for its robust construction, the Exmark 920 is equipped with a powerful engine, ensuring efficient and effective mowing even in demanding conditions.

One of the standout features of the Exmark 920 is its cutting deck. With a 52-inch or 60-inch mower deck option, it allows users to cover a large mowing area quickly. The deck is crafted from high-strength steel, providing durability and longevity while maintaining a lightweight design that enhances maneuverability. Innovative blade design promotes superior airflow for an even cut, preventing clumping and ensuring a polished finish across various grass types.

The Exmark 920 utilizes advanced technology, including the innovative RED Technology, which enhances engine performance by optimizing power consumption. This results in reduced fuel consumption while maintaining the required power output for demanding tasks. Additionally, the mower’s intuitive controls include a user-friendly interface, allowing for easy adjustments and settings, catering to the varying needs of different lawn types and conditions.

Another notable feature of the Exmark 920 is its all-day comfort design. With an ergonomic seat and advanced suspension system, operators can tackle long mowing sessions without discomfort. The padded seat is adjustable, providing maximum support to minimize fatigue, while the suspension system absorbs bumps and uneven terrain for a smoother ride.

Furthermore, the Exmark 920 prioritizes serviceability. Easy access points for maintenance and a well-designed layout ensure that routine tasks, such as oil changes and blade replacements, can be completed efficiently. The model also comes equipped with LED headlights for improved visibility during early morning or late evening mowing.

In summary, the Exmark 920 is a sophisticated mower combining power, advanced technology, and design for comfort and utility. Its high-performance engine, durable cutting deck, user-friendly controls, and serviceable layout make it an ideal choice for anyone seeking to achieve a well-manicured lawn with professional results. Whether for commercial or residential use, the Exmark 920 stands out as a leading option in the market, enabling users to tackle any mowing challenge with confidence and ease.