Distribution Amplifiers
P/2 DA2 WM F, WM EC F P/2 DA2 D, and AAP models
User’s Manual
68-463-02 Rev. C
Precautions
Extron’s Warranty
Safety Instructions English
USA, Canada, South America
FCC Class A Notice
Table of Contents
Chapter 2 Controls and Installation
Appendix Specifications, Dimensions, Parts, and
Front and Rear Panels
Table of Contents, cont’d
Features
Chapter1One
Introduction
Controls and Installation
Features
Installing the P/2 DA2 WM F/EC F
Installing the P/2 DA2 D
Controls and Installation
Front and Rear Panels
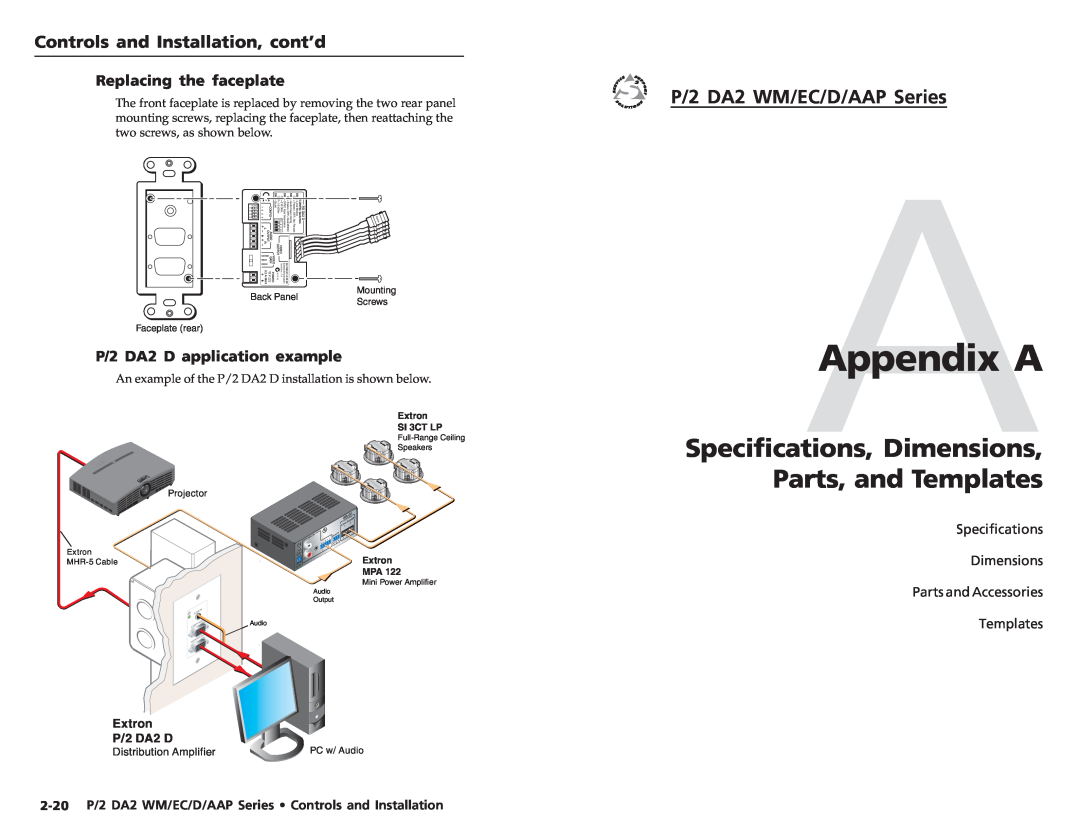
Front faceplate
P/2 DA2 WM F faceplate features
Controls and Installation, cont’d
Switch
P/2 DA2 WM F/EC F rear panel
P/2 DA2 D rear panel
Installing the P/2 DA2 WM F/EC F
Easy setup procedure
Controls and Installation, cont’d
5Video output - BNC connectors for RGBHV output
Installing the mud ring bracket
Extron MR 200D
Controls and Installation, cont’d
Installing a mud ring bracket
Connecting audio output
Cabling
Controls and Installation, cont’d
Unbalanced audio
Controls and Installation, cont’d
Installing architectural adapter plates
Balanced audio
P/2 DA2 WM F wall mount installation
P/2 DA2 WM EC F Euro Channel installation
Setting the DIP switches
Controls and Installation, cont’d
Installing the P/2 DA2 D
Setting the internal jumpers
Preparing the site and installing the wall box
Controls and Installation, cont’d
Extron P2 DA2 D
Mounting the distribution amplifier
Controls and Installation, cont’d
Specifications, Dimensions
Parts and Accessories
AAppendix A
Replacing the faceplate
Specifications, Dimensions, and Parts
Specifications
Video
Video input
Specifications, Dimensions, Parts, cont’d
Audio
Audio input
Audio output
Specifications, Dimensions, and Parts, cont’d
Dimensions
P/2 DA2 WM F faceplate dimensions
All dimensions are given in inches
P/2 DA2 WM F AAP faceplate dimensions
P/2 DA2 D faceplate dimensions
Specifications, Dimensions, and Parts, cont’d
WM F AAP model faceplate dimensions
Parts and Accessories
Included Parts
Cables
Mud ring mounting brackets
Page
Multi Type Connector Architectural Adapter Plates
Specifications, Dimensions, and Parts, cont’d
P/2 DA2 WM F
Templates
P/2 DA2 WM F AAP mounting template
P/2 DA2 D mounting template
SURFACE CUT-OUT AREA FOR FURNITURE MOUNT
SURFACE CUT-OUTAREA FOR
Specifications, Dimensions, and Parts, cont’d
A-18P/2 DA2 WM/EC/D/AAP Series • Appendix