Installation — Stage Four, cont’d

NThe installation must conform to national and local electrical codes, and UL requirements. Refer to the device’s user manual for details.

1.Pull the cables

a.Loosen the PCM 240 set screws and remove the PMP.

b.Gather all the cables from the speakers, A/V wall plates, MLC 104 IP Plus controller, and any optional devices installed that have been run to the projector location, and pull them down through the hole in the ceiling tile. These cables are:

the MLC power/RS-232 cable,

the CAT 5 input cables from the wall plates, the speaker cables,

the MLC to projector IR/Serial comms cable, any optional device cables (e.g. PPC 25 sensor)

c.Gather the cables together below the suspended ceiling and pass them down the PMP.

d.Screw the PMP back up into position and tighten the set screws on the PCM 240.

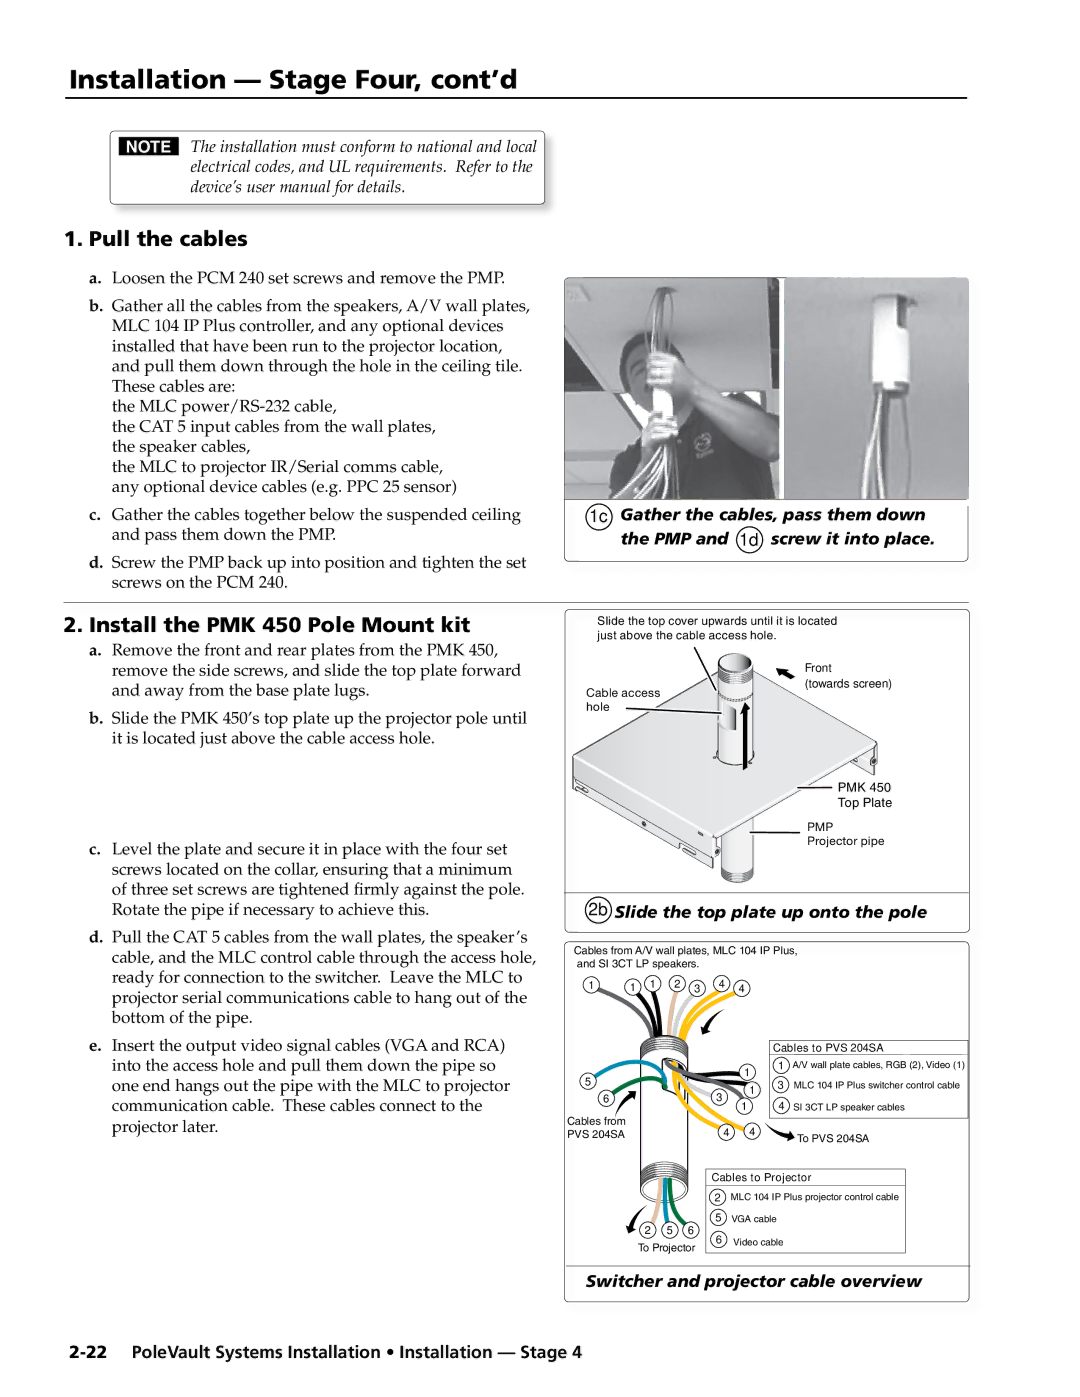
1c Gather the cables, pass them down the PMP and 1d screw it into place.

2. Install the PMK 450 Pole Mount kit

a.

Remove the front and rear plates from the PMK 450,


remove the side screws, and slide the top plate forward


and away from the base plate lugs.

b. Slide the PMK 450’s top plate up the projector pole until


it is located just above the cable access hole.

c.

Level the plate and secure it in place with the four set


screws located on the collar, ensuring that a minimum


of three set screws are tightened firmly against the pole.


Rotate the pipe if necessary to achieve this.

d. Pull the CAT 5 cables from the wall plates, the speaker’s


cable, and the MLC control cable through the access hole,


ready for connection to the switcher. Leave the MLC to

Slide the top cover upwards until it is located just above the cable access hole.

Front

(towards screen)

Cable access

hole

PMK 450

Top Plate

PMP

Projector pipe

2b Slide the top plate up onto the pole

Cables from A/V wall plates, MLC 104 IP Plus, and SI 3CT LP speakers.

projector serial communications cable to hang out of the

bottom of the pipe.

e. Insert the output video signal cables (VGA and RCA)

into the access hole and pull them down the pipe so

one end hangs out the pipe with the MLC to projector

communication cable. These cables connect to the

projector later.

1

5

6

Cables from PVS 204SA

1 1 2 3 4 4


Cables to PVS 204SA


1

1 A/V wall plate cables, RGB (2), Video (1)


3 MLC 104 IP Plus switcher control cable

3

1


1

4 SI 3CT LP speaker cables


44 To PVS 204SA

Cables to Projector

2MLC 104 IP Plus projector control cable

5VGA cable

2

5

6

6


To Projector

Video cable


Switcher and projector cable overview

2-22 PoleVault Systems Installation • Installation — Stage 4

Page 34
Image 34
Extron electronic PVS 400, PVS 200 Installation Stage Four, cont’d, Pull the cables, Install the PMK 450 Pole Mount kit

PVS 300, PVS 400, PVS 200 specifications

Extron Electronics is renowned for its innovative audiovisual solutions, and among its diverse range of products, the PVS (Presentation and Video System) series stands out. The PVS 400, PVS 300, and PVS 200 models are designed to streamline multimedia presentations while offering various features tailored to different user needs.

The Extron PVS 400 is the flagship model, ideal for sophisticated presentation environments. This powerful device supports 4K video distribution and includes multiple input capabilities including HDMI, VGA, and composite video. A significant feature of the PVS 400 is its ability to scale video inputs to fit various resolutions, ensuring optimal quality performance during presentations. The built-in streaming technology allows real-time video feeds to remote audiences, making it an excellent choice for hybrid and online meetings.

Built with advanced processing capabilities, the PVS 400 supports audio embedding and de-embedding, ensuring high-quality sound is delivered alongside the video. Additionally, the intuitive user interface simplifies operation, making it accessible for presenters at all levels. The system is designed for integration with Extron's global control platform, allowing seamless control of AV functions through a single touch panel.

The Extron PVS 300 serves as a mid-range solution offering robust features without compromising quality. It supports up to 1080p resolution, making it suitable for most conventional presentation environments. The PVS 300 incorporates essential features like audio mixing, simple video switching, and basic scaling capabilities. It's particularly well-suited for educational institutions and small to mid-sized conference rooms where high performance is necessary but extensive features are not required.

Lastly, the Extron PVS 200 is tailored for users needing a straightforward and cost-effective presentation tool. Designed for small meetings and classrooms, this model includes essential input options, basic video switching, and audio support. The PVS 200 is easy to set up and use, making it a popular choice for users seeking reliability without complex configurations.

In conclusion, the Extron PVS 400, PVS 300, and PVS 200 models represent a versatile range of solutions catering to various audiovisual needs. Whether it's the high-powered capabilities of the PVS 400, the balanced features of the PVS 300, or the budget-friendly nature of the PVS 200, Extron has positioned itself as a leader in the presentation technology market. Each model provides distinct characteristics that ensure effective communication and impactful presentations, contributing to the overall success of any meeting or event.