Introduction, cont’d
Application Diagrams
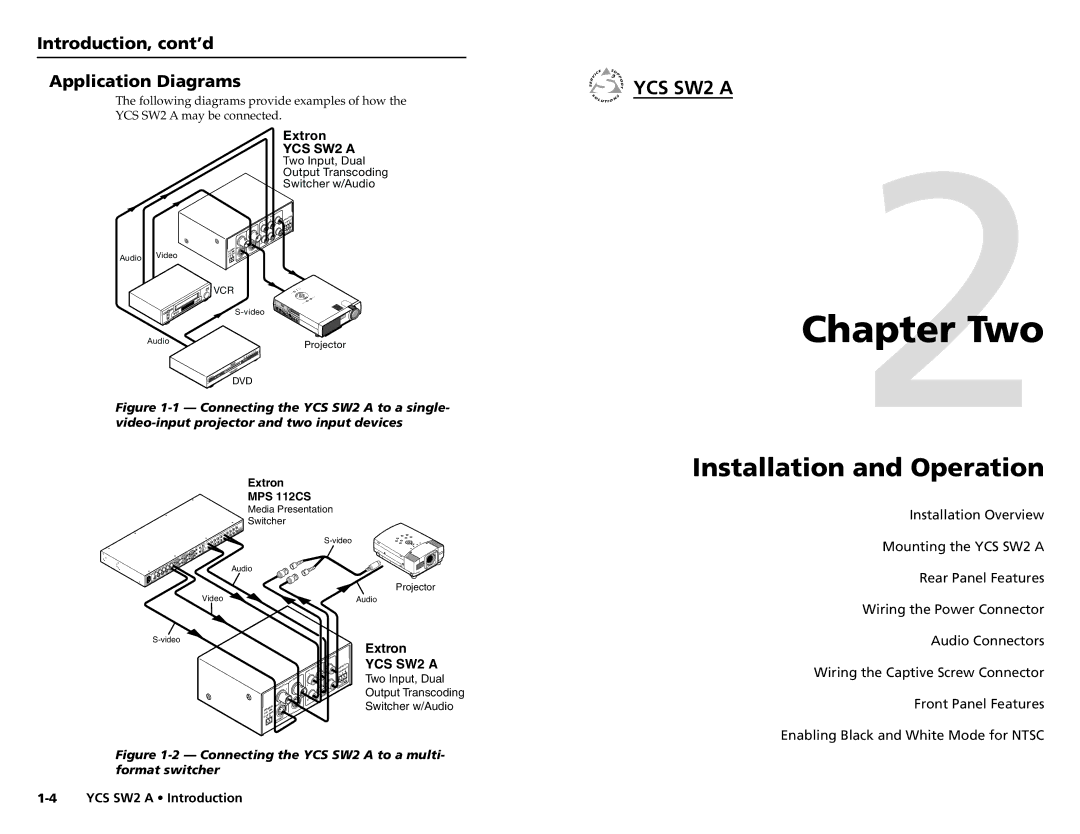
The following diagrams provide examples of how the
YCS SW2 A may be connected.
Extron
YCS SW2 A
Two Input, Dual
Output Transcoding
Switcher w/Audio
|
|
|
|
|
|
|
|
|
|
|
|
| OUTP | UT |
|
|
|
|
|
|
|
|
|
|
|
|
|
|
|
|
|
| |
|
|
|
|
|
|
|
|
|
|
| TS |
|
|
| MOT | E |
|
|
|
|
|
|
|
|
|
| INPU |
|
| RE |
| ||
|
|
|
|
|
|
|
|
|
|
| 2 |
| ACT | |||
|
|
|
|
|
|
|
|
|
|
|
|
|
| CONT |
| |
|
|
|
|
|
|
|
|
|
| 1 |
|
| L | 1 | 2 |
|
|
|
|
|
|
|
|
|
| OUTP | UT |
|
|
|
|
|
|
|
|
|
|
|
|
|
|
|
|
|
|
|
|
| SW | |
|
|
|
|
|
|
| PUTS |
|
|
|
|
|
|
| TO- | |
|
|
|
|
|
| IN | 1 |
| L |
|
|
| AU |
|
| |
|
|
|
|
|
|
|
|
|
|
| R |
|
|
| ||
|
|
|
|
|
|
|
|
|
|
|
| AUDI | O |
|
|
|
|
|
|
|
|
|
|
|
|
| R |
|
|
|
|
| |
|
|
|
|
|
|
|
|
|
|
|
|
|
|
|
| |
|
| WER | VIDE | O | 2 |
|
|
|
|
|
|
|
| |||
|
|
|
|
|
|
|
|
|
|
|
|
|
| |||
| Video | POV | MA | X |
|
|
|
|
|
|
|
|
|
| ||
Audio | 12 |
| S | VI | DEO |
|
|
|
|
|
|
| ||||
| 0.4A |
|
|
|
|
|
|
|
|
|
|
|
| |||
VCR
| |
Audio | Projector |
|
DVD
Figure 1-1 — Connecting the YCS SW2 A to a single- video-input projector and two input devices
Extron
MPS 112CS
Media Presentation
Switcher
| |
| Audio |
| Projector |
Video | Audio |

 YCS SW2 A
Chapter2Two
Installation and Operation
Installation Overview
Mounting the YCS SW2 A
Rear Panel Features
Wiring the Power Connector
|
|
|
|
|
|
|
|
|
| TPU | T |
|
|
|
|
|
|
|
|
| OU |
| |
|
|
|
| IN | PU | TS |
|
|
|
| |
|
|
|
|
| 1 |
|
|
| |||
|
|
| R | VID | EO |
| 2 |
|
|
| |
| WE |
|
|
|
|
|
|
| |||
|
|
|
|
|
|
|
|
|
| ||
PO | MAX |
|
|
|
|
| EO |
|
| ||
12V |
|
|
|
| VID |
|
| ||||
0. | 4A |
|
|
| IDE | O |
|
|
| ||
|
|
|
|
|
|
|
|
| |||
|
|
|
|
|
|
|
|
|
|
| |
|
|
| TPU | T |
|
|
|
|
| OU |
|
|
|
| |
INPU | TS | 2 |
| R | EM | OTE | T |
| TAC | ||||||
|
| ON |
| ||||
1 |
| L |
| C | 2 |
|
|
|
| 1 |
|
|
| ||
L |
|
|
| AU | TO | ||
|
|
|
|
|
| ||
| R |
AU | DIO |
| |
R |
|
Extron
YCS SW2 A
Two Input, Dual Output Transcoding Switcher w/Audio
Audio Connectors
Wiring the Captive Screw Connector Front Panel Features Enabling Black and White Mode for NTSC
