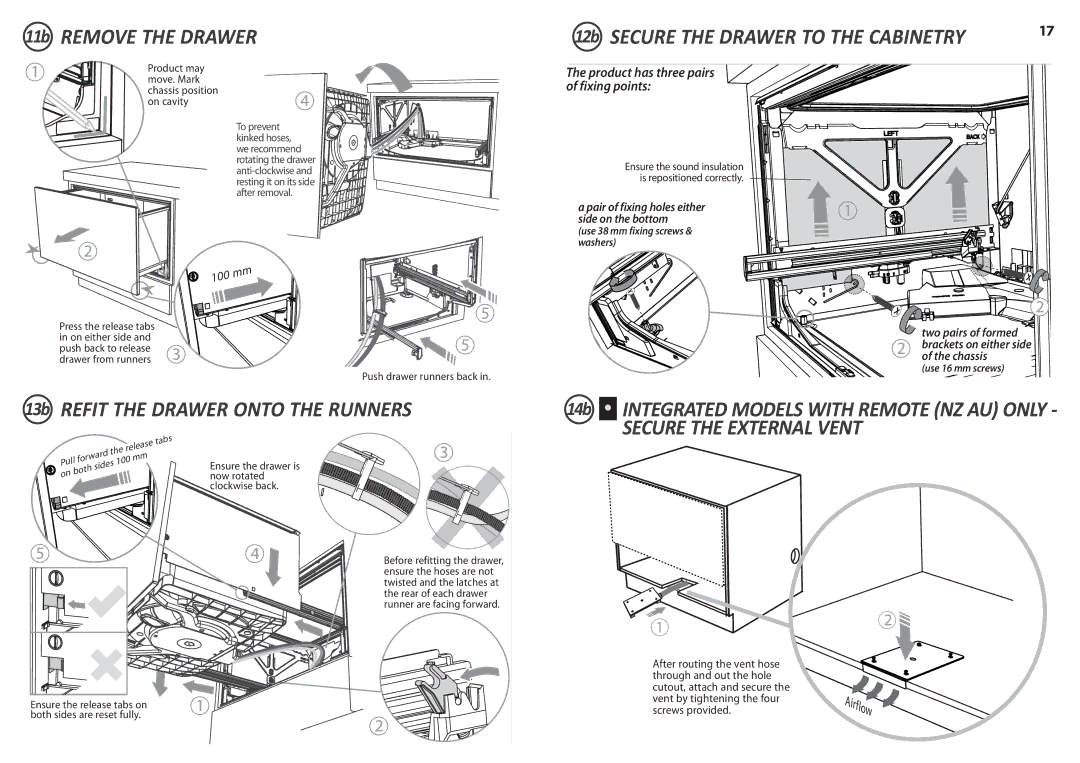
11b REMOVE THE DRAWER
12b SECURE THE DRAWER TO THE CABINETRY | 17 |
|
1 | Product may |
move. Mark |
chassis position on cavity
4
The product has three pairs of fixing points:
To prevent ![]()
![]()
![]()
![]()
![]()
![]()
![]()
![]()
![]()
![]()
![]()
![]()
![]()
![]()
![]()
![]()
![]()
![]() kinked hoses,
kinked hoses, ![]()
![]()
![]()
![]()
![]()
![]()
![]()
![]()
![]()
![]()
![]()
![]()
![]()
![]()
![]()
![]()
![]()
![]()
![]()
![]()
![]()
![]()
![]()
![]() we recommend
we recommend ![]()
![]()
![]()
![]()
![]()
![]()
![]()
![]()
![]()
![]()
![]()
![]()
![]()
![]()
![]()
![]()
![]()
![]()
![]()
![]()
![]() rotating the drawer
rotating the drawer ![]()
![]()
![]()
![]()
![]()
![]()
![]()
![]()
![]()
![]()
![]()
![]()
![]()
![]()
![]()
![]()
![]()
![]()
![]()
![]()
![]()
![]()
![]()
![]()
![]()
![]() resting it on its side
resting it on its side ![]()
![]()
![]()
![]()
![]()
![]()
![]()
![]()
![]()
![]()
after removal.
Ensure the sound insulation ![]() is repositioned correctly.
is repositioned correctly. ![]()
a pair of fixing holes either side on the bottom
1
2
|
| 100 | mm |
|
|
| |
Press the release tabs |
|
| 5 |
|
|
| |
in on either side and |
|
| 5 |
push back to release | 3 |
| |
drawer from runners |
|
|
Push drawer runners back in.
13b REFIT THE DRAWER ONTO THE RUNNERS
(use 38 mm fixing screws & washers)
![]()
![]()
![]()
![]()
![]()
![]()
![]()
![]()
![]() 2
2
two pairs of formed
2brackets on either side of the chassis
(use 16 mm screws)
14b ![]() INTEGRATED MODELS WITH REMOTE (NZ AU) ONLY -
INTEGRATED MODELS WITH REMOTE (NZ AU) ONLY -
SECURE THE EXTERNAL VENT
|
|
| the | release | tabs | ||
|
|
|
| ||||
|
|
|
| mm |
| ||
Pull | forward | 100 | Ensure the drawer is | ||||
| sides |
| |||||
on | both |
|
|
| |||
|
|
|
| now rotated | |||
|
|
|
|
|
| ||
|
|
|
|
|
|
| |
clockwise back.
5 | 4 |
3
Before refitting the drawer, ensure the hoses are not twisted and the latches at the rear of each drawer runner are facing forward.
1
2
Ensure the release tabs on | 1 |
both sides are reset fully. |
|
2
After routing the vent hose through and out the hole cutout, attach and secure the vent by tightening the four screws provided.
Airflow ![]()
![]()