ASSEMBLY INSTRUCTIONS
Occasionally our products contain components that are |
| |
NOTE: All location references, such as | ||
front, rear, left or right, made in these | ||
protect flooring, or anything else the parts may contact, | ||
instructions are from the user being | ||
with newspaper or cloth. | ||
on the equipment and facing forward. | ||
|
40 year old to get a cardiovascular effect the individual would need to keep their heart rate at or above 126 beats per minute to get a cardiovascular effect. Note: Although 70% was used in this example, the heart rate range needed to achieve results falls between 60% and 85% of your maximum heart rate.
CLOTHING
All exercise clothing should be
Never wear rubberized or plastic clothing, such garments interfere with the evaporation of perspiration and can cause body temperature
Tools Required (included):
Allen Wrench
Multi “T” Tool w/Phillips Screwdriver
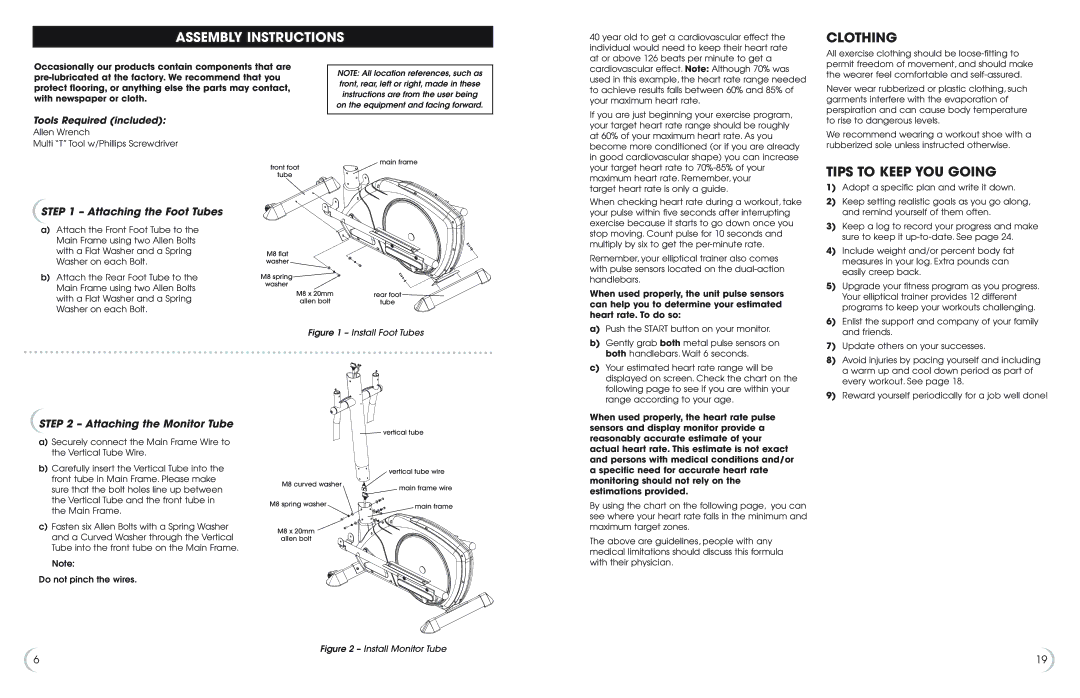
STEP 1 – Attaching the Foot Tubes
a)Attach the Front Foot Tube to the Main Frame using two Allen Bolts with a Flat Washer and a Spring Washer on each Bolt.
b)Attach the Rear Foot Tube to the Main Frame using two Allen Bolts with a Flat Washer and a Spring Washer on each Bolt.
main frame
front foot
tube
M8 flat washer
M8 spring![]() washer
washer
M8 x 20mm | rear foot |
allen bolt | tube |
If you are just beginning your exercise program, your target heart rate range should be roughly at 60% of your maximum heart rate. As you become more conditioned (or if you are already in good cardiovascular shape) you can increase your target heart rate to
target heart rate is only a guide.
When checking heart rate during a workout, take your pulse within five seconds after interrupting exercise because it starts to go down once you stop moving. Count pulse for 10 seconds and multiply by six to get the
Remember, your elliptical trainer also comes with pulse sensors located on the
When used properly, the unit pulse sensors can help you to determine your estimated heart rate. To do so:
to rise to dangerous levels.
We recommend wearing a workout shoe with a rubberized sole unless instructed otherwise.
TIPS TO KEEP YOU GOING
1) | Adopt a specific plan and write it down. |
2) | Keep setting realistic goals as you go along, |
| and remind yourself of them often. |
3) | Keep a log to record your progress and make |
| sure to keep it |
4) | Include weight and/or percent body fat |
| measures in your log. Extra pounds can |
| easily creep back. |
5) | Upgrade your fitness program as you progress. |
| Your elliptical trainer provides 12 different |
| programs to keep your workouts challenging. |
6) | Enlist the support and company of your family |
Figure 1 – Install Foot Tubes
a)Push the START button on your monitor.
b)Gently grab both metal pulse sensors on both handlebars. Wait 6 seconds.
c)Your estimated heart rate range will be displayed on screen. Check the chart on the following page to see if you are within your range according to your age.
| and friends. |
7) | Update others on your successes. |
8) | Avoid injuries by pacing yourself and including |
| a warm up and cool down period as part of |
| every workout. See page 18. |
9) | Reward yourself periodically for a job well done! |
STEP 2 – Attaching the Monitor Tube
a)Securely connect the Main Frame Wire to the Vertical Tube Wire.
b)Carefully insert the Vertical Tube into the front tube in Main Frame. Please make sure that the bolt holes line up between the Vertical Tube and the front tube in the Main Frame.
c)Fasten six Allen Bolts with a Spring Washer and a Curved Washer through the Vertical Tube into the front tube on the Main Frame.
Note:
Do not pinch the wires.
![]() vertical tube
vertical tube
vertical tube wire
M8 curved washer
main frame wire
M8 spring washer | main frame |
|
M8 x 20mm
allen bolt
Figure 2 – Install Monitor Tube
When used properly, the heart rate pulse sensors and display monitor provide a reasonably accurate estimate of your actual heart rate. This estimate is not exact and persons with medical conditions and/or a specific need for accurate heart rate monitoring should not rely on the estimations provided.
By using the chart on the following page, you can see where your heart rate falls in the minimum and maximum target zones.
The above are guidelines, people with any medical limitations should discuss this formula with their physician.
6 | 19 |