STEP 1 – Foot Tube Assembly
Remove the two Carriage Bolts, Washers and Nylon Nuts from both the Front Foot Tube with Rollers and the Rear Foot Tube with Caps.
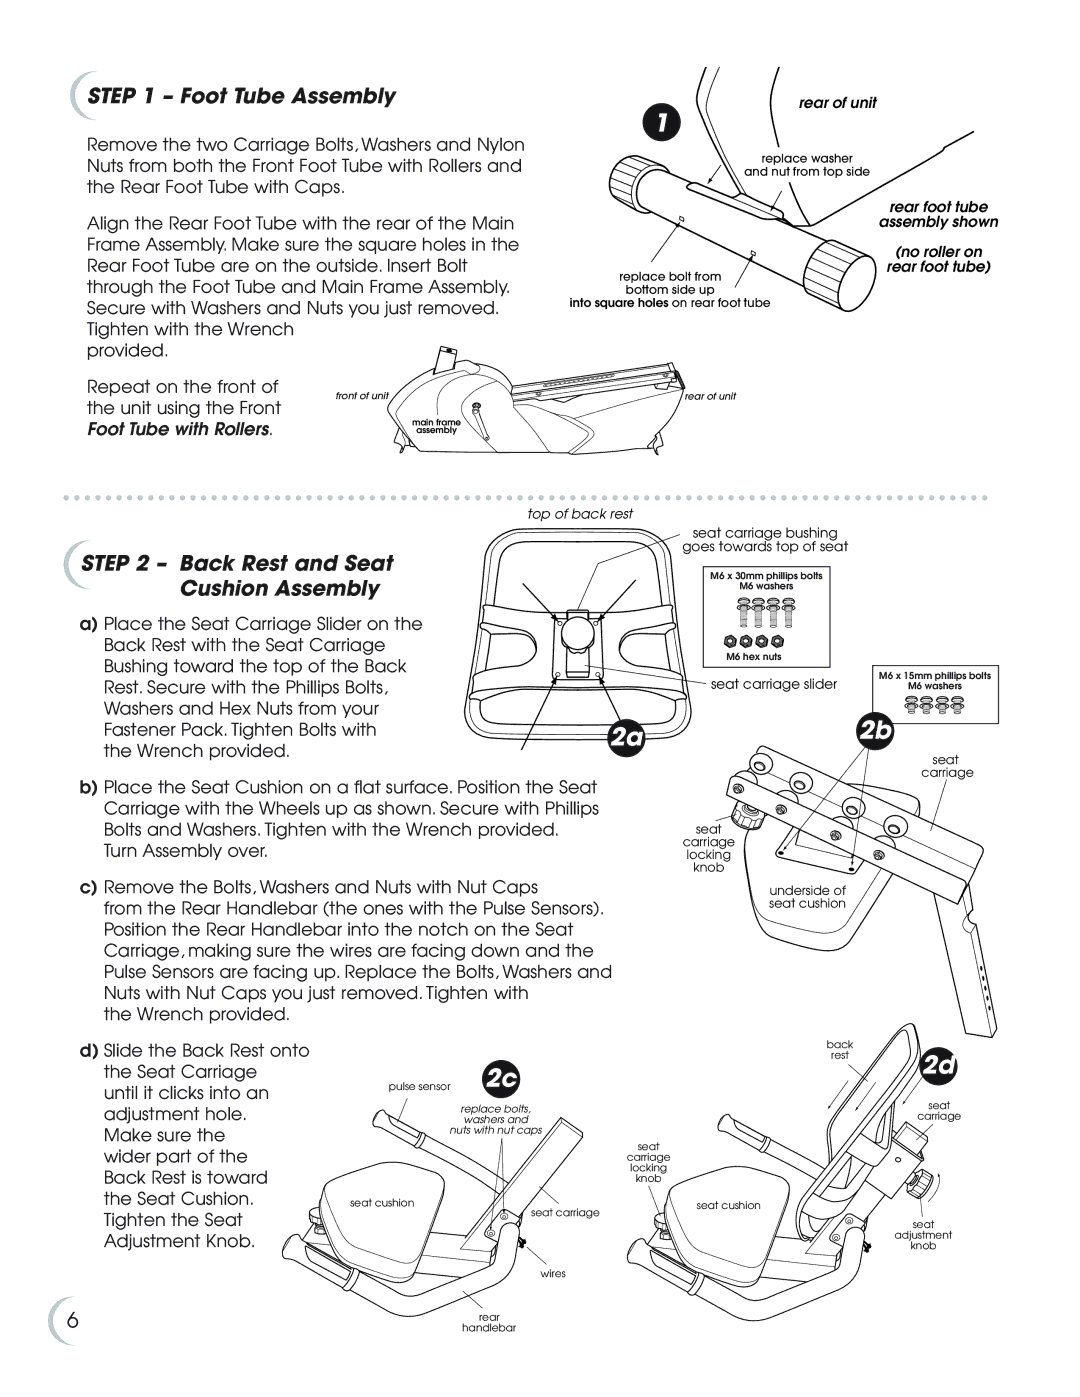
Align the Rear Foot Tube with the rear of the Main Frame Assembly. Make sure the square holes in the
rear of unit
1
replace washer
and nut from top side
rear foot tube
assembly shown
Rear Foot Tube are on the outside. Insert Bolt through the Foot Tube and Main Frame Assembly.
replace bolt from
bottom side up
(no roller on
rear foot tube)
Secure with Washers and Nuts you just removed. Tighten with the Wrench
provided.
into square holes on rear foot tube
Repeat on the front of | front of unit | |
the unit using the Front | ||
main frame | ||
Foot Tube with Rollers. | ||
assembly |
STEP 2 – Back Rest and Seat Cushion Assembly
a)Place the Seat Carriage Slider on the Back Rest with the Seat Carriage Bushing toward the top of the Back Rest. Secure with the Phillips Bolts, Washers and Hex Nuts from your Fastener Pack. Tighten Bolts with
the Wrench provided.
rear of unit
top of back rest
seat carriage bushing
goes towards top of seat
M6 x 30mm phillips bolts
M6 washers
M6 hex nuts
seat carriage slider
2a
M6 x 15mm phillips bolts
M6 washers
2b
seat carriage
b) Place the Seat Cushion on a flat surface. Position the Seat |
|
Carriage with the Wheels up as shown. Secure with Phillips |
|
Bolts and Washers. Tighten with the Wrench provided. | seat |
Turn Assembly over. | carriage |
locking | |
| knob |
c)Remove the Bolts, Washers and Nuts with Nut Caps
from the Rear Handlebar (the ones with the Pulse Sensors). Position the Rear Handlebar into the notch on the Seat Carriage, making sure the wires are facing down and the Pulse Sensors are facing up. Replace the Bolts, Washers and Nuts with Nut Caps you just removed. Tighten with
the Wrench provided.
underside of seat cushion
d)Slide the Back Rest onto the Seat Carriage until it clicks into an adjustment hole.
Make sure the wider part of the Back Rest is toward the Seat Cushion.
Tighten the Seat
Adjustment Knob.
6
|
| back | 2d |
|
| rest | |
| 2c |
| |
pulse sensor |
|
| |
| replace bolts, |
| seat |
|
| carriage | |
| washers and |
| |
nuts with nut caps |
|
| |
|
| seat |
|
|
| carriage |
|
|
| locking |
|
|
| knob |
|
seat cushion | seat carriage | seat cushion |
|
|
| seat | |
|
|
| |
|
|
| adjustment |
|
|
| knob |
| wires |
|
|
| rear |
|
|
| handlebar |
|
|