Model
Basic Recording - 2 (Recording with the rear panel MIC IN jack)
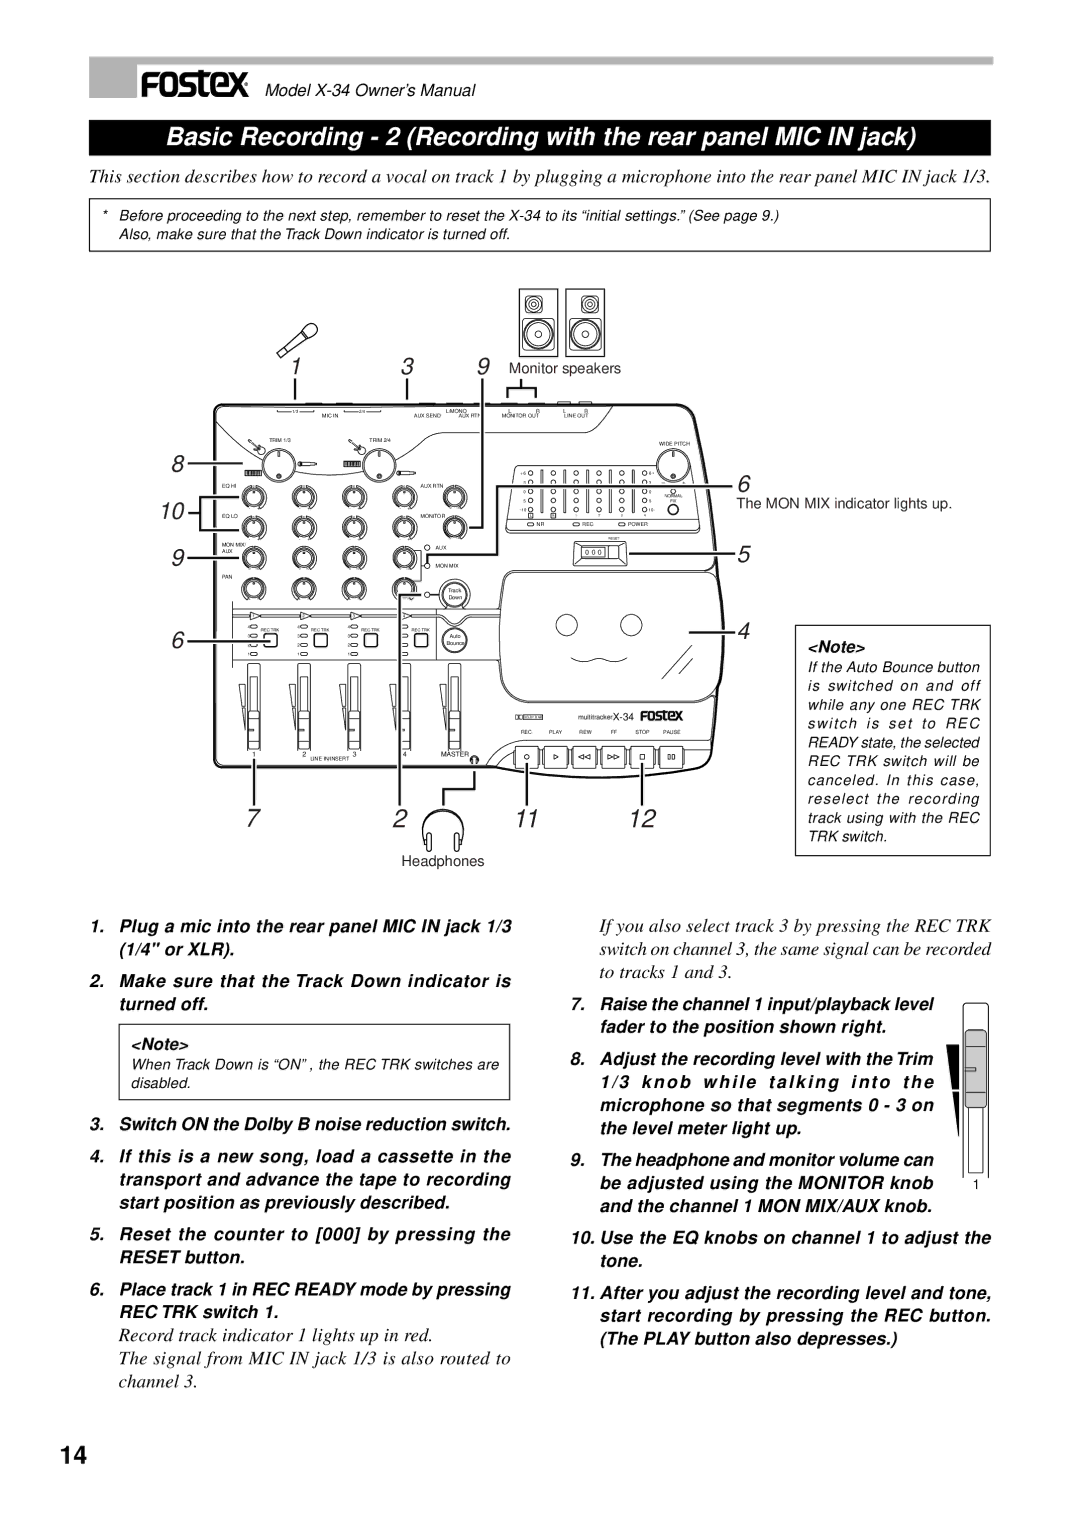
This section describes how to record a vocal on track 1 by plugging a microphone into the rear panel MIC IN jack 1/3.
*Before proceeding to the next step, remember to reset the
|
|
| 1 |
|
|
| 3 |
|
| 9 | Monitor speakers |
|
|
| ||||||
|
|
| 1/3 | MIC IN |
| 2/4 |
|
| L/MONO | R | L | R | L |
| R |
|
|
|
| |
|
|
|
|
|
|
|
| AUX SEND | AUX RTN | MONITOR OUT | LINE OUT |
|
|
|
| |||||
|
| TRIM 1/3 |
|
| TRIM 2/4 |
|
|
|
|
|
|
|
|
|
|
|
| WIDE PITCH | ||
|
|
|
|
|
|
|
|
|
|
|
|
|
|
|
|
|
|
| ||
8 |
|
|
|
|
|
|
|
|
|
|
|
| + 6 |
|
|
|
| 6 + |
|
|
| EQ HI | 0 |
| 0 |
| 0 |
| 0 | AUX RTN |
|
|
| 3 |
|
|
|
| 3 | – | + |
|
|
|
|
|
|
|
|
|
|
|
|
| 0 |
|
|
|
| 0 | NORMAL | |
10 |
|
|
|
|
|
|
|
|
|
|
|
|
|
|
|
|
|
| ||
|
|
|
|
|
|
|
|
|
|
|
| 5 |
|
|
|
| 5 | FIX |
| |
- + | - + | - + | - + | 0 | 10 |
|
| - 10 |
|
|
|
| 10 - |
|
| |||||
|
|
|
|
|
|
|
|
|
| |||||||||||
EQ LO | 0 |
| 0 |
| 0 |
| 0 | MONITOR |
|
|
| L | R | 1 | 2 | 3 | 4 |
|
| |
|
|
|
|
|
|
|
|
|
|
|
| NR |
|
| REC |
| POWER |
|
| |
|
|
|
|
|
|
|
|
|
|
|
|
|
|
|
|
|
| |||
| - | + | - | + | - | + | - | + | 0 | 10 |
|
|
|
|
|
| RESET |
|
|
|
9 | MON MIX/ |
|
|
|
|
|
|
| AUX |
|
|
|
|
|
|
|
|
|
|
|
AUX |
|
|
|
|
|
|
|
|
|
|
|
|
| 0 0 0 |
|
|
|
| ||
|
|
|
|
|
|
|
|
|
|
|
|
|
|
|
|
|
| |||
0 | 10 | 0 | 10 | 0 | 10 | 0 | 10 | MON MIX |
|
|
|
|
|
|
|
|
|
| ||
| PAN |
|
|
|
|
|
|
|
|
|
|
|
|
|
|
|
|
|
|
|
|
|
|
|
|
|
|
|
| Track |
|
|
|
|
|
|
|
|
|
| |
| L | R | L | R | L | R | L | R | Down |
|
|
|
|
|
|
|
|
|
| |
|
| 1 |
| 2 |
| 3 |
| 4 |
|
|
|
|
|
|
|
|
|
|
|
|
6 | 4 | REC TRK | 4 | REC TRK | 4 | REC TRK | 4 | REC TRK |
|
|
|
|
|
|
|
|
|
|
| |
|
|
|
|
|
|
|
|
|
|
|
|
|
|
| ||||||
3 |
| 3 |
| 3 |
| 3 |
| Auto |
|
|
|
|
|
|
|
|
|
| ||
2 |
| 2 |
| 2 |
| 2 |
| Bounce |
|
|
|
|
|
|
|
|
|
| ||
1 |
| 1 |
| 1 |
| 1 |
|
|
|
|
|
|
|
|
|
|
|
|
| |
|
|
|
|
|
|
|
|
|
|
|
|
|
|
|
|
| ||||
|
|
|
|
|
|
|
|
|
|
|
|
| DOLBY B NR |
|
|
|
| |||
|
|
|
|
|
|
|
|
|
|
|
|
|
|
|
|
|
| |||
|
|
|
|
|
|
|
|
|
|
|
|
| REC | PLAY |
| REW | FF | STOP | PAUSE |
|
|
| 1 |
| 2 |
| 3 |
| 4 | MASTER |
|
|
|
|
|
|
|
|
|
| |
|
|
|
| LINE IN/INSERT |
|
|
|
|
|
|
|
|
|
|
|
|
|
|
| |
| 7 |
|
|
|
| 2 |
|
|
|
| 11 |
|
|
|
| 12 |
|
| ||
|
|
|
|
|
|
|
| Headphones |
|
|
|
|
|
|
|
|
| |||
6
The MON MIX indicator lights up.
5
4
<Note>
If the Auto Bounce button is switched on and off while any one REC TRK switch is set to REC READY state, the selected REC TRK switch will be canceled. In this case, reselect the recording track using with the REC TRK switch.
1.Plug a mic into the rear panel MIC IN jack 1/3 (1/4" or XLR).
2.Make sure that the Track Down indicator is turned off.
<Note>
When Track Down is “ON” , the REC TRK switches are disabled.
3.Switch ON the Dolby B noise reduction switch.
4.If this is a new song, load a cassette in the transport and advance the tape to recording start position as previously described.
5.Reset the counter to [000] by pressing the RESET button.
6.Place track 1 in REC READY mode by pressing REC TRK switch 1.
Record track indicator 1 lights up in red.
The signal from MIC IN jack 1/3 is also routed to channel 3.
If you also select track 3 by pressing the REC TRK switch on channel 3, the same signal can be recorded to tracks 1 and 3.
7.Raise the channel 1 input/playback level fader to the position shown right.
8.Adjust the recording level with the Trim 1 / 3 k n o b w h i l e t a l k i n g i n t o t h e microphone so that segments 0 - 3 on the level meter light up.
9.The headphone and monitor volume can
be adjusted using the MONITOR knob | 1 |
and the channel 1 MON MIX/AUX knob. |
|
10.Use the EQ knobs on channel 1 to adjust the tone.
11.After you adjust the recording level and tone, start recording by pressing the REC button. (The PLAY button also depresses.)
14