Window Installation Instructions for 6000, 8000, and 10,000 BTU Units (models AS_06, AS_08, and AS_10)
Read completely, then follow
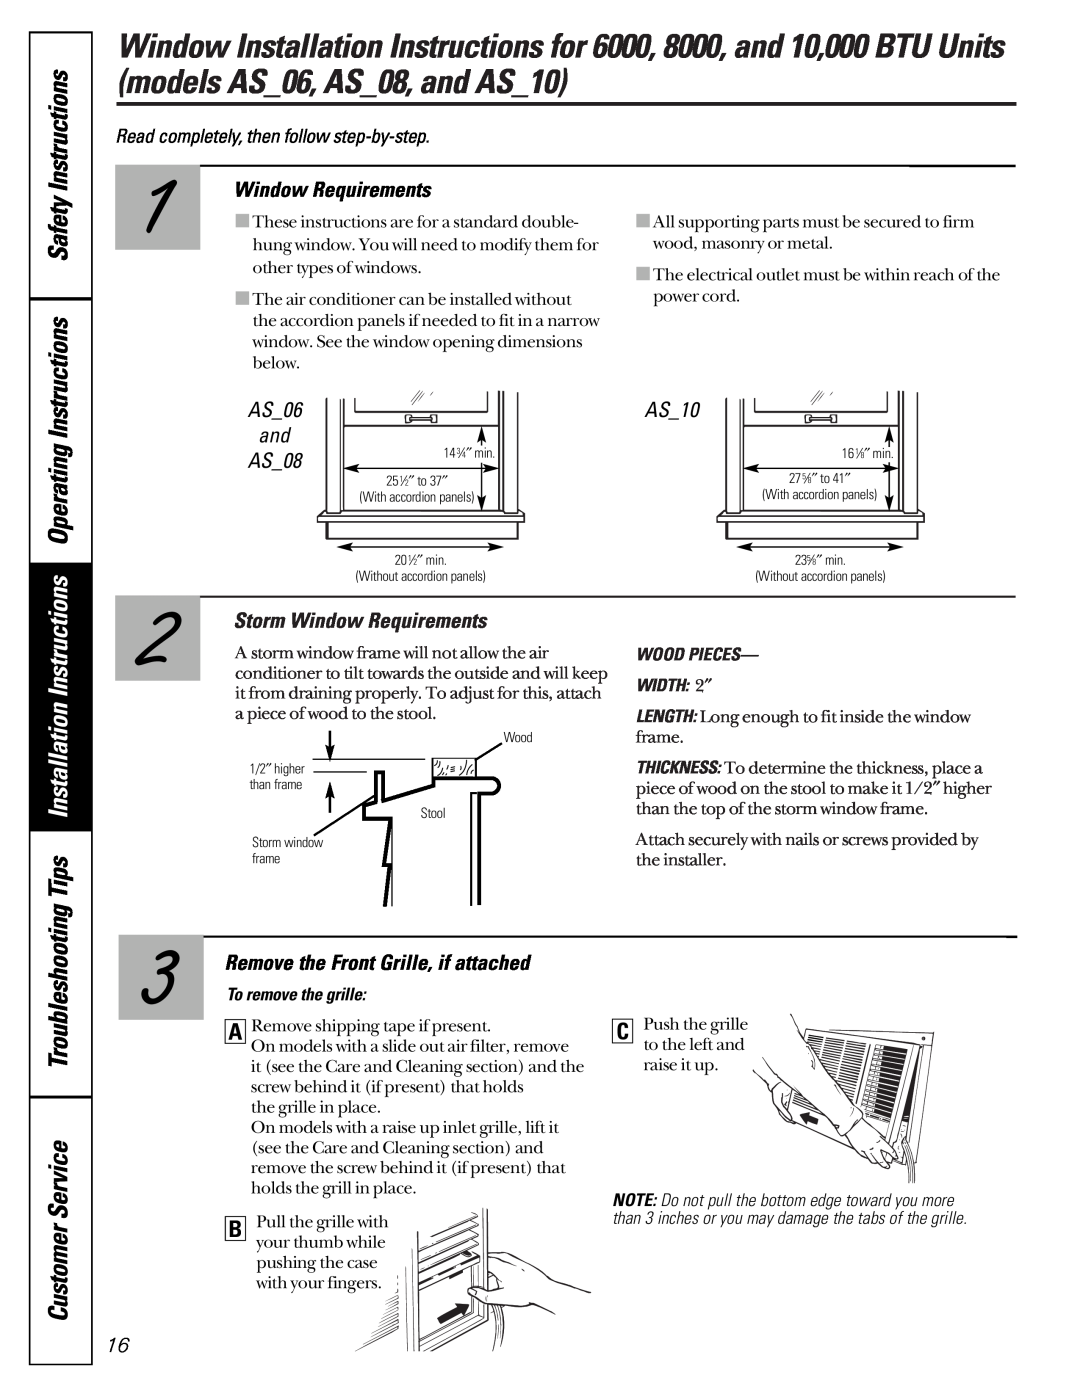
1 | Window Requirements |
■These instructions are for a standard double- | |
hung window. You will need to modify them for |
other types of windows.
■The air conditioner can be installed without the accordion panels if needed to fit in a narrow window. See the window opening dimensions below.
■All supporting parts must be secured to firm wood, masonry or metal.
■The electrical outlet must be within reach of the power cord.
AS_06 |
| AS_10 | |
and | 143⁄4″ min. | 161⁄8″ min. | |
AS_08 | |||
| 275⁄8″ to 41″ | ||
1 ″ | ″ | ||
25 ⁄2 | to 37 | (With accordion panels) | |
(With accordion panels) | |||
201⁄2″ min. | 235⁄8″ min. | ||
(Without accordion panels) | (Without accordion panels) | ||
Installation Instructions OperatingInstructions SafetyInstructions
2 | Storm Window Requirements | ||||||||||||||||||
A storm window frame will not allow the air | |||||||||||||||||||
conditioner to tilt towards the outside and will keep | |||||||||||||||||||
| it from draining properly. To adjust for this, attach | ||||||||||||||||||
| a piece of wood to the stool. | ||||||||||||||||||
|
|
|
|
|
|
|
|
|
|
|
|
|
|
|
|
|
|
|
|
|
|
|
|
|
|
|
|
|
|
|
|
|
|
|
|
|
| Wood |
|
|
|
|
|
|
|
|
|
|
|
|
|
|
|
|
|
|
|
|
|
|
|
|
|
|
|
|
|
|
|
|
|
|
|
|
|
|
|
| |
|
| 1/2″ higher |
|
|
|
|
|
|
|
|
|
|
|
|
|
| |||
|
|
|
|
|
|
|
|
|
|
|
|
|
|
|
|
| |||
|
| than frame |
|
|
|
|
|
|
|
|
|
|
|
|
|
| |||
|
|
|
|
|
|
|
|
|
|
|
| Stool |
|
|
|
|
| ||
|
|
|
|
|
|
|
|
|
|
|
|
|
|
|
|
| |||
|
|
| Storm window |
|
|
|
|
|
|
|
|
| |||||||
|
|
| frame |
|
|
|
|
|
|
|
| ||||||||
|
|
|
|
|
|
|
|
|
|
|
|
|
|
|
|
|
|
|
|
|
|
|
|
|
|
|
|
|
|
|
|
|
|
|
|
|
|
|
|
WOOD PIECES—
WIDTH: 2″
LENGTH: Long enough to fit inside the window frame.
THICKNESS: To determine the thickness, place a piece of wood on the stool to make it 1/2″ higher than the top of the storm window frame.
Attach securely with nails or screws provided by the installer.
TroubleshootingTips
CustomerService
3
16
Remove the Front Grille, if attached
To remove the grille:
ARemove shipping tape if present.
On models with a slide out air filter, remove it (see the Care and Cleaning section) and the screw behind it (if present) that holds
the grille in place.
On models with a raise up inlet grille, lift it (see the Care and Cleaning section) and remove the screw behind it (if present) that holds the grill in place.
B | Pull the grille with |
| your thumb while |
| |
| pushing the case |
| with your fingers. |
CPush the grille to the left and
raise it up.
NOTE: Do not pull the bottom edge toward you more than 3 inches or you may damage the tabs of the grille.