Care and cleaning of the range.

Operating Instructions Safety Instructions

Installation

Instructions


Troubleshooting Tips

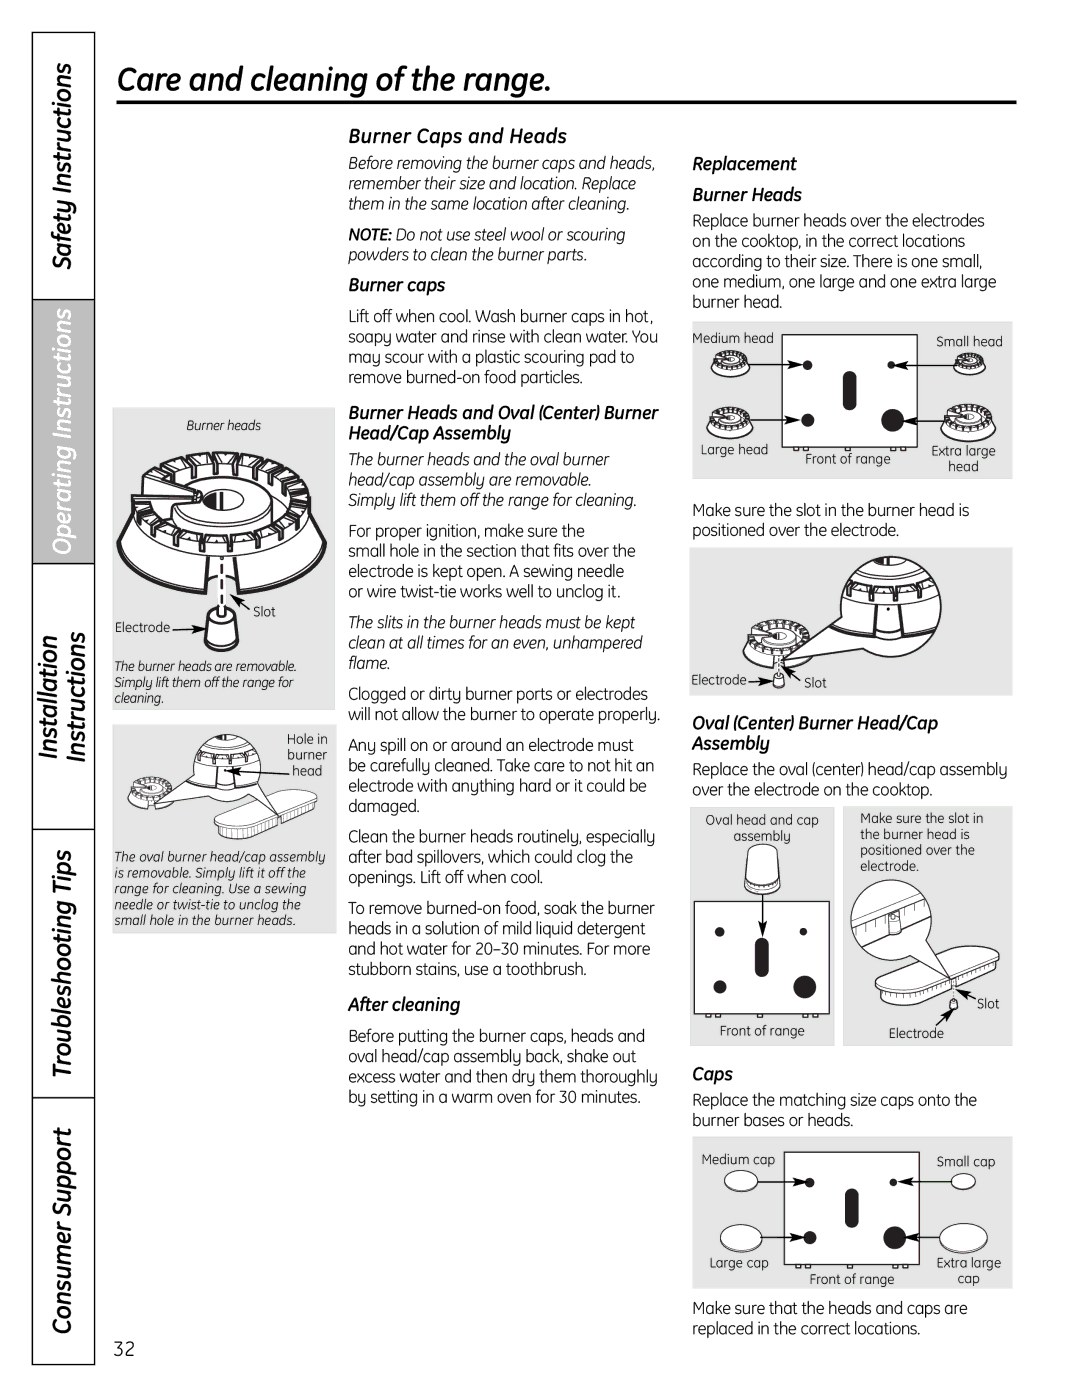
Burner heads

Slot

Electrode

The burner heads are removable. Simply lift them off the range for cleaning.

Hole in burner head

The oval burner head/cap assembly is removable. Simply lift it off the range for cleaning. Use a sewing needle or twist-tie to unclog the small hole in the burner heads.

Burner Caps and Heads

Before removing the burner caps and heads, remember their size and location. Replace them in the same location after cleaning.

NOTE: Do not use steel wool or scouring powders to clean the burner parts.

Burner caps

Lift off when cool. Wash burner caps in hot, soapy water and rinse with clean water. You may scour with a plastic scouring pad to remove burned-on food particles.

Burner Heads and Oval (Center) Burner Head/Cap Assembly

The burner heads and the oval burner head/cap assembly are removable. Simply lift them off the range for cleaning.

For proper ignition, make sure the

small hole in the section that fits over the electrode is kept open. A sewing needle or wire twist-tie works well to unclog it.

The slits in the burner heads must be kept clean at all times for an even, unhampered flame.

Clogged or dirty burner ports or electrodes will not allow the burner to operate properly.

Any spill on or around an electrode must be carefully cleaned. Take care to not hit an electrode with anything hard or it could be damaged.

Clean the burner heads routinely, especially after bad spillovers, which could clog the openings. Lift off when cool.

To remove burned-on food, soak the burner heads in a solution of mild liquid detergent and hot water for 20–30 minutes. For more stubborn stains, use a toothbrush.

After cleaning

Before putting the burner caps, heads and oval head/cap assembly back, shake out excess water and then dry them thoroughly by setting in a warm oven for 30 minutes.

Replacement

Burner Heads

Replace burner heads over the electrodes on the cooktop, in the correct locations according to their size. There is one small, one medium, one large and one extra large burner head.

Medium head


Small head

Large head


Extra large


Front of range


head


Make sure the slot in the burner head is positioned over the electrode.

Electrode Slot

Oval (Center) Burner Head/Cap Assembly

Replace the oval (center) head/cap assembly over the electrode on the cooktop.

Oval head and cap

Make sure the slot in

assembly

the burner head is


positioned over the


electrode.

Slot

Front of range

Electrode

Caps

Replace the matching size caps onto the burner bases or heads.

Consumer Support

Medium cap

Large cap

Small cap


Extra large


Front of range


cap

Make sure that the heads and caps are replaced in the correct locations.

32

Page 32
Image 32
GE P2B918 installation instructions Burner Caps and Heads

P2B918 specifications

The GE P2B918 is a cutting-edge appliance that exemplifies the intersection of innovative technology and user-centered design. This model stands out due to its advanced features tailored to meet the demands of modern households while promoting energy efficiency and convenience.

At the core of the GE P2B918 is its highly efficient cooling system, which utilizes advanced temperature management technology. This feature ensures that food is stored at optimal temperatures, maintaining freshness and extending shelf life. The cooling system incorporates an advanced air circulation mechanism that prevents warm spots and provides consistent temperatures throughout.

The P2B918 also boasts an intuitive smart control panel, allowing users to easily adjust settings and monitor appliance performance. The digital display provides real-time feedback and notifications about temperature adjustments, making it user-friendly and accessible for everyone in the household. Moreover, the integrated Wi-Fi capability enables remote access through a compatible smartphone app, giving users the ability to manage their appliance from anywhere.

Another impressive characteristic of the GE P2B918 is its spacious interior, creatively designed to maximize storage capacity. The adjustable shelving and specialized compartments cater to various food items, providing flexibility and organization. This organization minimizes clutter and makes it easier to find and access ingredients.

Energy efficiency is a key highlight of the GE P2B918, which is designed to consume less energy while providing maximum performance. It adheres to stringent energy guidelines, helping consumers save on electricity bills while supporting eco-friendly initiatives. Additionally, the appliance employs LED lighting that enhances visibility inside the refrigerator, consuming less energy than traditional bulbs.

In terms of aesthetics, the GE P2B918 presents a sleek, modern design that fits seamlessly into contemporary kitchens. Available in a variety of finishes, including stainless steel and matte colors, it offers options for different decor styles while ensuring durability and easy maintenance.

With its combination of innovative features, superior technology, and stylish design, the GE P2B918 stands out as an exceptional choice for consumers seeking a reliable and efficient appliance that enhances their kitchen experience. Whether it's its cooling technology, smart controls, or energy-efficient capabilities, the P2B918 embodies what modern appliances should aspire to be.