Instrucciones para la instalación

INSTALACIÓN—VENTILACIÓN HACIA EL EXTERIOR

UBICACIÓN DE LOS CONDUCTOS Y CABLEADO

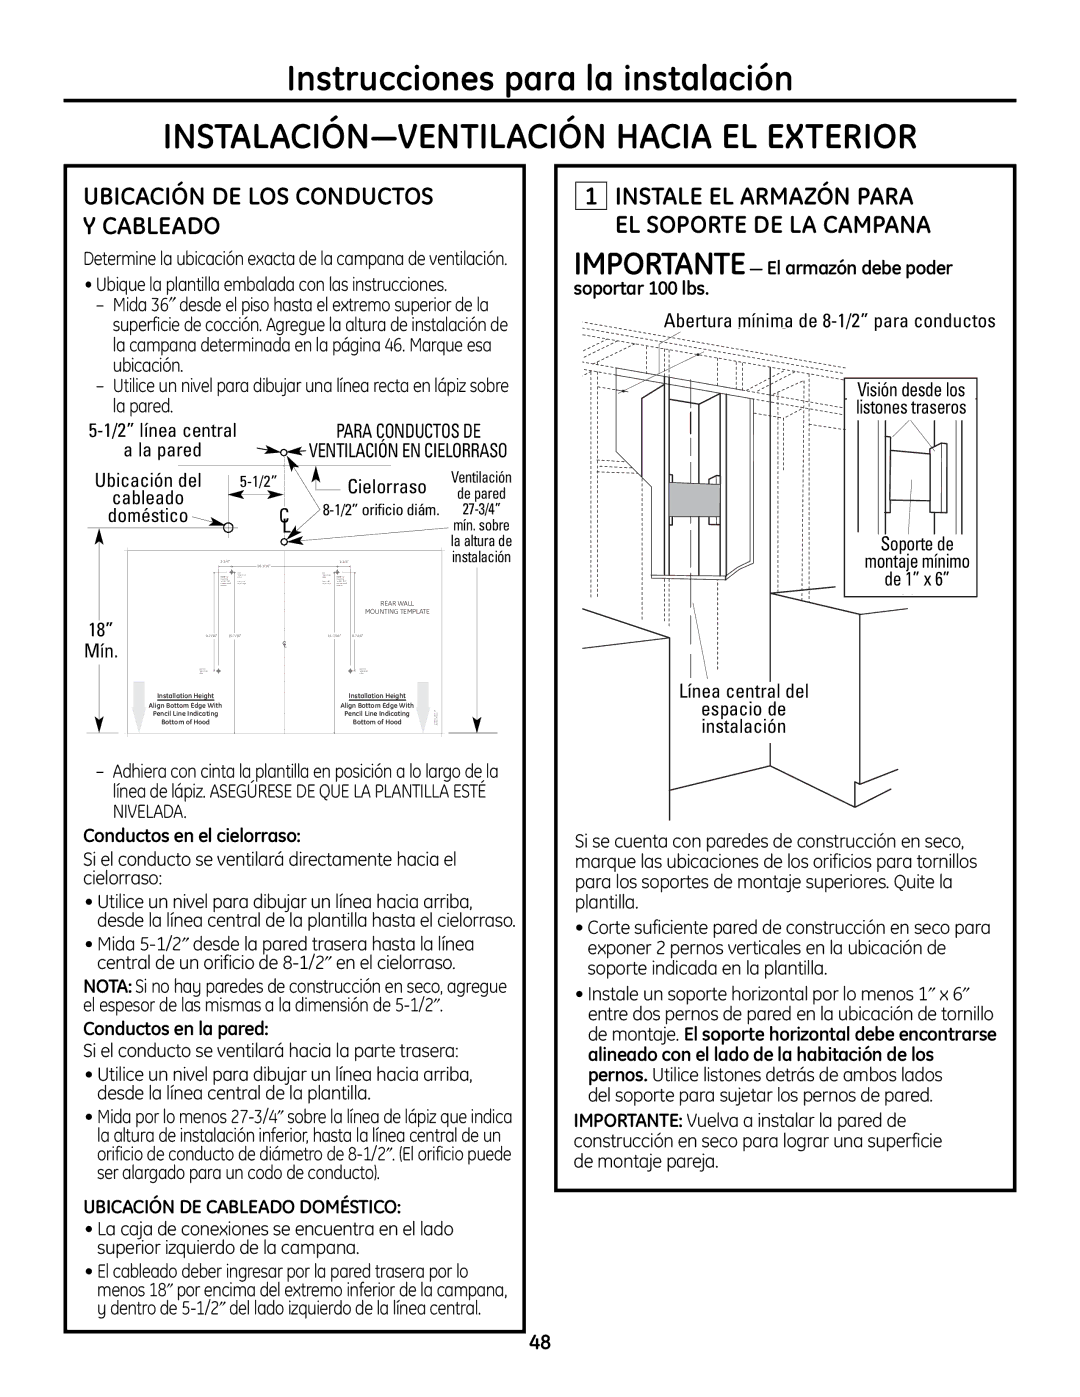
Determine la ubicación exacta de la campana de ventilación.

Ubique la plantilla embalada con las instrucciones.

Mida 36desde el piso hasta el extremo superior de la superficie de cocción. Agregue la altura de instalación de la campana determinada en la página 46. Marque esa ubicación.

Utilice un nivel para dibujar una línea recta en lápiz sobre la pared.


5-1/2” línea central


PARA CONDUCTOS DE


a la pared


VENTILACIÓN EN CIELORRASO


Ventilación


Ubicación del


5-1/2”


Cielorraso


cableado


de pared


doméstico


C


8-1/2” orificio diám.


27-3/4”


L


mín. sobre


la altura de


1-1/4


1-1/4


instalación


10-1/16


REAR WALL


MOUNTING TEMPLATE


18”


9-7/16


15-7/16


15-7/16


9-7/16


Mín.


C


L


Installation Height


Installation Height


Align Bottom Edge With


Align Bottom Edge With


Pencil Line Indicating


Pencil Line Indicating


Bottom of Hood


Bottom of Hood


Adhiera con cinta la plantilla en posición a lo largo de la línea de lápiz. ASEGÚRESE DE QUE LA PLANTILLA ESTÉ NIVELADA.

Conductos en el cielorraso:

Si el conducto se ventilará directamente hacia el cielorraso:

Utilice un nivel para dibujar un línea hacia arriba, desde la línea central de la plantilla hasta el cielorraso.

Mida 5-1/2desde la pared trasera hasta la línea central de un orificio de 8-1/2en el cielorraso.

NOTA: Si no hay paredes de construcción en seco, agregue el espesor de las mismas a la dimensión de 5-1/2.

Conductos en la pared:

Si el conducto se ventilará hacia la parte trasera:

Utilice un nivel para dibujar un línea hacia arriba, desde la línea central de la plantilla.

Mida por lo menos 27-3/4sobre la línea de lápiz que indica

la altura de instalación inferior, hasta la línea central de un orificio de conducto de diámetro de 8-1/2. (El orificio puede ser alargado para un codo de conducto).

UBICACIÓN DE CABLEADO DOMÉSTICO:

La caja de conexiones se encuentra en el lado superior izquierdo de la campana.

El cableado deber ingresar por la pared trasera por lo menos 18por encima del extremo inferior de la campana, y dentro de 5-1/2del lado izquierdo de la línea central.

1INSTALE EL ARMAZÓN PARA EL SOPORTE DE LA CAMPANA

IMPORTANTEEl armazón debe poder soportar 100 lbs.

Abertura mínima de 8-1/2” para conductos

Visión desde los listones traseros

Soporte de

montaje mínimo

de 1” x 6”

Línea central del

espacio de instalación

Si se cuenta con paredes de construcción en seco, marque las ubicaciones de los orificios para tornillos para los soportes de montaje superiores. Quite la plantilla.

Corte suficiente pared de construcción en seco para exponer 2 pernos verticales en la ubicación de soporte indicada en la plantilla.

Instale un soporte horizontal por lo menos 1x 6entre dos pernos de pared en la ubicación de tornillo de montaje. El soporte horizontal debe encontrarse alineado con el lado de la habitación de los pernos. Utilice listones detrás de ambos lados

del soporte para sujetar los pernos de pared.

IMPORTANTE: Vuelva a instalar la pared de construcción en seco para lograr una superficie de montaje pareja.

48

Page 48
Image 48
GE ZV830 INSTALACIÓN-VENTILACIÓN Hacia EL Exterior, Ubicación DE LOS Conductos Y Cableado, Ubicación DE Cableado Doméstico

ZV830 specifications

The GE ZV830 is a groundbreaking and sophisticated addition to the lineup of kitchen appliances, designed to elevate both functionality and aesthetics. Packed with a range of advanced features, the ZV830 stands out as a state-of-the-art microwave that not only meets but exceeds modern culinary demands.

One of the standout characteristics of the GE ZV830 is its sleek and modern design, which seamlessly integrates into any kitchen decor. The appliance features a stainless-steel finish that is not only visually appealing but also easy to clean, making it a practical choice for busy homeowners. The unit is designed for installation over a range or cooktop, freeing up counter space while providing powerful cooking capabilities.

The ZV830 is equipped with a robust 1.7 cubic feet capacity, providing ample space for cooking large dishes or multiple items simultaneously. This microwave offers an impressive 1,000 watts of cooking power, ensuring quick and efficient heating, defrosting, and cooking of food.

One of the key technologies implemented in the GE ZV830 is its sensor cooking feature. This advanced technology allows the microwave to automatically adjust cooking times and power levels based on the moisture released from the food. As a result, users can achieve perfectly cooked meals without the guesswork traditionally associated with microwave cooking.

Additionally, the GE ZV830 boasts a range of convenient cooking presets and auto-reheat options, streamlining meal preparation. Features such as popcorn settings and pizza reheating options make it a versatile tool for any kitchen. The unit also includes a dedicated steam function, which is perfect for health-conscious individuals looking to prepare steamed vegetables easily.

Highly regarded for its user-friendly interface, the GE ZV830 includes a large LED display that provides clear visibility of cooking settings and times. The straightforward keypad allows for easy input, making it accessible for all users, including those less familiar with kitchen technology.

Furthermore, the GE ZV830 is designed with safety in mind. It includes child lock features to prevent unintended use, offering peace of mind for families. In conclusion, the GE ZV830 is an exemplary microwave that combines design, performance, and innovative technology to enhance the cooking experience. Its advanced features and user-centric design make it a valuable addition to any modern kitchen.