Operation
Night Mode
Night mode is available with some Dolby Digital programs, if it has been encoded in the material. It compresses the peak sound levels, maintaining the intelligibility of the dialogue and quieter passages, while reducing the loudness of special effects and louder passages to avoid disturbing others. Night Mode is accessed from the Audio Effects menu. Press the Audio Effects Button and scroll down to the Night Mode line. Three levels of compression are available:
Off: At this setting, there is no compression, as the Night mode is deactivated.
Half: A mild compression is applied.
Full: More compression is applied.
Feel free to experiment and simply cycle through all of the available surround modes at any time; you cannot cause any problems for the AVR 355/ AVR 255 by doing so.
NOTE: To access 6.1- and 7.1-channel modes, such as Dolby Digital EX, DTS-ES, Logic 7 (7.1 modes), DTS Neo:6 (6.1 modes), and 7-channel Stereo, you must enable the surround back channels as explained in the Manual Setup section. You should not enable these channels if you don’t have surround back speakers in your system.
Tape Recording
In normal operation, the audio or video source selected for listening through the AVR is sent to the record outputs. This means that any program you are watching or listening to may be record- ed simply by placing machines connected to the outputs for Analog Outputs or Video 1 Outputs in the record mode.
When a digital audio recorder is connected to the Coaxial Digital Output , you are able to record the digital signal using a CD-R, MiniDisc or other digital recording system.
NOTES:
•The digital outputs are active only when a digi- tal signal is present, and they do not convert an analog input to a digital signal, or change the for- mat of the digital signal (e.g. Dolby Digital to PCM or vice versa). In additon, the digital recorder must be compatible with the output signal. For example,the PCM digital output from a CD player may be recorded on a CD-R or MiniDisc, but Dolby Digital or DTS signals may not.
•To make an analog recording from a digital source is possible, but only from a PCM source (not Dolby Digital or DTS) and correctly only with "Surround Off" mode (with any Surround mode only the L/R front signals will be fed to the record outputs).
Using  (AVR 355 only)
When Harman Kardon’s (optional) is connected and a compatible Apple® iPod® is
docked in The Bridge, press the  DMP Selector Button C on the Remote Control or the Source List @ followed by the Up/Down Arrows to choose the iPod as the input source allowing playback of audio, video and still-image materials on your iPod through your high-quality
audio/video system. Pressing the  DMP Selector Button C will also activate the AVR remote’s control codes for the iPod, and you may also use the front-panel controls to operate the iPod.
When The Bridge is properly connected and a compatible iPod is properly docked, the Upper Display Line # will read DMP/ CONNECTED. Once that message appears, use the remote or front-panel buttons to control the iPod. See the Function List Table on page 46 for a listing of the remote control buttons that have been programmed to control the iPod.
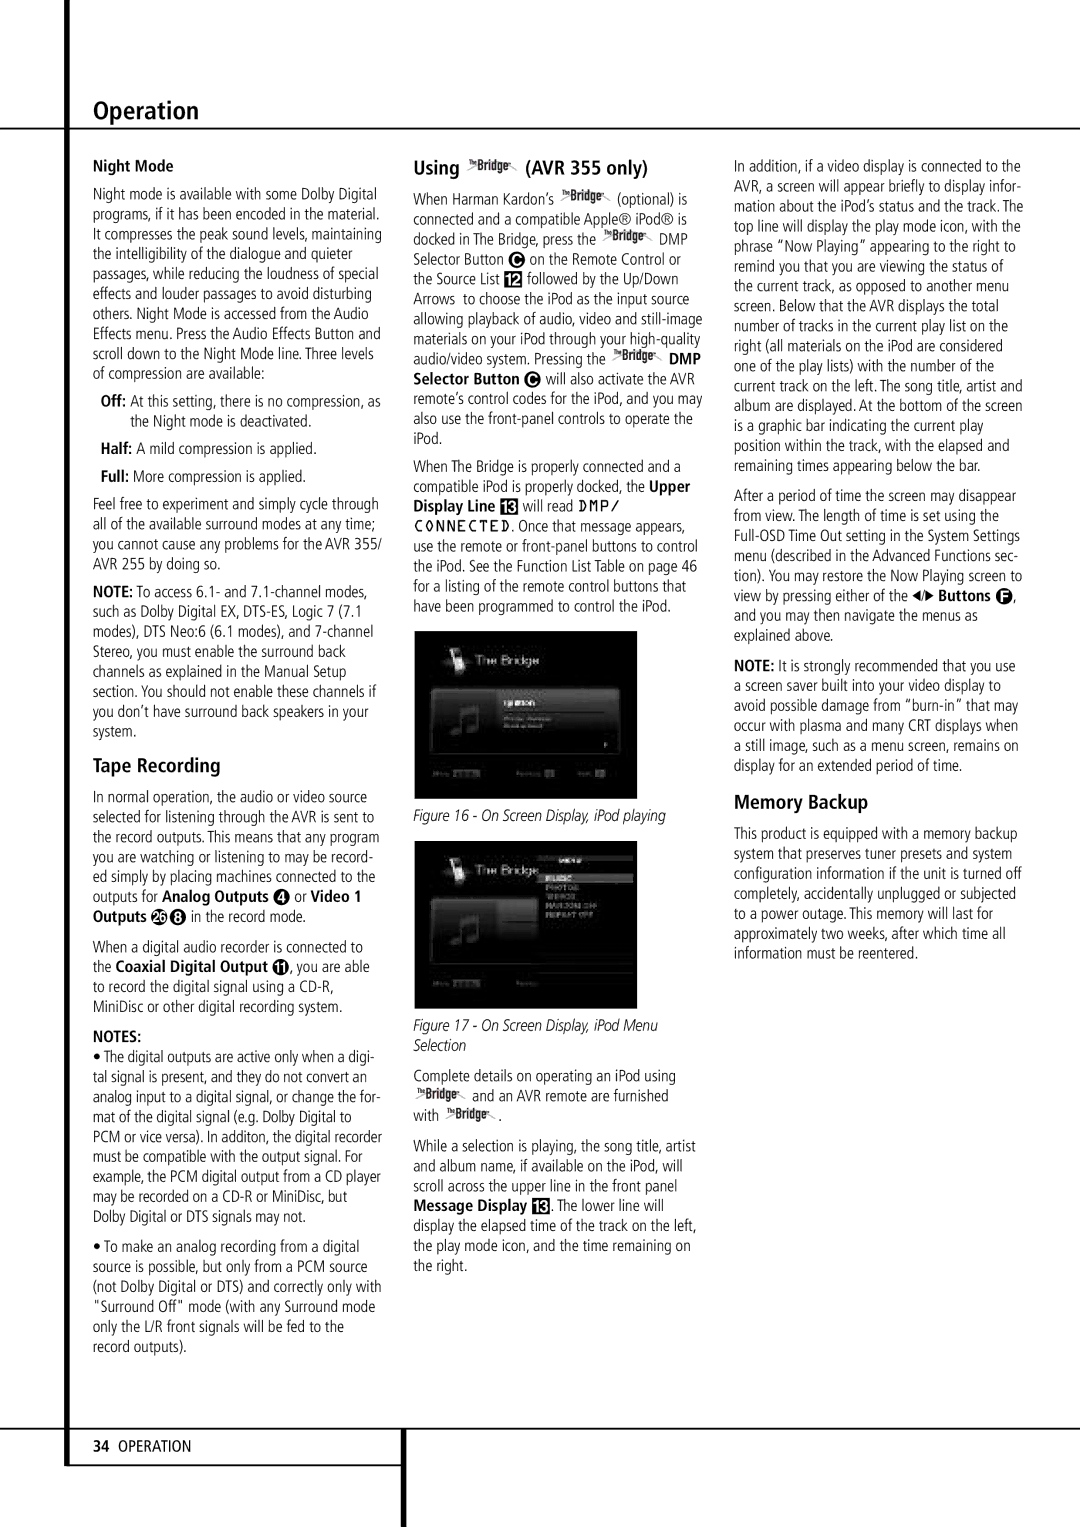
Figure 16 - On Screen Display, iPod playing
Figure 17 - On Screen Display, iPod Menu Selection
Complete details on operating an iPod using  and an AVR remote are furnished
with  .
.
While a selection is playing, the song title, artist and album name, if available on the iPod, will scroll across the upper line in the front panel Message Display #. The lower line will display the elapsed time of the track on the left, the play mode icon, and the time remaining on the right.
In addition, if a video display is connected to the AVR, a screen will appear briefly to display infor- mation about the iPod’s status and the track. The top line will display the play mode icon, with the phrase “Now Playing” appearing to the right to remind you that you are viewing the status of the current track, as opposed to another menu screen. Below that the AVR displays the total number of tracks in the current play list on the right (all materials on the iPod are considered one of the play lists) with the number of the current track on the left. The song title, artist and album are displayed. At the bottom of the screen is a graphic bar indicating the current play position within the track, with the elapsed and remaining times appearing below the bar.
After a period of time the screen may disappear from view. The length of time is set using the Full-OSD Time Out setting in the System Settings menu (described in the Advanced Functions sec- tion). You may restore the Now Playing screen to view by pressing either of the ‹/› Buttons F, and you may then navigate the menus as explained above.
NOTE: It is strongly recommended that you use a screen saver built into your video display to avoid possible damage from “burn-in” that may occur with plasma and many CRT displays when a still image, such as a menu screen, remains on display for an extended period of time.
Memory Backup
This product is equipped with a memory backup system that preserves tuner presets and system configuration information if the unit is turned off completely, accidentally unplugged or subjected to a power outage. This memory will last for approximately two weeks, after which time all information must be reentered.