Troubleshooting (continued)
Symptom | Possible Cause | Corrective Action |
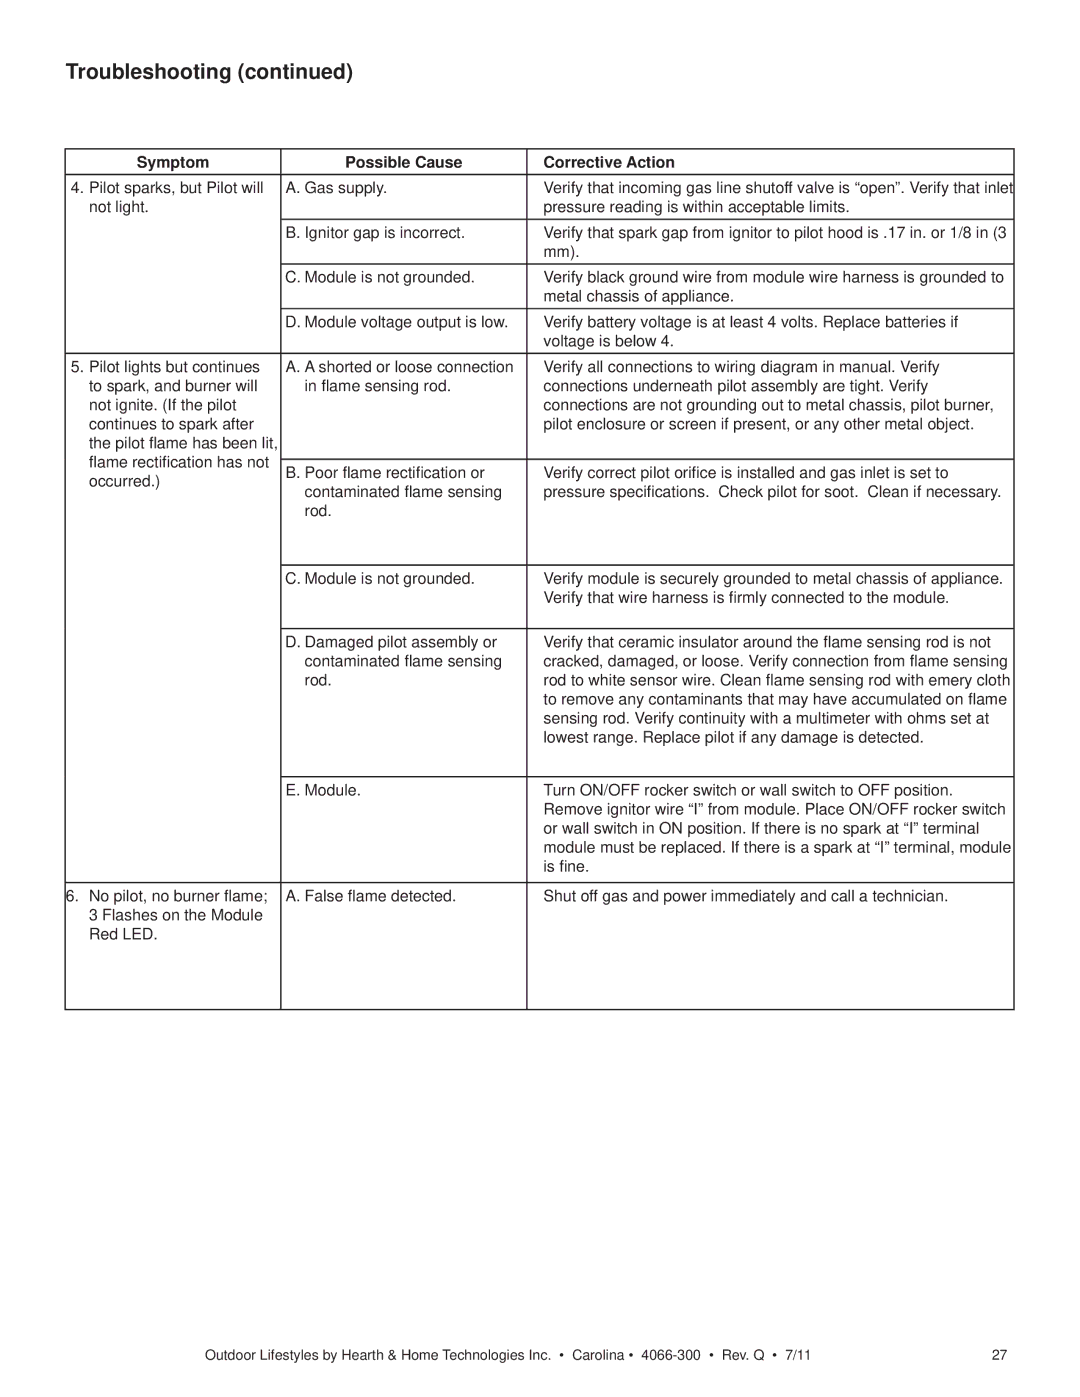
4. Pilot sparks, but Pilot will | A. Gas supply. | Verify that incoming gas line shutoff valve is “open”. Verify that inlet |
not light. |
| pressure reading is within acceptable limits. |
| B. Ignitor gap is incorrect. | Verify that spark gap from ignitor to pilot hood is .17 in. or 1/8 in (3 |
|
| mm). |
| C. Module is not grounded. | Verify black ground wire from module wire harness is grounded to |
|
| metal chassis of appliance. |
| D. Module voltage output is low. | Verify battery voltage is at least 4 volts. Replace batteries if |
|
| voltage is below 4. |
5. Pilot lights but continues | A. A shorted or loose connection | Verify all connections to wiring diagram in manual. Verify |
to spark, and burner will | in flame sensing rod. | connections underneath pilot assembly are tight. Verify |
not ignite. (If the pilot |
| connections are not grounding out to metal chassis, pilot burner, |
continues to spark after |
| pilot enclosure or screen if present, or any other metal object. |
the pilot flame has been lit, |
|
|
flame rectification has not |
|
|
B. Poor flame rectification or | Verify correct pilot orifice is installed and gas inlet is set to | |
occurred.) | contaminated flame sensing | pressure specifications. Check pilot for soot. Clean if necessary. |
| ||
| rod. |
|
|
|
|
| C. Module is not grounded. | Verify module is securely grounded to metal chassis of appliance. |
|
| Verify that wire harness is firmly connected to the module. |
|
|
|
| D. Damaged pilot assembly or | Verify that ceramic insulator around the flame sensing rod is not |
| contaminated flame sensing | cracked, damaged, or loose. Verify connection from flame sensing |
| rod. | rod to white sensor wire. Clean flame sensing rod with emery cloth |
|
| to remove any contaminants that may have accumulated on flame |
|
| sensing rod. Verify continuity with a multimeter with ohms set at |
|
| lowest range. Replace pilot if any damage is detected. |
|
|
|
| E. Module. | Turn ON/OFF rocker switch or wall switch to OFF position. |
|
| Remove ignitor wire “I” from module. Place ON/OFF rocker switch |
|
| or wall switch in ON position. If there is no spark at “I” terminal |
|
| module must be replaced. If there is a spark at “I” terminal, module |
|
| is fine. |
|
|
|
6. No pilot, no burner flame; | A. False flame detected. | Shut off gas and power immediately and call a technician. |
3 Flashes on the Module |
|
|
Red LED. |
|
|
|
|
|
Outdoor Lifestyles by Hearth & Home Technologies Inc. • Carolina • | 27 |