A MAJOR CAUSE OF VENT RELATED FIRES IS FAIL- URE TO MAINTAIN REQUIRED CLEARANCES (AIR SPACES) TO COMBUSTIBLE MATERIALS. IT IS OF THE UTMOST IMPORTANCE THAT DURACHIMNEY II BE INSTALLED ONLY IN ACCORDANCE WITH THESE INSTRUCTIONS.

B. Clearances

Always allow at least a 2-inch clearance between Dura- Chimney II Pipe and any combustible materials. Never fill any required clearance space with insulation or any other materials. Combustible materials include lumber, plywood, sheetrock, plaster and lath, furniture, curtains, electrical wiring, and building insulation.

C. Installation Notes

Proper planning for your DuraChimney II installation will result in greater safety, efficiency, and convenience, as well as saving time and money. You must use only authorized DuraChimney II parts to maintain a listed chimney system. Do not mix parts or try to match with other products or use improvised solutions. Do not install damaged or modi- fied parts. Practice good workmanship. Sloppy work could jeopardize your chimney’s safety. Keep electrical wiring and building insulation away from all chimneys. When deciding the location of your chimney, try to avoid modifi- cations to roof beams and other structural components of the building. If you have any questions, contact either your dealer or Simpson Dura-Vent directly.

D. Frame Openings

From the ceiling, drop a plumb bob to the center of the

fireplace’s flue outlet and mark this center point on the ceil- ing. Mark appropriate cutting lines around the center point. Cut a square hole in the ceiling. Frame a level, square opening centered over the hole that you have cut. Frame openings at each floor level above the Fireplace (Figure 8.2). These openings are to hold the Firestop and Attic Insulation shield. Locate each opening by dropping a plumb bob to the four corners of the opening below. Maintain the minimum 2-inch clearance/air space. Maintain the minimum clearances and dimensions as specified in Table 8.1.

Table 8.2

Diameter

Framing Dimension

14”

21” X 21”

E. Cut Roof Opening

Determine and cut an opening in the roof directly above the opening below, and at least 4-inches larger than the chimney’s outside diameter to provide at least a 2-inch clearance all around the chimney. The chimney must be centered within this opening and maintain the minimum 2- inch clearance to combustibles.

F. Install Firestop

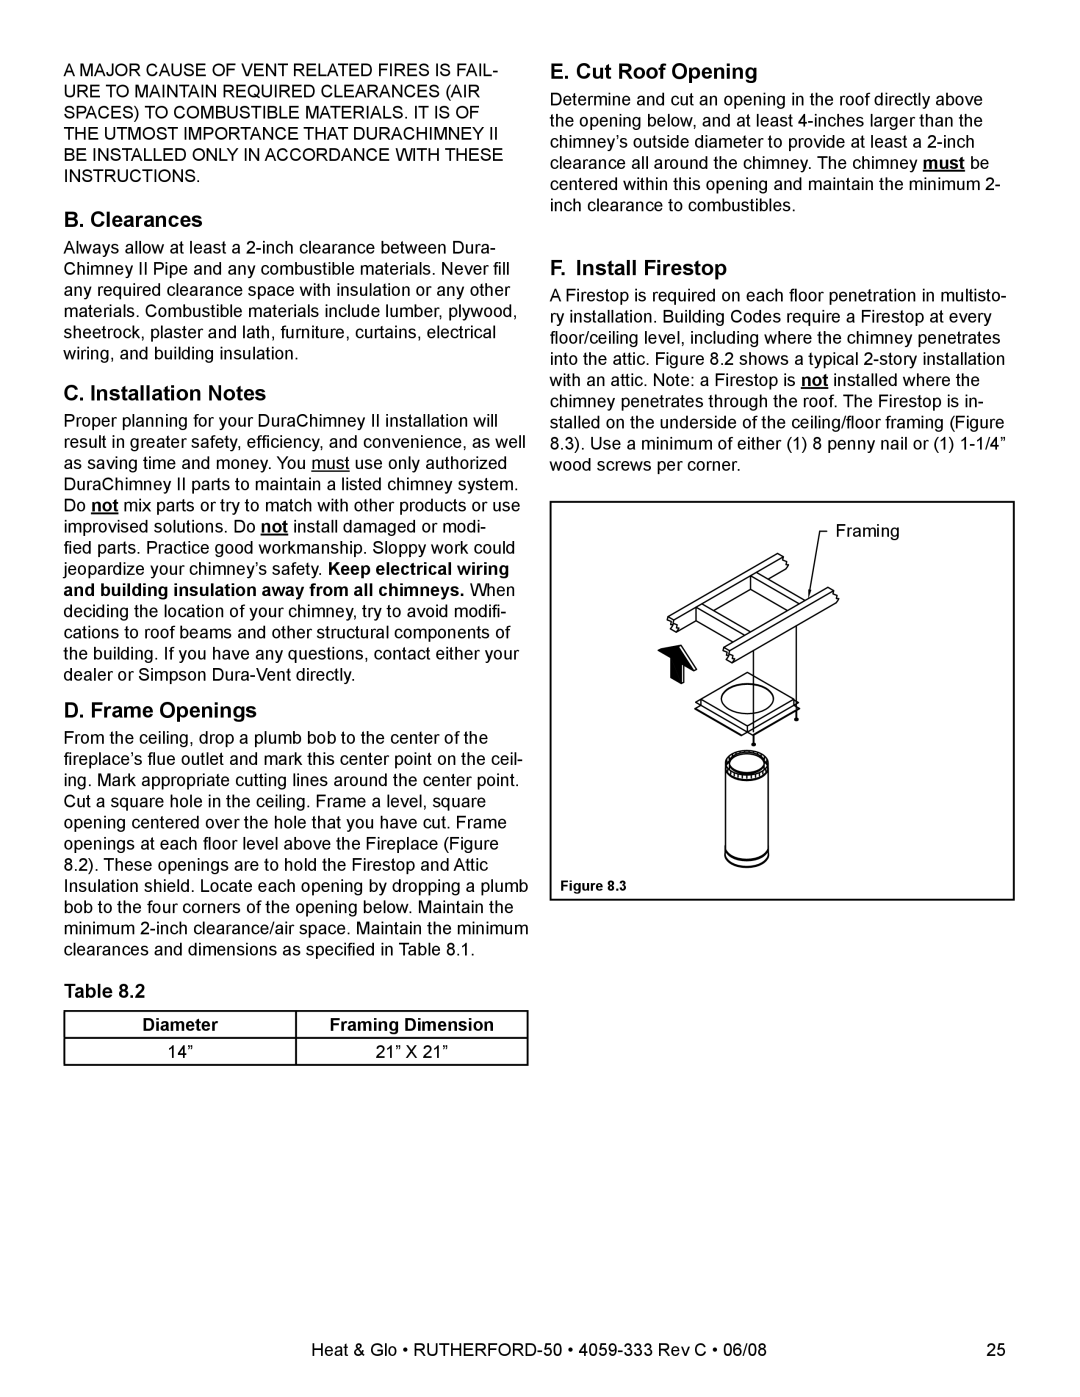
A Firestop is required on each floor penetration in multisto- ry installation. Building Codes require a Firestop at every floor/ceiling level, including where the chimney penetrates into the attic. Figure 8.2 shows a typical 2-story installation with an attic. Note: a Firestop is not installed where the chimney penetrates through the roof. The Firestop is in- stalled on the underside of the ceiling/floor framing (Figure 8.3). Use a minimum of either (1) 8 penny nail or (1) 1-1/4” wood screws per corner.

Framing

Figure 8.3

Heat & Glo • RUTHERFORD-504059-333 Rev C • 06/08

25

Page 25
Image 25
Heat & Glo LifeStyle 50 owner manual Installation Notes, Frame Openings, Cut Roof Opening, Install Firestop

50 specifications

The Heat & Glo LifeStyle 50 is a contemporary gas fireplace that embodies a perfect blend of modern aesthetics and cutting-edge technology. Designed for those who seek elegance and functionality, this fireplace is ideal for both new constructions and renovations, making it a versatile choice for any home.

One of the standout features of the LifeStyle 50 is its large viewing area. With its expansive glass front, it presents a stunning display of flames that creates a warm and inviting atmosphere. This design not only maximizes the visual impact but also enhances the overall ambiance of the living space. The fireplace allows for customizable flame and ember bed colors, enabling homeowners to personalize their experience further.

The LifeStyle 50 incorporates advanced heating technology that ensures efficient warmth distribution. With a powerful heat output, this model can effectively warm larger areas, making it suitable for open-plan living spaces. The fireplace operates quietly and efficiently, utilizing a user-friendly remote control for convenient operation. This allows for seamless adjustments to temperature and flame settings at the touch of a button.

Moreover, the LifeStyle 50 is designed with ease of installation in mind. Its flexible venting options allow for both horizontal and vertical installation, accommodating various architectural layouts. The fireplace can be vented directly through the wall or roof, providing installers with greater versatility. The unit is also constructed using durable materials, ensuring longevity and minimal maintenance.

A key characteristic of the Heat & Glo LifeStyle 50 is its commitment to safety. Equipped with advanced safety features, including an automatic shut-off system and a glass front that remains cool to the touch, this fireplace prioritizes peace of mind for homeowners.

Additionally, the LifeStyle 50 is compatible with smart home integration, allowing users to control their fireplace through popular smart home systems. This connectivity enhances user experience, offering convenience and ease of access from anywhere.

In summary, the Heat & Glo LifeStyle 50 is a sophisticated gas fireplace that combines stylish design with smart technology, high efficiency, and safety features. Its adaptability, performance, and aesthetic appeal make it an excellent choice for anyone looking to add a touch of luxury and warmth to their home.