K. Finish Top

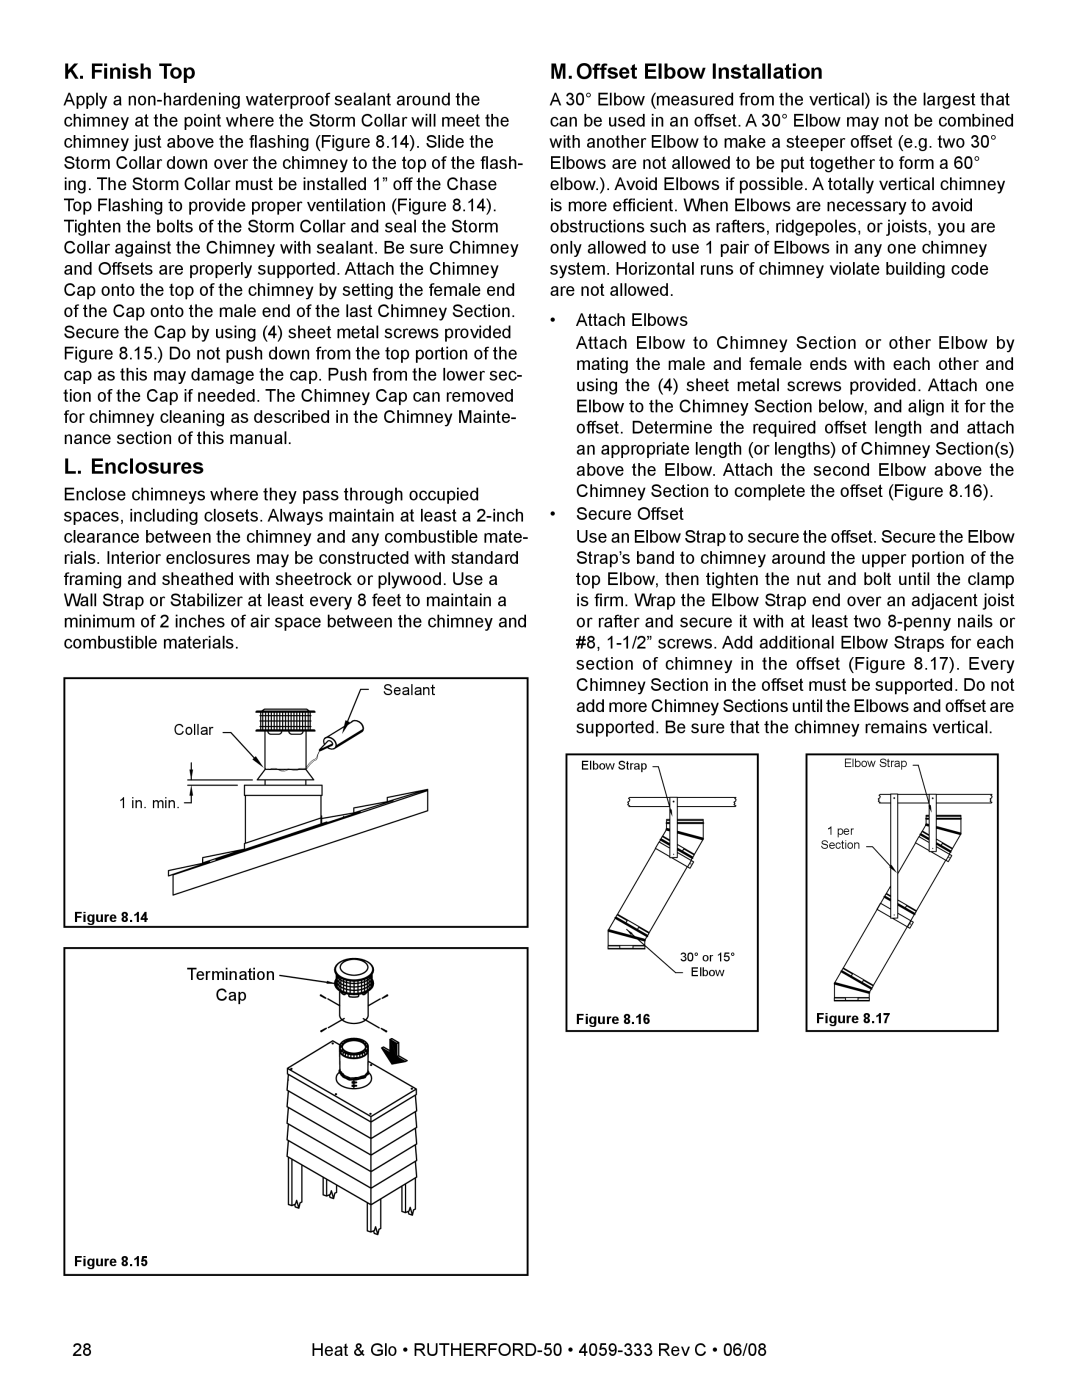
Apply a non-hardening waterproof sealant around the chimney at the point where the Storm Collar will meet the chimney just above the flashing (Figure 8.14). Slide the Storm Collar down over the chimney to the top of the flash- ing. The Storm Collar must be installed 1” off the Chase Top Flashing to provide proper ventilation (Figure 8.14). Tighten the bolts of the Storm Collar and seal the Storm Collar against the Chimney with sealant. Be sure Chimney and Offsets are properly supported. Attach the Chimney Cap onto the top of the chimney by setting the female end of the Cap onto the male end of the last Chimney Section. Secure the Cap by using (4) sheet metal screws provided Figure 8.15.) Do not push down from the top portion of the cap as this may damage the cap. Push from the lower sec- tion of the Cap if needed. The Chimney Cap can removed for chimney cleaning as described in the Chimney Mainte- nance section of this manual.

L. Enclosures

Enclose chimneys where they pass through occupied spaces, including closets. Always maintain at least a 2-inch clearance between the chimney and any combustible mate- rials. Interior enclosures may be constructed with standard framing and sheathed with sheetrock or plywood. Use a Wall Strap or Stabilizer at least every 8 feet to maintain a minimum of 2 inches of air space between the chimney and combustible materials.

Sealant

Collar

M. Offset Elbow Installation

A 30° Elbow (measured from the vertical) is the largest that can be used in an offset. A 30° Elbow may not be combined with another Elbow to make a steeper offset (e.g. two 30° Elbows are not allowed to be put together to form a 60° elbow.). Avoid Elbows if possible. A totally vertical chimney is more efficient. When Elbows are necessary to avoid obstructions such as rafters, ridgepoles, or joists, you are only allowed to use 1 pair of Elbows in any one chimney system. Horizontal runs of chimney violate building code are not allowed.

Attach Elbows

Attach Elbow to Chimney Section or other Elbow by mating the male and female ends with each other and using the (4) sheet metal screws provided. Attach one Elbow to the Chimney Section below, and align it for the offset. Determine the required offset length and attach an appropriate length (or lengths) of Chimney Section(s) above the Elbow. Attach the second Elbow above the Chimney Section to complete the offset (Figure 8.16).

Secure Offset

Use an Elbow Strap to secure the offset. Secure the Elbow Strap’s band to chimney around the upper portion of the top Elbow, then tighten the nut and bolt until the clamp is firm. Wrap the Elbow Strap end over an adjacent joist or rafter and secure it with at least two 8-penny nails or #8, 1-1/2” screws. Add additional Elbow Straps for each section of chimney in the offset (Figure 8.17). Every Chimney Section in the offset must be supported. Do not add more Chimney Sections until the Elbows and offset are supported. Be sure that the chimney remains vertical.

1 in. min.

Figure 8.14

Termination

Cap

Figure 8.15

Elbow Strap

30° or 15°

Elbow

Figure 8.16

Elbow Strap

1 per

Section

Figure 8.17

28

Heat & Glo • RUTHERFORD-504059-333 Rev C • 06/08

Page 28
Image 28
Heat & Glo LifeStyle 50 owner manual Finish Top, Enclosures, Offset Elbow Installation

50 specifications

The Heat & Glo LifeStyle 50 is a contemporary gas fireplace that embodies a perfect blend of modern aesthetics and cutting-edge technology. Designed for those who seek elegance and functionality, this fireplace is ideal for both new constructions and renovations, making it a versatile choice for any home.

One of the standout features of the LifeStyle 50 is its large viewing area. With its expansive glass front, it presents a stunning display of flames that creates a warm and inviting atmosphere. This design not only maximizes the visual impact but also enhances the overall ambiance of the living space. The fireplace allows for customizable flame and ember bed colors, enabling homeowners to personalize their experience further.

The LifeStyle 50 incorporates advanced heating technology that ensures efficient warmth distribution. With a powerful heat output, this model can effectively warm larger areas, making it suitable for open-plan living spaces. The fireplace operates quietly and efficiently, utilizing a user-friendly remote control for convenient operation. This allows for seamless adjustments to temperature and flame settings at the touch of a button.

Moreover, the LifeStyle 50 is designed with ease of installation in mind. Its flexible venting options allow for both horizontal and vertical installation, accommodating various architectural layouts. The fireplace can be vented directly through the wall or roof, providing installers with greater versatility. The unit is also constructed using durable materials, ensuring longevity and minimal maintenance.

A key characteristic of the Heat & Glo LifeStyle 50 is its commitment to safety. Equipped with advanced safety features, including an automatic shut-off system and a glass front that remains cool to the touch, this fireplace prioritizes peace of mind for homeowners.

Additionally, the LifeStyle 50 is compatible with smart home integration, allowing users to control their fireplace through popular smart home systems. This connectivity enhances user experience, offering convenience and ease of access from anywhere.

In summary, the Heat & Glo LifeStyle 50 is a sophisticated gas fireplace that combines stylish design with smart technology, high efficiency, and safety features. Its adaptability, performance, and aesthetic appeal make it an excellent choice for anyone looking to add a touch of luxury and warmth to their home.