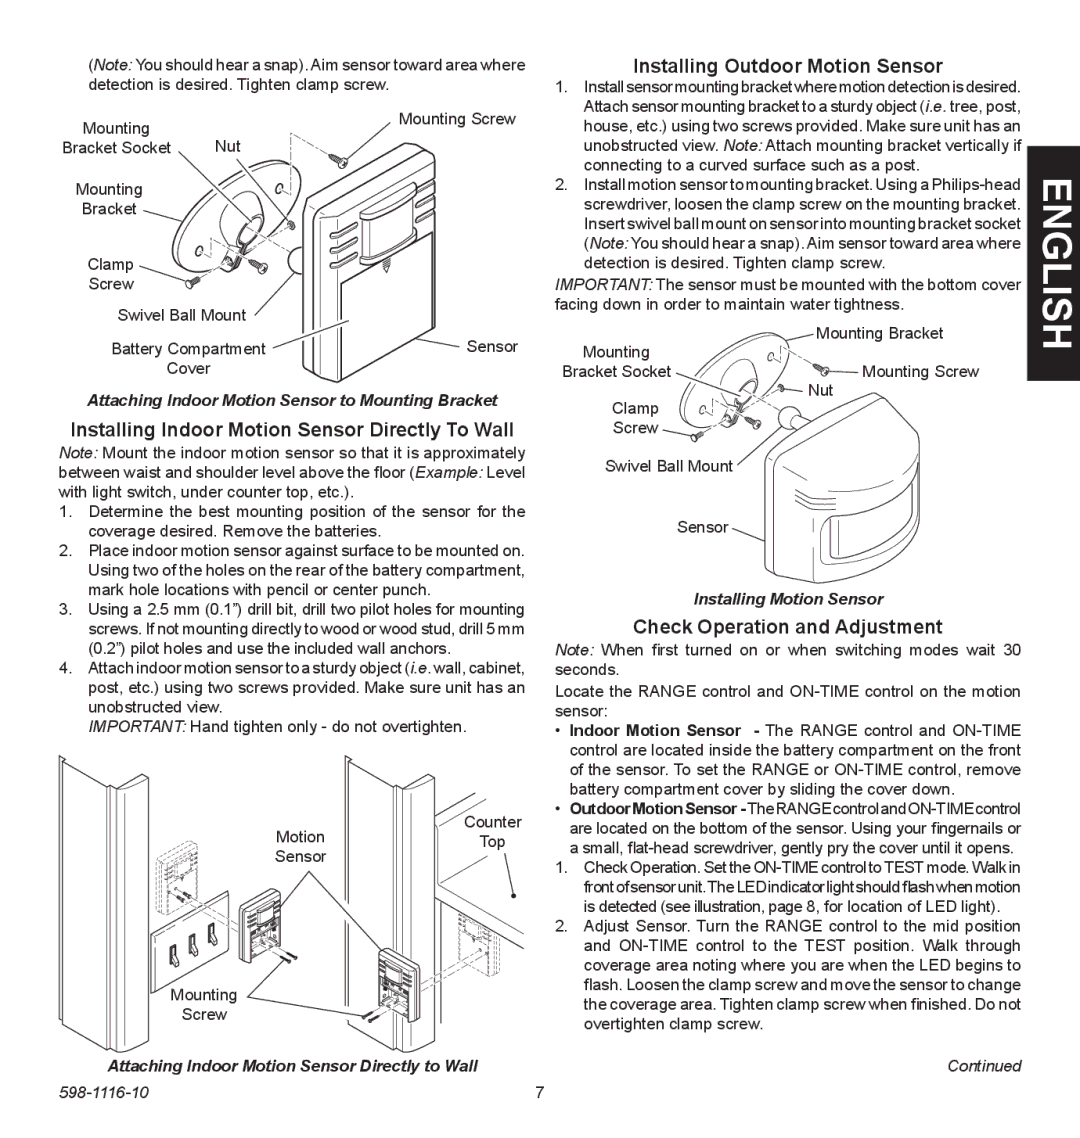
(Note: You should hear a snap). Aim sensor toward area where detection is desired. Tighten clamp screw.

Mounting


Mounting Screw

Nut


Bracket Socket


Mounting


Bracket


Clamp


Screw


Swivel Ball Mount


Battery Compartment

Sensor

Cover


Attaching Indoor Motion Sensor to Mounting Bracket

Installing Indoor Motion Sensor Directly To Wall

Note: Mount the indoor motion sensor so that it is approximately

between waist and shoulder level above the floor (Example: Level with light switch, under counter top, etc.).

1.Determine the best mounting position of the sensor for the coverage desired. Remove the batteries.

2.Place indoor motion sensor against surface to be mounted on. Using two of the holes on the rear of the battery compartment, mark hole locations with pencil or center punch.

3.Using a 2.5 mm (0.1”) drill bit, drill two pilot holes for mounting screws. If not mounting directly to wood or wood stud, drill 5 mm (0.2”) pilot holes and use the included wall anchors.

4.Attach indoor motion sensor to a sturdy object (i.e. wall, cabinet, post, etc.) using two screws provided. Make sure unit has an unobstructed view.

IMPORTANT: Hand tighten only - do not overtighten.

Motion

Counter

Top

Sensor


Mounting

Screw

Attaching Indoor Motion Sensor Directly to Wall

Installing Outdoor Motion Sensor

1. Installsensormountingbracketwheremotiondetectionisdesired.


Attach sensor mounting bracket to a sturdy object (i.e. tree, post,


house, etc.) using two screws provided. Make sure unit has an


unobstructed view. Note: Attach mounting bracket vertically if


connecting to a curved surface such as a post.

ENGLISH

2. Install motion sensor to mounting bracket. Using a Philips-head

screwdriver, loosen the clamp screw on the mounting bracket.


Insert swivel ball mount on sensor into mounting bracket socket


(Note: You should hear a snap). Aim sensor toward area where


detection is desired. Tighten clamp screw.


IMPORTANT: The sensor must be mounted with the bottom cover


facing down in order to maintain water tightness.


Mounting Bracket


Mounting


Bracket Socket

Mounting Screw


Clamp

Nut


Screw


Swivel Ball Mount


Sensor


Installing Motion Sensor

Check Operation and Adjustment

Note: When first turned on or when switching modes wait 30 seconds.

Locate the RANGE control and ON-TIME control on the motion sensor:

Indoor Motion Sensor - The RANGE control and ON-TIME control are located inside the battery compartment on the front of the sensor. To set the RANGE or ON-TIME control, remove battery compartment cover by sliding the cover down.

OutdoorMotionSensor -TheRANGEcontrolandON-TIMEcontrol are located on the bottom of the sensor. Using your fingernails or a small, flat-head screwdriver, gently pry the cover until it opens.

1.Check Operation. Set the ON-TIME control to TEST mode. Walk in frontofsensorunit.TheLEDindicatorlightshouldflashwhenmotion is detected (see illustration, page 8, for location of LED light).

2.Adjust Sensor. Turn the RANGE control to the mid position and ON-TIME control to the TEST position. Walk through coverage area noting where you are when the LED begins to flash. Loosen the clamp screw and move the sensor to change the coverage area. Tighten clamp screw when finished. Do not overtighten clamp screw.

Continued

598-1116-10

Page 7
Image 7
Heath Zenith 598-1116-10 Installing Indoor Motion Sensor Directly To Wall, Installing Outdoor Motion Sensor

598-1116-10 specifications

The Heath Zenith 598-1116-10 is an advanced motion-sensing outdoor light designed to enhance security and functionality around homes and businesses. This fixture is engineered with the latest technologies to provide reliable performance while ensuring energy efficiency and ease of use.

One of the main features of the 598-1116-10 is its state-of-the-art motion sensor. The device employs a passive infrared (PIR) technology that detects movement within a significant range, ensuring that any motion in its monitored area triggers the light. The sensor is adjustable, allowing users to customize the detection range and sensitivity to suit their specific environment. This adaptability is crucial for minimizing false alarms from unwarranted movements, such as passing cars or animals.

In addition to its motion-detection capabilities, the Heath Zenith 598-1116-10 offers various lighting options. The fixture is equipped with a powerful LED light source that produces a bright output while consuming less energy than traditional incandescent bulbs. This not only aids in lowering electricity costs but also contributes to a longer lifespan for the light, reducing the frequency and hassle of bulb replacements.

The design of the 598-1116-10 reflects both aesthetic appeal and functional robustness. The weather-resistant construction ensures that the light can withstand various climatic conditions, making it suitable for installation in different outdoor environments. The sleek and modern design complements a wide range of architectural styles, enhancing the property’s overall curb appeal.

Another important characteristic of this outdoor security light is its convenient operating features. The device includes a manual override option, allowing homeowners to keep the light on continuously for extended periods when needed, such as during gatherings or outdoor events. Additionally, the light can be set to operate on a timer, providing flexibility and control over illumination schedules.

In conclusion, the Heath Zenith 598-1116-10 stands out in the outdoor lighting market due to its motion-sensing technology, energy-efficient LED lighting, durable design, and user-friendly features. It serves not only as a means of illumination but also as a crucial security element, helping to deter potential intruders while offering peace of mind for property owners. This combination of practicality and style makes the 598-1116-10 a top choice for those looking to enhance their outdoor lighting system.