OPERAÇÕES (continuação)

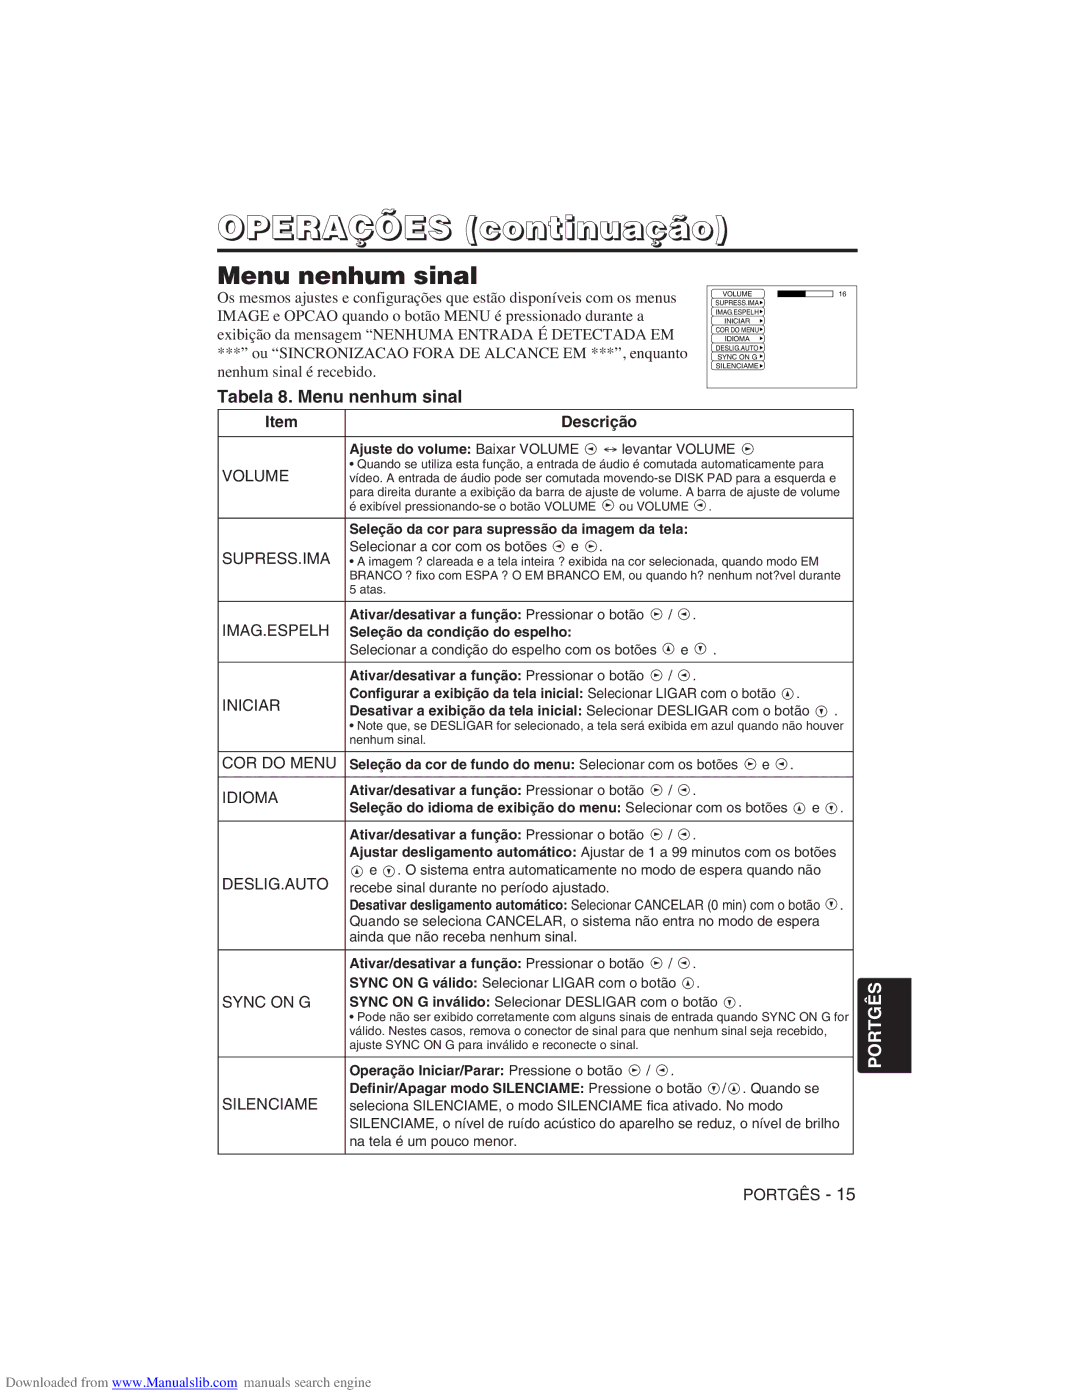
Menu nenhum sinal

Os mesmos ajustes e configurações que estão disponíveis com os menus

VOLUME


16

SUPRESS.IMA


IMAGE e OPCAO quando o botão MENU é pressionado durante a

IMAG.ESPELH


INICIAR


exibição da mensagem “NENHUMA ENTRADA É DETECTADA EM

COR DO MENU


IDIOMA


***” ou “SINCRONIZACAO FORA DE ALCANCE EM ***”, enquanto

DESLIG.AUTO


SYNC ON G


nenhum sinal é recebido.

SILENCIAME


Tabela 8. Menu nenhum sinal

Item

Descrição


Ajuste do volume: Baixar VOLUME

levantar VOLUME

VOLUME

• Quando se utiliza esta função, a entrada de áudio é comutada automaticamente para

vídeo. A entrada de áudio pode ser comutada movendo-se DISK PAD para a esquerda e


para direita durante a exibição da barra de ajuste de volume. A barra de ajuste de volume


é exibível pressionando-se o botão VOLUME

ou VOLUME .

Seleção da cor para supressão da imagem da tela:

Selecionar a cor com os botões e .

SUPRESS.IMA • A imagem ? clareada e a tela inteira ? exibida na cor selecionada, quando modo EM BRANCO ? fixo com ESPA ? O EM BRANCO EM, ou quando h? nenhum not?vel durante 5 atas.

Ativar/desativar a função: Pressionar o botão / .

IMAG.ESPELH Seleção da condição do espelho:

Selecionar a condição do espelho com os botões e .


Ativar/desativar a função: Pressionar o botão / .

INICIAR

Configurar a exibição da tela inicial: Selecionar LIGAR com o botão .

Desativar a exibição da tela inicial: Selecionar DESLIGAR com o botão .


Note que, se DESLIGAR for selecionado, a tela será exibida em azul quando não houver nenhum sinal.

COR DO MENU Seleção da cor de fundo do menu: Selecionar com os botões e .

IDIOMA

Ativar/desativar a função: Pressionar o botão

/ .

Seleção do idioma de exibição do menu: Selecionar com os botões e .


Ativar/desativar a função: Pressionar o botão

/ .


Ajustar desligamento automático: Ajustar de 1 a 99 minutos com os botões


e . O sistema entra automaticamente no modo de espera quando não

DESLIG.AUTO recebe sinal durante no período ajustado.


Desativar desligamento automático: Selecionar CANCELAR (0 min) com o botão . Quando se seleciona CANCELAR, o sistema não entra no modo de espera ainda que não receba nenhum sinal.

Ativar/desativar a função: Pressionar o botão / .

SYNC ON G válido: Selecionar LIGAR com o botão .

SYNC ON G SYNC ON G inválido: Selecionar DESLIGAR com o botão .

Pode não ser exibido corretamente com alguns sinais de entrada quando SYNC ON G for válido. Nestes casos, remova o conector de sinal para que nenhum sinal seja recebido, ajuste SYNC ON G para inválido e reconecte o sinal.

Operação Iniciar/Parar: Pressione o botão / .

Definir/Apagar modo SILENCIAME: Pressione o botão / . Quando se

SILENCIAME seleciona SILENCIAME, o modo SILENCIAME fica ativado. No modo SILENCIAME, o nível de ruído acústico do aparelho se reduz, o nível de brilho na tela é um pouco menor.

PORTGÊS - 15

PORTGÊS

Downloaded from www.Manualslib.com manuals search engine

Page 184
Image 184
Hitachi CP-X275W user manual Tabela 8. Menu nenhum sinal, Iniciar

CP-X275W specifications

The Hitachi CP-X275W and CP-S225W are advanced projectors designed to meet the varied needs of educational institutions, corporate environments, and home theaters. Both models boast impressive features and cutting-edge technologies that enhance user experience and image quality.

The CP-X275W projector is particularly noteworthy for its WXGA resolution of 1280 x 800 pixels, which enables a clear and vibrant display suitable for detailed presentations and graphics. It has a brightness level of 3,200 ANSI lumens, ensuring that images remain sharp and visible even in well-lit rooms. The contrast ratio of 2,000:1 further enhances image clarity, providing deeper blacks and more vibrant colors.

One of the most significant features of the CP-X275W is its advanced lens shift and keystone correction capabilities. These technologies allow users to adjust the image projection without distorting the picture, making installation more flexible. Moreover, the projector supports various input options, including HDMI, VGA, and USB, providing versatility for different devices and technologies.

On the other hand, the CP-S225W is tailored for more budget-conscious users while still delivering impressive performance. With a resolution of XGA at 1024 x 768 pixels and a brightness of 2,600 ANSI lumens, this model is well-equipped for classroom settings or small conference rooms. The 1,600:1 contrast ratio ensures that presentations remain clear, with defined image quality that captures audience attention.

Both projectors incorporate Hitachi’s proprietary technologies for enhanced performance. The lamps are designed with long operational life, up to 5,000 hours in eco mode, reducing maintenance costs and downtime. Additionally, they feature Hitachi’s Image Care technology, which maintains optimal image quality and energy efficiency, adjusting brightness based on the content being displayed.

Another highlight of both models is their portability, with a compact design and a weight that enables easy transport. They also include built-in speakers, eliminating the need for external audio equipment in many scenarios.

In summary, the Hitachi CP-X275W and CP-S225W projectors stand out for their robust features, image quality, and user-friendly technologies. While the CP-X275W is suited for high-demand environments requiring superior clarity and detail, the CP-S225W provides an excellent value proposition for everyday use. Both projectors cater to diverse audience needs, making them excellent choices for various applications.