Adjustments and functions (continued)
SET UP
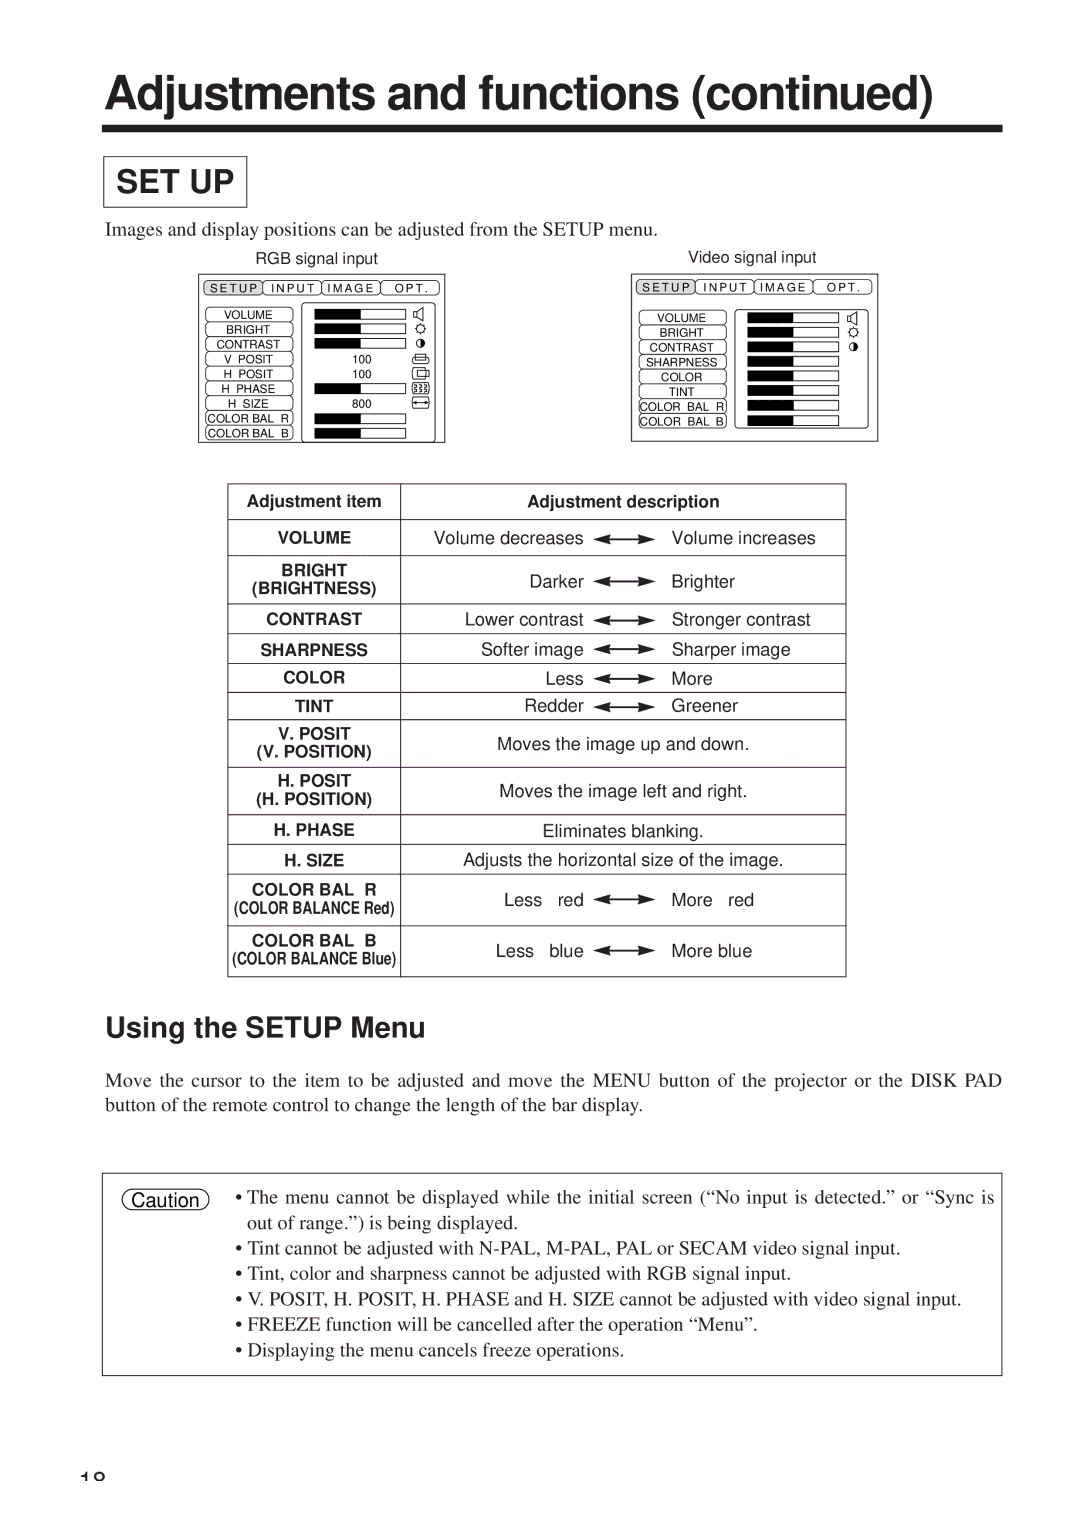
Images and display positions can be adjusted from the SETUP menu.
RGB signal input
S E T U P I N P U T I M A G E O P T . | |
VOLUME |
|
BRIGHT |
|
CONTRAST |
|
V POSIT | 100 |
H POSIT | 100 |
H PHASE |
|
H SIZE | 800 |
COLOR BAL R |
|
COLOR BAL B |
|
Video signal input
S E T U P I N P U T I M A G E O P T . |
VOLUME |
BRIGHT |
CONTRAST |
SHARPNESS |
COLOR |
TINT |
COLOR BAL R |
COLOR BAL B |
Adjustment item | Adjustment description | ||||
|
|
|
| ||
VOLUME | Volume decreases |
| Volume increases | ||
| |||||
|
|
|
|
| |
BRIGHT | Darker |
| Brighter | ||
(BRIGHTNESS) |
| ||||
|
|
|
| ||
|
|
|
| ||
CONTRAST | Lower contrast |
| Stronger contrast | ||
| |||||
|
|
|
| ||
SHARPNESS | Softer image |
| Sharper image | ||
| |||||
|
|
|
|
| |
COLOR |
| Less |
| More | |
|
| ||||
|
|
|
| ||
TINT | Redder |
| Greener | ||
| |||||
|
|
|
|
| |
V. POSIT | Moves the image up and down. | ||||
(V. POSITION) | |||||
|
|
|
| ||
|
|
|
|
| |
H. POSIT | Moves the image left and right. | ||||
(H. POSITION) | |||||
|
|
|
| ||
|
|
| |||
H. PHASE |
| Eliminates blanking. | |||
|
| ||||
H. SIZE | Adjusts the horizontal size of the image. | ||||
|
|
|
|
| |
COLOR BAL R | Less | red |
| More red | |
(COLOR BALANCE Red) |
| ||||
|
|
|
| ||
|
|
|
|
| |
COLOR BAL B | Less | blue |
| More blue | |
(COLOR BALANCE Blue) |
| ||||
|
|
|
| ||
|
|
|
|
| |
Using the SETUP Menu
Move the cursor to the item to be adjusted and move the MENU button of the projector or the DISK PAD button of the remote control to change the length of the bar display.
Caution | • The menu cannot be displayed while the initial screen (“No input is detected.” or “Sync is |
| out of range.”) is being displayed. |
•Tint cannot be adjusted with
•Tint, color and sharpness cannot be adjusted with RGB signal input.
•V. POSIT, H. POSIT, H. PHASE and H. SIZE cannot be adjusted with video signal input.
•FREEZE function will be cancelled after the operation “Menu”.
•Displaying the menu cancels freeze operations.
18
