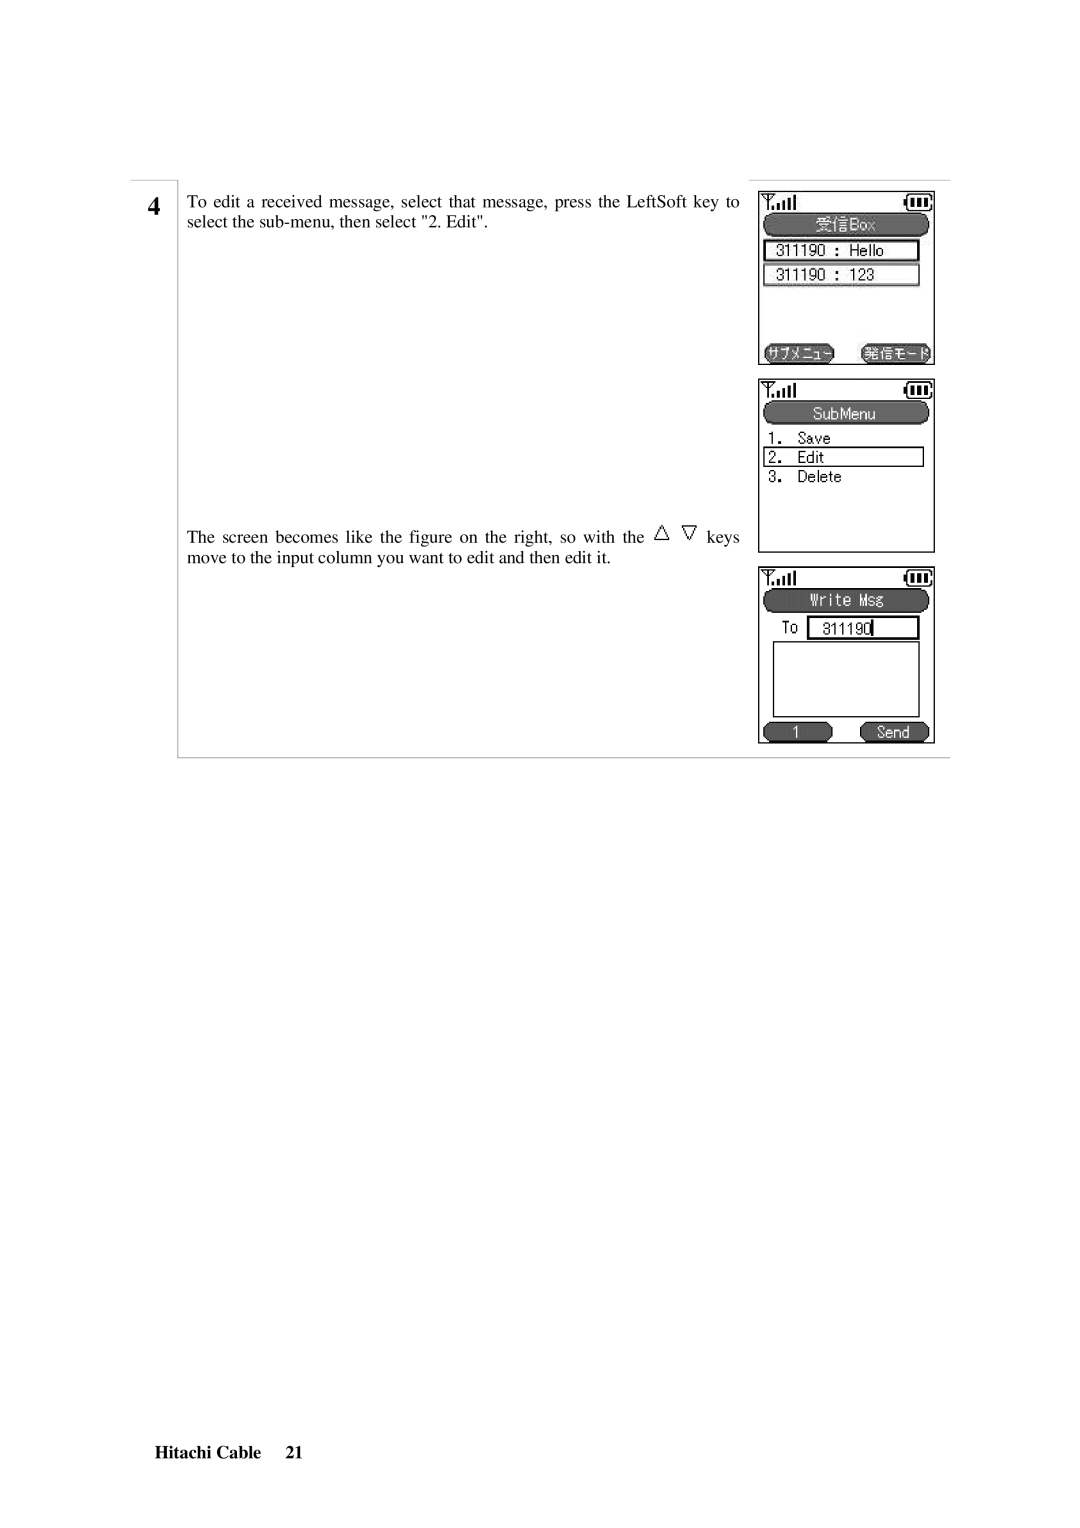
TD61-2472
Page
NAMES & FUNCTIONS OF DEVICE PARTS
1.11.9Time setting
1.1. Displayed icons
Names & Functions of Device Parts
1 , …
Table 1. Key Operation
Hitachi Cable
1.2.1 Text input mode
1.2. Number pad input table
Hitachi Cable
Press the key to confirm the character
Select a character with the keys
kanji ideograms with the keys
Press the key to confirm the character
1.4. Power OFF
1.3. Power ON
Application
1.6. Receive
1.5. Call
Hitachi Cable
1.7.1 New registration 1.7.1.1 Registration from telephone number
1.7. Contact list
1.7.1.2 Registration from contact list menu
Hitachi Cable
1.7.1.3 Registration from search results
Hitachi Cable
1.7.1.4 Registration from a call log
Hitachi Cable
1.7.1.5 Registration from IM
Hitachi Cable
1.7.1.6 Registration from presence
1.7.2 Call from contact list
1.7.3 Group revision
To delete a group, select the group to delete, press the LeftSoft key to select the sub-menu, then select 2. Delete
Hitachi Cable
1.7.4 Erase one item from contact list
1.7.5 Erase all
Displays the mail menu
1.8. IM
1 Press the LeftSoft key to select the menu item Select 2. IM
With some connection equipment, this is not possible
1.8.1 Inbox
To edit a received message, select that message, press the LeftSoft key to select the sub-menu, then select 2. Edit
The screen in the figure on the right 3rd line is displayed
Writing and sending a new message 1 From the IM menu, select 2. New
1.8.2 New
Input the telephone number to send to
Input the message with the number keys and the LeftSoft key
After the Message sent message screen is immediately displayed, a screen is displayed to confirm whether or not you want to save the message
Hitachi Cable
1.8.3 Drafts
Hitachi Cable
Hitachi Cable
1.8.4 Outbox
Hitachi Cable
Hitachi Cable
1.8.5 Delete All
Hitachi Cable
1.9. Call log
1.9.2 Call log delete
1.9.1 Details
Hitachi Cable
Hitachi Cable
1.9.3 Delete all data
Hitachi Cable
1.9.4 Calling from the call log
1.10.1 User list
1.10.Presence
Registering a user
1.10.2 User Registration
To register a user, either press the 2 on the number pad or select
Register user, then press the key
1.10.4 Block register
1.10.3 Block list
Hitachi Cable
Hitachi Cable
Hitachi Cable
1.10.5 Status
1.11.1 Ringer/vibration
1.11.Basic settings menu
1.11.1.2 Ringtones
1.11.1.1 Distinctive Ringtones
Setting
Ringer
1.11.1.4 LED
1.11.1.3 Mode
Hitachi Cable
Setting the headphone/earpiece/ringer volume
1.11.1.5 Volume adjustment
1 From the telephone menu, select 5. Adjust volume
Use the keys to set the volume, then finalize with the key
1.11.2 Caller ID
1.11.3 Service LED
1 From the setting menu, select 2. Calling number
Setting the Service LED
Adjusting the display screen brightness
1.11.4 Brightness adjustment
1 From the setting menu, select 4. Adjust brightness
Use the keys to adjust the contrast, then finalize with the key
1.11.5 Security
1.11.6 Information display
From the information display menu, select 2. URL & Proxy
The boot ROM and software version are displayed
From the information display menu, select 3. MAC address
The MAC address is displayed
1.11.8 Font size
1.11.7 Error Msg
Setting the Error Msg
1 From the information display menu, select 7. Error Msg
1.11.9 Time setting
Use the number pad to input the NTP server IP address
Select 3. NTP server 1 or 4. NTP server
Select 5. Time offset
Use the keys to select the time, then finalize with the key
1.11.11 Courtesy mode On/Off
1.11.10 Language setting
Press and hold down the * key on the number pad
Silent mode and vibration mode are switched On
Hitachi Cable
When the keylock is set, button operations are disabled
1.11.12 KeyLock/KeyUnlock
Enter the password
Press and hold down the Lock key on the side of the phone
Hitachi Cable
Enter the password
1.12.Hold function
Various operation methods
1.12.1 Hold
1.12.2 Hold release
1.13.2 Outside-line call
1.13.Calling method 1.13.1 Internal extension call
Hitachi Cable
1.13.3 184/186 call
1.13.4.1 Calling in call mode from the contact list
1.13.4 Operation methods using call mode
1.13.5 Redial
Hitachi Cable
1.13.6 Speed dialing
1.13.7 Timer between digits
After a short time, a call is made automatically to the telephone number for the speed dialing number entered
1.14.Accessory guidelines
Accessories
1.15.Accessories covered
1.16.AC power supply adaptor
1.19.Removing the battery
1.18.Installing the battery
1.17.USB cable option
1.20.Charging with the desktop charger
1.22.LED
1.21.Charging without the desktop charger
Step 2 Remove the connector cover from the WIRELESSIP5000
Step 1 Connect the AC adaptor to a wall socket
1.23.Warning about emergency services
Safety Information
1.25.Warning about the impact of electromagnetic signals
1.26.Warning about battery handling
Hitachi Cable
Appendix Specifications
Open space
Hitachi Cable
Indoors
About 3 hours
Hitachi Cable
3 In power save mode