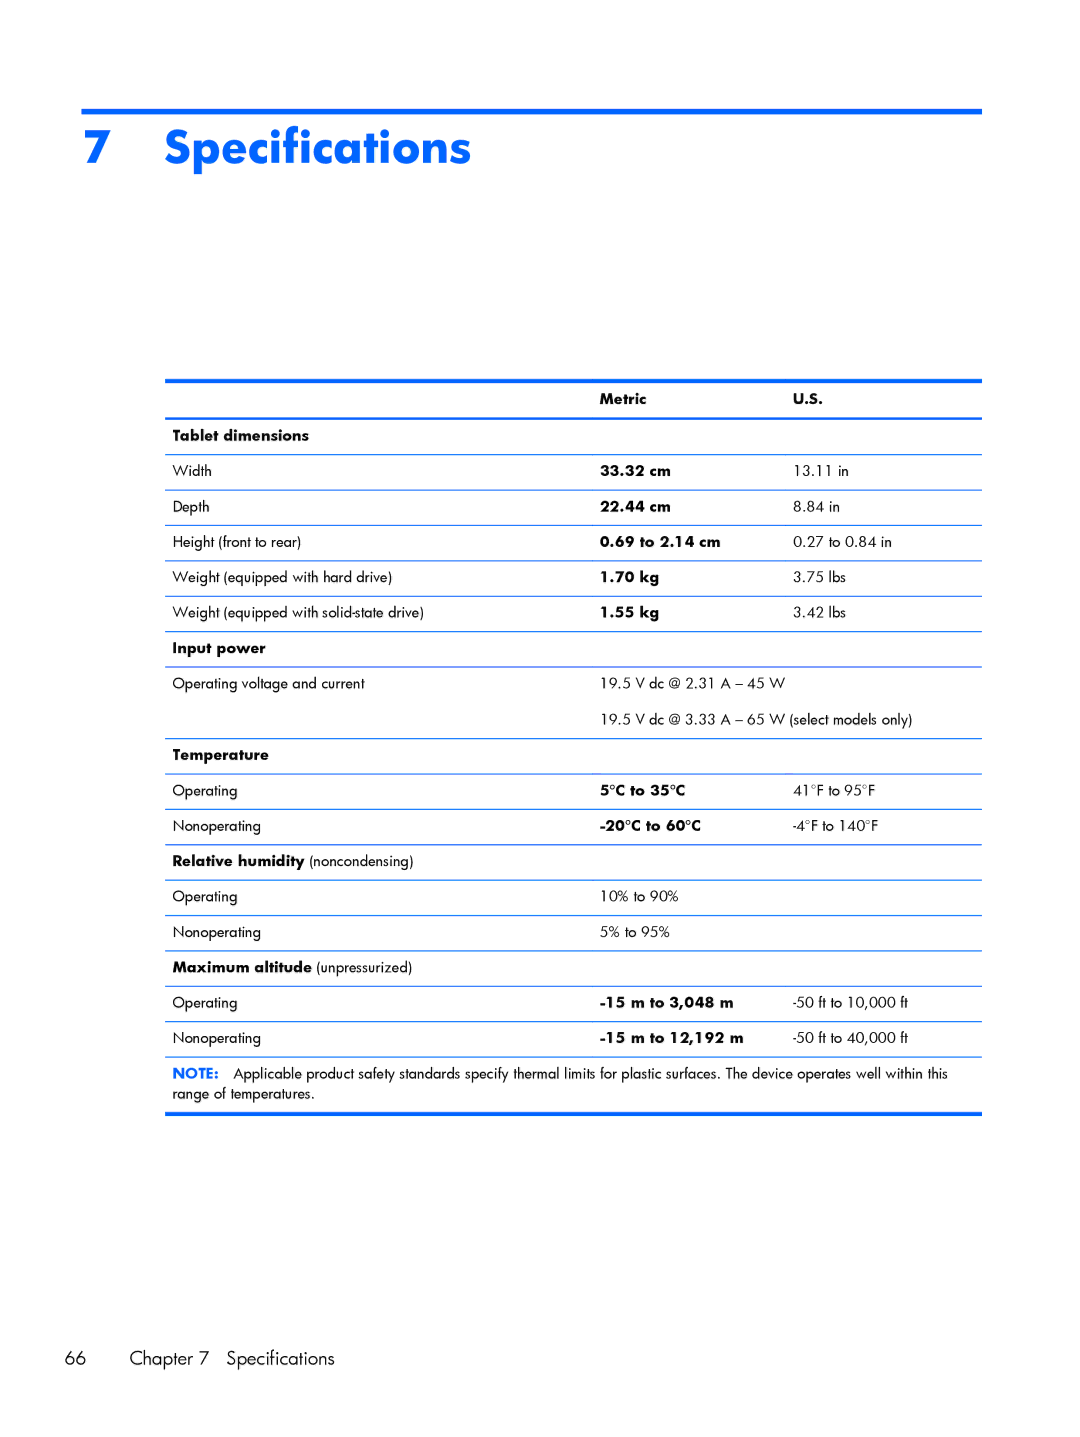
HP Pavilion x360 Convertible PC
Product notice
Safety warning notice
iv Safety warning notice
Removal and replacement procedures
Table of contents
Removal and replacement preliminary requirements
Product description
Backing up, restoring, and recovering
Using Setup Utility BIOS and HP PC Hardware Diagnostics UEFI
Specifications
Power cord set requirements
10 Recycling
Index
Page
Description
1 Product description
Category
equipped with an
equipped with an
Category
Description
equipped with an
equipped with an
Category
Description
equipped with an
Category
Wireless
Chapter 1 Product description
Description
Category
2 External component identification
Display
Windows button
Buttons and speakers
Chapter 2 External component identification
fn key
Keys
esc key
Lights
Reads your finger gestures to move the pointer or activate
TouchPad
TouchPad zone
items on the screen
Left side
Connects an optional USB device, such as a keyboard, mouse
Audio-out headphone/Audio-in
The security cable is designed to act as a deterrent, but it may
Right side
facing the slot, insert the card into the slot, and then push in on
Bottom
Bottom
3 Illustrated parts catalog
Locating the serial number, product number, and model number
Computer major components
Spare part number
Chapter 3 Illustrated parts catalog
Component
Spare part number
Computer major components
Component
WLAN module
Chapter 3 Illustrated parts catalog
Power connector cable
Power button board includes cable
Component
Display assembly components
Miscellaneous parts
Chapter 3 Illustrated parts catalog
Sequential part number listing
Power cord for use only on computer models equipped with an Intel processor in Australia 3-pin
MB L3 cache, dual core, 15 W, a graphics subsystem with UMA memory, and a non-Windows
Keyboard/top cover with metallic finish for use on all computer models in the Czech Republic and
256-GB, SATA-3, multi-level cell, solid-state drive for use only on computer models equipped with
Description
Chapter 3 Illustrated parts catalog
Spare part number
Cables and connectors
4 Removal and replacement preliminary requirements
Service considerations
Tools required
Grounding guidelines
Electrostatic discharge damage
Packaging and transporting guidelines
Workstation guidelines
Voltage protection level
Equipment guidelines
Material
5 Removal and replacement procedures
Computer feet
Keyboard/top cover
Keyboard/top cover
4. Remove the three screw covers
6. Turn the computer right side up, with the front toward you
7. Open the computer
Reverse this procedure to install the keyboard/top cover
Chapter 5 Removal and replacement procedures
11. Remove the keyboard/top cover
TouchPad
Battery
Hard drive
Remove the hard drive
Chapter 5 Removal and replacement procedures
4. Remove the keyboard/top cover see Keyboard/top cover on page
3. Remove the hard drive
WLAN module
Remove the WLAN module
Chapter 5 Removal and replacement procedures
4. Remove the keyboard/top cover see Keyboard/top cover on page
Audio/USB board
Page
Speakers
Power button board
Display assembly
Remove the display assembly
Chapter 5 Removal and replacement procedures
a. Remove the display bezel screw covers
6. Remove the display assembly
Display assembly
Chapter 5 Removal and replacement procedures
9. Release the display panel cable 2 from the left display hinge
11. Remove the display panel
The display panel is available using spare part number
Display assembly
12. If it is necessary to replace the webcam/microphone module
d. Remove the webcam/microphone module
The webcam/microphone module is available using spare part number
Chapter 5 Removal and replacement procedures
13. If it is necessary to replace the display panel cable
e. Remove the display panel cable
The display panel cable is available using spare part number
Display assembly
14. If it is necessary to replace the display hinges
b. Remove the display hinge cover
Chapter 5 Removal and replacement procedures
15. If it is necessary to replace the display hinge covers
Power connector cable
System board
a. Battery see Battery on page b. WLAN module see WLAN module on page
c. Fan see Fan on page d. Audio/USB board see Audio/USB board on page
Reverse this procedure to install the system board
Chapter 5 Removal and replacement procedures
e. Speakers see Speakers on page
f. Display assembly see Display assembly on page
Heat sink
g. System board see System board on page
3. Remove the heat sink
Reverse this procedure to install the heat sink
Chapter 5 Removal and replacement procedures
f. Display assembly see Display assembly on page
Memory module
a. Battery see Battery on page b. WLAN module see WLAN module on page
c. Fan see Fan on page d. Audio/USB board see Audio/USB board on page
Reverse this procedure to install a memory module
Chapter 5 Removal and replacement procedures
Updating the BIOS
6 Using Setup Utility BIOS and HP PC Hardware Diagnostics UEFI
Starting Setup Utility BIOS
Determining the BIOS version
Downloading a BIOS update
5. In the Diagnostic section, click HP UEFI Support Environment
Using HP PC Hardware Diagnostics UEFI
Downloading HP PC Hardware Diagnostics UEFI to a USB device
7 Specifications
66 Chapter 7 Specifications
See Creating HP Recovery media on page
8 Backing up, restoring, and recovering
Creating recovery media and backups
Creating HP Recovery media
Restore and recovery
Recovering using HP Recovery Manager
What you need to know
Changing the computer boot order
Using the HP Recovery partition select models only
Using HP Recovery media to recover
Removing the HP Recovery partition select models only
Requirements for specific countries and regions
9 Power cord set requirements
Requirements for all countries
Chapter 9 Power cord set requirements
10 Recycling
Index
J jacks