Start Začínáme Alapismeretek
Page
Getting Started Guide
Trademark Credits
Contents
Product Setup
Introduction
Installation checklist
Where to look for information
Shipping box space requirements
Prepare product location
Product size
Product Setup
1194 mm 47 643 mm 457 mm 1308 mm 52
Product Setup
Location requirements for the product
Check package contents
Remove the product from the shipping box
Remove internal packaging
Product parts front and back views English
Identify product parts
Position the product
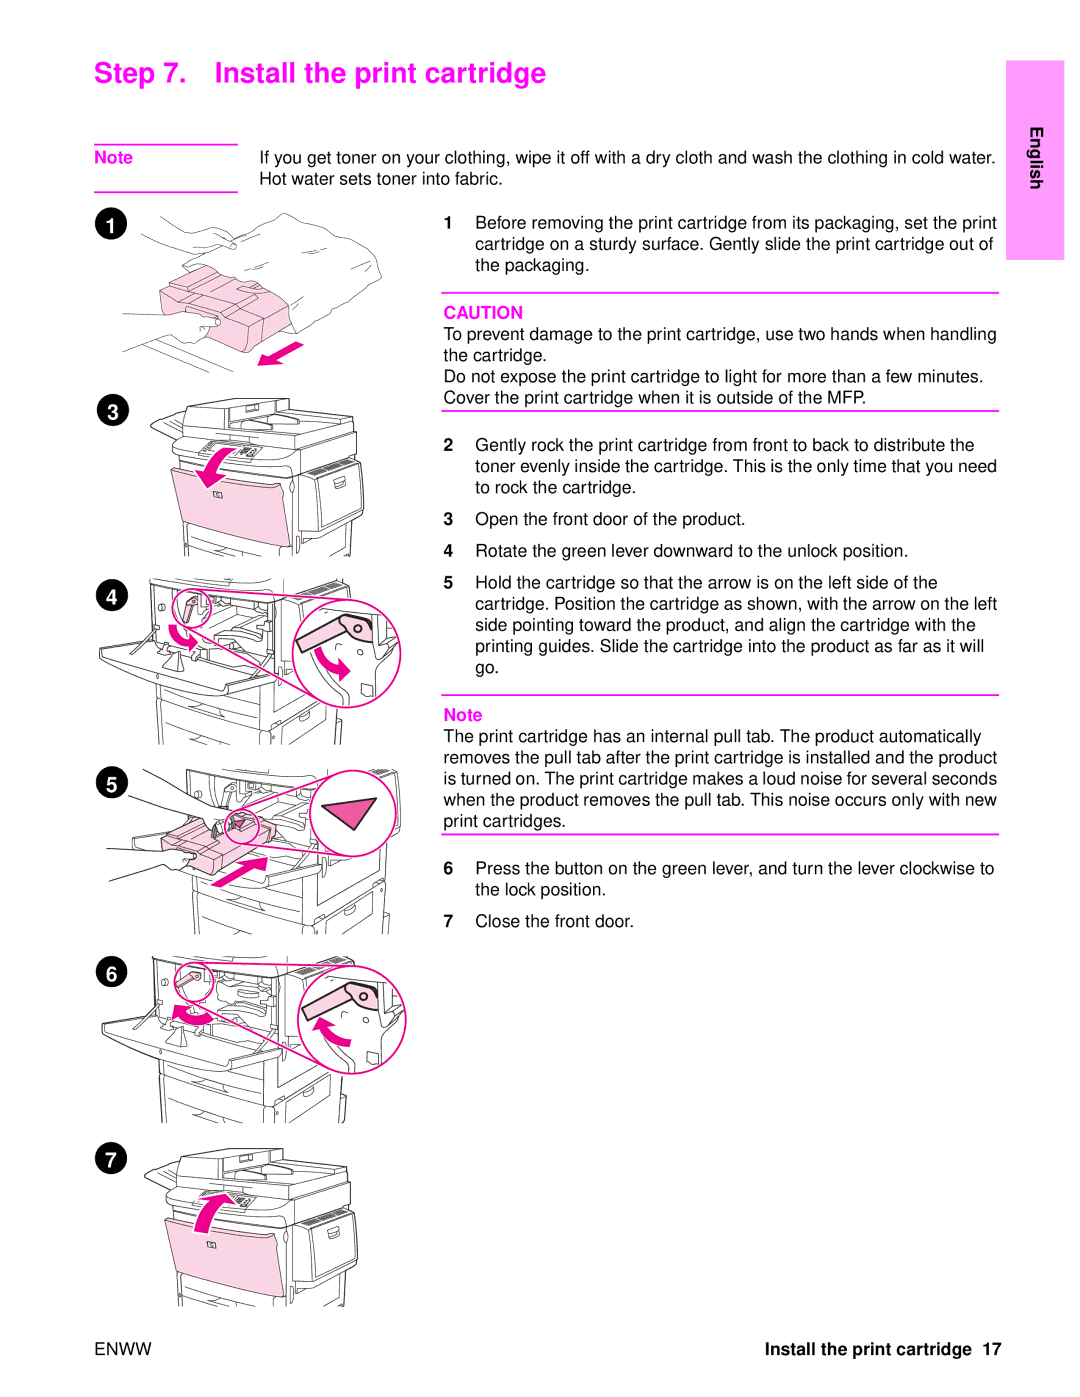
Install the print cartridge
Install output device
Change the control panel overlays
Connect product cables
Connecting to Ethernet 10/100Base-TX network
Connect power cords
To configure the control panel language
Configure the control panel display language
To load Tray
Load Trays 1, 2, 3,
To load Tray 2 and Tray
To load Tray
English
Touch Information Touch Print Configuration
Print the configuration
Touch Configure Device
Configure embedded Send to e-mail
Installing Windows printing software
Install software
Installing Macintosh printing software
Customer support
Verify product setup
Hewlett-Packard limited warranty statement
Warranty and regulatory information
Service during and after the warranty period
HP’s Premium Protection Warranty
HP software license terms
FCC regulations
Safety information
Declaration of Conformity
Conforms to the following Product Specifications
Manufacturer’s
Čeština
Začínáme
Ochranné známky
Obsah
Obsah
Úvod
Příručka Použití
Kde hledat informace
Záznamový list instalace
Příručka Začínáme
Prostorové požadavky pro přepravní krabici
Krok 1. Příprava umístění zařízení
Prostorové požadavky pro vybalení
219 mm
Rozměry zařízení
105 mm 643 mm 457 mm 201 mm 536 mm 533 mm 554 mm 648 mm
826 mm3470 mm4 457 mm
554 mm 648 mm1 643 mm 457 mm 664 mm
105 mm 201 mm1 533 mm 643 mm 457 mm2
691 mm 617 mm 643 mm
194 mm
308 mm1 643 mm
503 mm
Instalace zařízení
Požadavky na umístění zařízení
Leták s informacemi pro referenci
Krok 2. Kontrola obsahu balení
Se softwarem zařízení
Tato příručka
Krok 3. Vyjmutí zařízení z přepravní krabice
Varování
Krok 4. Odstranění vnitřního obalového materiálu
Díly zařízení pohled zepředu a zezadu
Krok 5. Identifikace dílů zařízení
Připevněte výstupní přihrádku ADF
Krok
Krok 7. Instalace tiskových kazet
Přihrádkami
Krok 8. Instalace výstupního zařízení
Krok 9. Změna překryvných segmentů ovládacího panelu
Umístění portů rozhraní
Krok 10. Zapojení kabelů zařízení
Druhý konec kabelu zapojte do sít´ového portu
Připojení k síti Ethernet 10/100Base-TX
Vytáhněte výstupní zařízení
Připojte sít´ový kabel do konektoru RJ-45
Viz část Nastavení jazyka displeje ovládacího panelu
Krok 11. Zapojení kabelů napájení
Postup při nastavení jazyka ovládacího panelu
Krok 12. Nastavení jazyka displeje ovládacího panelu
Postup při založení papíru do zásobníku
Krok 13. Naplnění zásobníků 1, 2, 3 a
Postup při založení papíru do zásobníku 2 a zásobníku
Postup při založení papíru do zásobníku
Zásobník do zařízení nezarážejte
Krok 14. Tisk konfigurační stránky
Stiskněte položku Konfigurace zařízení
Krok 15. Konfigurace vestavěné funkce Odeslat e-mailem
Instalace tiskového softwaru pro systém Windows
Krok 16. Instalace softwaru
Instalace tiskového softwaru pro systém Macintosh
Ověření e-mailu
Krok 17. Ověření nastavení zařízení
Podpora pro zákazníky
Ověření kopírování
Prohlášení o omezené záruce společnosti Hewlett-Packard
Informace o záruce a předpisech
Servis během záruční doby a po jejím vypršení
Omezená záruka pro tiskové kazety a sady válce
Záruka pojistné ochrany společnosti HP
Licenční podmínky softwaru HP
Osvědčení EMI pro Koreu Osvědčení EMI pro Tchaj-wan
Předpisy FCC
Kanadské stanovy DOC
Osvědčení Vcci Japonsko
List s údaji o materiálové bezpečnosti
Bezpečnostní informace
Laserové osvědčení pro Finsko
Osvědčení bezpečnosti laseru
Je ve shodě s následujícími specifikacemi zařízení
Prohlášení o souhlasu s podmínkami
Je v souladu s následujícími specifikacemi zařízení
Magyar
Alapvető tudnivalók kézikönyve
Kiadványszám Q3726-90904 Edition 1, 11/2004
Tartalom
Tartalom
Bevezetés
Összeállítási ellenőrzőlista
Hol található információ?
Szállítódoboz helyigénye
Lépés a készülék helyének előkészítése
Kicsomagolás helyigénye
1219 mm 48 hüvelyk
Készülék mérete
826 mm
470 mm
1664 mm 66 hüvelyk
503 mm 691 mm 20 hüv 457 mm 617 mm 643 mm 27 hüvelyk
826 mm 33 hüvelyk 463 mm 555 mm 643 mm 18 hüv
1018 mm 643 mm 45 mm 40 hüvelyk 25 hüvelyk
470 mm 19 hüvelyk 1664 mm 66 hüvelyk
Megfelelő térköz a nyomtató körül Jól szellőző helyiség
Készülék elhelyezésével kapcsolatos követelmények
Ez a kézikönyv
Lépés a csomag tartalmának ellenőrzése
Kézikönyve
Gyorsreferencia poszter
Lépés a készülék kivétele a szállítódobozból
Megjegyzés
Lépés a belső csomagolás eltávolítása
Lépés a készülék részegységei
Ha az ADF kimeneti tálca fel van szerelve, távolítsa el
Készülék elhelyezése
Lehessen és legyen lehetőség a kimeneti eszközt telepíteni
Kerekek rögzülnek
Vigyázat
Lépés a nyomtatópatron telepítése
Kimeneti eszközök
Lépés a kimeneti eszköz üzembe helyezése
Tálcás postaláda eszköz
Lépés a kezelőpanel fedőlapjának cseréje
Az interfész portok elhelyezkedése
10. lépés a készülék kábeleinek csatlakoztatása
LAN-csatlakozó RJ-45
Párhuzamos B csatlakozó párhuzamos
Csatlakoztatás Ethernet 10/100Base-TX hálózathoz
Lásd a kezelőpanel kijelzője nyelvének beállítása
11. lépés a tápkábelek csatlakoztatása
Kezelőpanel nyelvének beállítása
12. lépés Kezelőpanel kijelzője nyelvének beállítása
Papír behelyezése az 1. tálcába
13. lépés Papír behelyezése az 1., 2., 3. és 4. tálcába
Helyezzen be A4 vagy letter méretű lapokat
Papír behelyezése a 2. és a 3. tálcába
Papír behelyezése a 4. tálcába
Tálcát finoman tolja be a készülékbe
Érintse meg a Konfiguráció nyomtatása elemet
14. lépés a konfigurációs oldal kinyomtatása
Gazdagépnevét
Windows nyomtatószoftver telepítése
16. lépés a szoftver telepítése
Macintosh nyomtatószoftver telepítése
Az e-mail funkció ellenőrzése
17. lépés a készülék telepítésének ellenőrzése
Ügyféltámogatás
Másolási funkció ellenőrzése
Hewlett-Packard korlátozott garanciavállalás
Garancia és szabályozási információk
Szerviz a garanciális idő alatt és után
Tulajdonjog
HP Premium Protection garanciája
HP szoftver-licenc feltételek
Licenc engedély
Elévülés, megszakítás
Másolatok és adaptációk
Visszafejtés és dekódolás tiltása
Átruházás
Koreai EMI nyilatkozat
FCC előírások
Kanadai DOC előírások
Vcci nyilatkozat Japán
Anyagbiztonsági adatlap
Biztonsági tájékoztató
Lézernyilatkozat Finnország számára
Lézer biztonság
Megfelel a következő termékspecifikációknak
Megfelelőségi nyilatkozat
120 a készülék üzembe helyezése
Polski
Wprowadzenie
Znaki towarowe
Spis treści
Spis treści
Wstęp
Podręcznik użytkownika
Szczegółowe informacje
Lista kontrolna instalacji
Podręcznik instalacji
Wymagania dotyczące miejsca na opakowanie transportowe
Krok 1. Przygotowanie miejsca pod urządzenie wielofunkcyjne
Wymagania dotyczące miejsca na rozpakowanie
1105 mm 1201 mm 643 mm 457 mm 536 mm 533 mm 554 mm 648 mm
Wymiary urządzenia wielofunkcyjnego
826 mm 470 mm 457 mm 1219 mm
533 mm 554 mm 648 mm 643 mm 457 mm 826 mm 470 mm 1664 mm
1308 mm 643 mm
1194 mm
617 mm 643 mm 457 mm 691 mm 1664 mm
457 mm 1664 mm
1018 mm 643 mm 463 mm 555 mm 45 mm
Plww
Plakat referencyjny
Krok 2. Sprawdzenie zawartości opakowania
Plww
Uwaga
Krok 4. Usunięcie wewnętrznych materiałów zabezpieczających
Elementy urządzenia wielofunkcyjnego widok z przodu i z tyłu
Krok 5. Identyfikacja części urządzenia wielofunkcyjnego
Urządzeń wyjściowych
Krok 6. Ustawienie urządzenia wielofunkcyjnego
Krok 7. Instalacja kasety z tonerem
Urządzenia wyjściowe
Krok 8. Instalacja urządzeń wyjściowych
Krok 9. Zmiana nakładek panelu sterowania
Umiejscowienie portów interfejsu
Krok 10. Podłączanie kabli urządzenia wielofunkcyjnego
Podłączony do gniazdka elektrycznego
Uwaga
Krok 11. Podłączanie przewodów zasilających
Konfiguracja języka panelu sterowania
Krok 12. Konfiguracja języka wyświetlacza panelu sterowania
Ładowanie papieru do podajnika
Krok 13. Ładowanie papieru do podajników 1, 2, 3 oraz
Podajnika
Dodawanie papieru do podajnika 2 oraz podajnika
Otwórz podajnik 4, wysuwając go aż do zatrzymania
Dodawanie papieru do podajnika
Zamknij podajnik
Krok 14. Drukowanie strony konfiguracji
Dotknij przycisku E-mail
Dotknij przycisku Konfiguruj urządzenie
Krok 16. Instalacja oprogramowania
Polski
Testowanie funkcji drukowania
Wsparcie klienta
Testowanie funkcji kopiowania
Testowanie funkcji przesyłania poczty elektronicznej
Gwarancja oraz informacje prawne
Serwis podczas i po zakończeniu okresu gwarancyjnego
Licencja na oprogramowanie HP
Gwarancja firmy HP na kasety z tonerem
Ograniczona gwarancja na kasety drukujące i bębny obrazu
Wymagania dotyczące eksportu
Dekompilacja i dekodowanie
Przekazanie Oprogramowania
Utrata praw
Oświadczenie EMI dla Korei Oświadczenie EMI dla Tajwanu
Oświadczenie o zgodności z normami FCC
Kanadyjska deklaracja zgodności DOC
Oświadczenie Vcci Japan
Bezpieczeństwo związane z promieniowaniem laserowym
Informacje na temat bezpieczeństwa
Informacje o bezpieczeństwie materiałów
Oznaczenia modeli
Deklaracja zgodności
Wszystkie
תומיאת תרהצה
תירבע
הרהזא
תוחיטב אשונב עדימ
FCC תונקת
HP לש הנכות רצומל יושיר יאנת
HP לש תדחוימ תוירחא
הירחאלו תוירחאה תפוקת ךלהמב תוריש
Hewlett-Packard לש תלבגומ תוירחא בתכ
תונקתו תוירחא יאשונב עדימ
חוקלל הכימת
רצומה תנקתה תקידב 17 בלש
הרעה
Macintosh תוכרעמב הספדה תנכות תנקתה
Windows תוכרעמב הספדה תנכות תנקתה
הנכות תנקתה 16 בלש
תינבומ ינורטקלא ראודל החילש לש הרוצת תרדגה 15 בלש
תורוצתה ףד תספדה 14 בלש
תוריהז
שגמ תניעט
רצומה לש הרקבה חולב ועיפוי הז שגמ רובע ריינה גוסו לדוגה יטרפ
3 ,2 ,1 םישגמ תניעט 13 בלש
הרקבה חול תגוצתב הפשה תרוצת תרדגה 12 בלש
הרקבה חול תגוצתב הפשה תרוצת תרדגה האר .ךלש
למשח ילבכ רוביח 11 בלש
Ethernet 10/100Base-TX תשרל תורבחתה
רצומה ילבכ רוביח 10 בלש
בלש
הרקבה חול תויוות תפלחה
טלפ ןקתה תנקתה בלש
הספדהה תינסחמ תנקתה
רצומה תבצה בלש
רצומה יקלח יוהיז בלש
םיימינפה הזיראה יקלח תרסה בלש
הלבוהה תביתמ רצומה תאצוה בלש
הזיראה תלוכת תקידב בלש
11 הנקתהל גוית תמישר
826
ץניא 480 ממ 1,018
ממ 463 ממ ץניא 470 ץניא 18 2 ץניא ץניא 66 ממ 1,664
הנקתהל גוית תמישר
Heww
רצומ תודימ
רצומה תזירא תלבקל שרדנה חטשה
רצומה תבצה רוזא תנכה בלש
הנקתהל גוית תמישר
עדימ שפחל ןכיה
אובמ
םיניינעה ןכות
רצומה תנקתה
םימושר רחסמ ינמיס
ךרדה תליחת ךירדמ
Page
Q3726-90904