Maintenance and Service Guide
Page
Safety warning notice
Iv Safety warning notice
Table of contents
123
146
Viii
Intel Core i7 processor, Dual Core
Intel Core i5 processors, Dual Core
Intel Celeron processors
Category Description HP ProBook HP EliteBook 6460b 8460p
Intel Core i3 processors, Dual Core
Chipset
Flash cache
Memory
Hard drives
Audio
Upgrade bay
Microphone
Webcam
Integrated Wwan options by way of wireless module
Wireless Integrated Wlan options by way of wireless module
Ethernet
Docking
External media card
Ports
Keyboard/pointing
Operating system Preinstalled
Power requirements
Security
Preinstalled with Microsoft Office
Web-only support
Restore Media
Serviceability End-user replaceable parts
Certified
Display
Component Description
To use the webcam, select Start All Programs HP
HP Webcam
External component identification
Top
TouchPad
Lights
Top
Buttons and fingerprint reader
Windows 7-SelectStart Control Panel System
Security Power Options
System and Maintenance Power Options
Windows Vista-SelectStart Control Panel
Keys
Esc key
Num lk key
Front
Left
All Programs SRS Premium Sound
Rear
Right
External component identification
Bottom
Start All Programs SRS Premium Sound
External component identification
Service tag
Illustrated parts catalog
Computer major components
Illustrated parts catalog
ExpressCard assembly
Lid switch board includes cable
RTC battery
Description Spare part number Display panel Not spared
Modem module
Description Spare part number
Wlan module
Computer major components
593530-001
Processor Intel Core i7 processors, Quad Core
Intel Core i7 processors, Dual Core
Wwan modules
Intel Celeron processor, Dual Core
Fan
Optical drive
Speaker assembly
Battery, Li-ion
Display components
Webcam module with microphone
Wlan antennas
Display hinge covers
Display Cable Kit
Wwan antennas
Display Screw Kit not illustrated
Item Description Spare part number
Display Latch Kit not illustrated
Display Rubber Kit not illustrated
Cable Kit
Item Description Spare part number Cable Kit 641830-001
Plastics Kit
Mass storage devices
Upgrade Bay Hard Drive Adapter Kit
Description Spare part number Optical drive
Miscellaneous parts
Sequential part number listing
Spare part Description Number
Illustrated parts catalog
Yemen, Zaire, Zambia, and Zimbabwe
Illustrated parts catalog
Sequential part number listing
Illustrated parts catalog
Sequential part number listing
Illustrated parts catalog
Sequential part number listing
Illustrated parts catalog
Sequential part number listing
WWAN, and 512-MB graphics
Ukraine and the Peoples Republic of China
Service considerations
Preliminary replacement requirements
Tools required
Cables and connectors
Typical electrostatic voltage levels
Grounding guidelines
Event 10% 40% 55%
Packaging and transporting guidelines
Equipment guidelines
Material Use Voltage protection level
Component replacement procedures
Service tag
Computer feet
Battery
SIM
Microphone modules
Description Spare part number Display panels
Display bezels
Display Screw Kit
Page
Page
Page
Component replacement procedures
Bottom door
Smart card reader
Description Spare part number For use in 6460b/8460p models
Optical drive
For use in 8460w models
Page
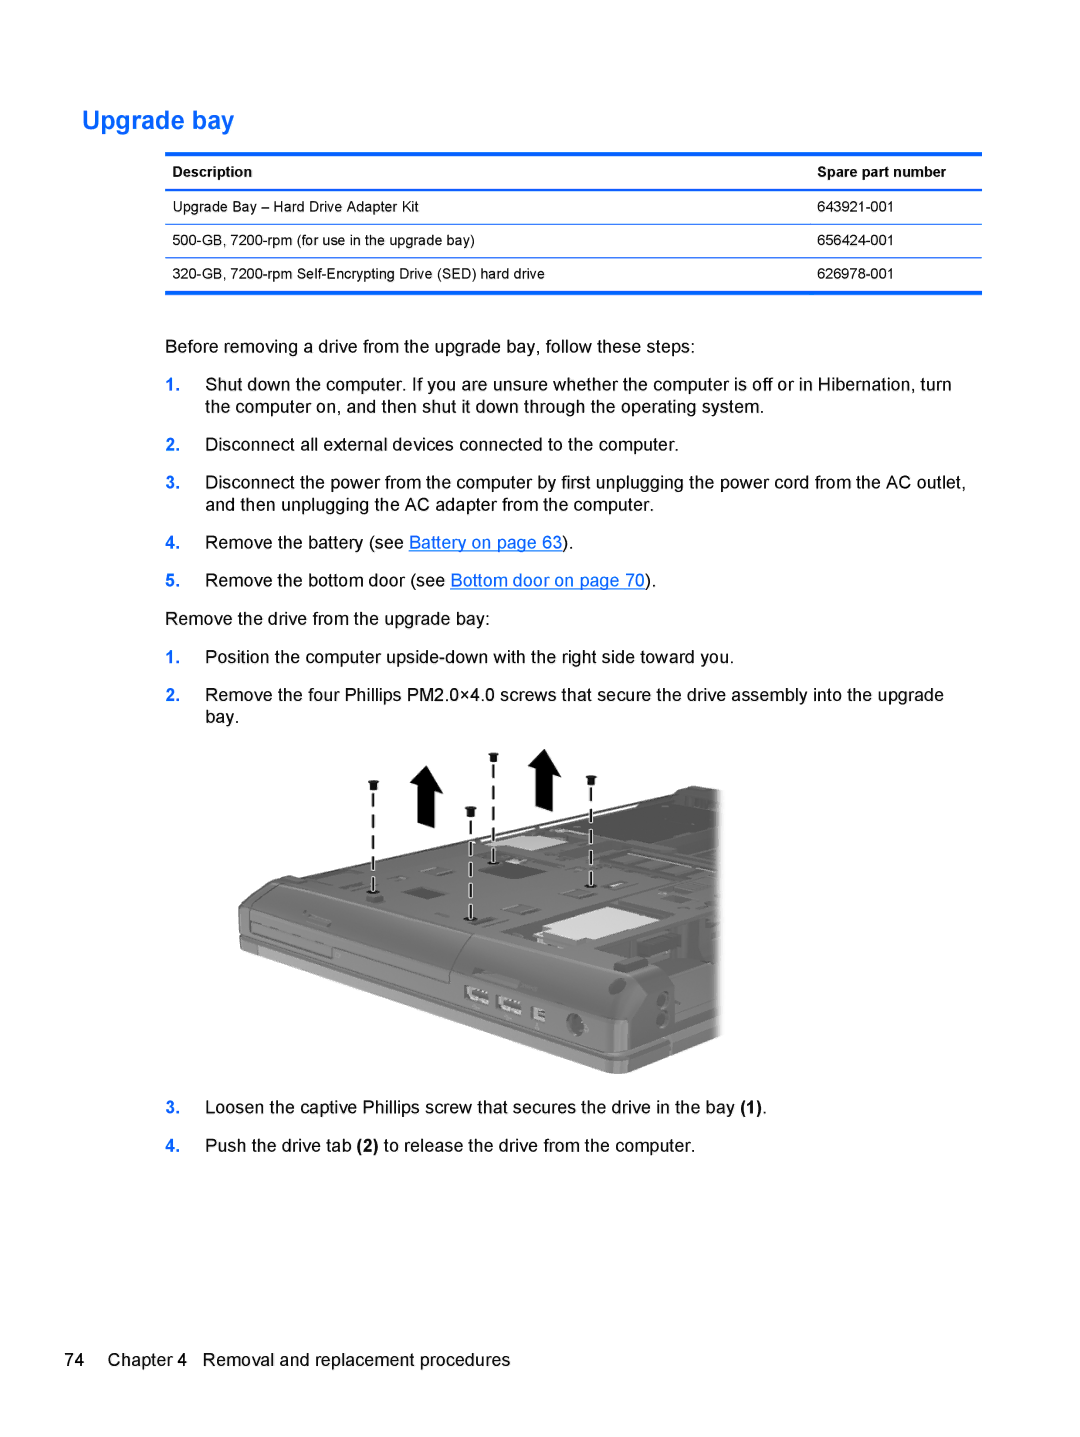
Upgrade bay
Page
Hard drive
Page
RTC battery
Description Spare part number RTC battery 651948-001
Update Bios before adding memory modules
Memory modules
Page
Wwan module
Page
Wlan module
Removal and replacement procedures
Description Spare part number
Page
Page
Bluetooth module
Description Spare part number Bluetooth module 537921-001
Modem module
Description Spare part number Modem module 628824-001
Fan
Description Spare part number Fan 641839-001
Heat sink
Page
Page
Processor
Page
Keyboard
Page
Description Spare part number For use in 6460b models
Bottom cover
For use in 8460p models
Page
Page
Page
Fingerprint reader board
Page
Lid switch
Page
Speaker assembly
Description Spare part number Speaker assembly 641840-001
Page
RJ-11 connector cable
Page
Page
Page
Page
Page
Page
Page
System board
For use only in Russia and China
Description Spare part number
Page
Page
USB 3.0 board
Description Spare part number USB 3.0 board 642762-001
ExpressCard assembly
Page
Starting Computer Setup
Using Computer Setup
Navigating and selecting in Computer Setup
Restoring factory settings in Computer Setup
Updating the Bios
Determining the Bios version
Using System Diagnostics
Computer specifications
35.6-cm 14.0-in, HD display specifications
Color gamut
35.6-cm 14.0-in, HD+ display specifications
Pixel resolution
Viewing angle @ CR10
Hard drive specifications
DVD±RW and CD-RW SuperMulti DL Combo Drive specifications
Blu-ray Disc ROM with SuperMulti DVD±R/RW DL Drive
CD-DA, CD+EG, CD-MIDI, CDTEXT, CD-ROM, CD-ROM XA
Maximum Media Capacity read
Blu-ray BD-R/RE + Dvdsm DL Drive
Maximum Media Capacity write Data transfer rate
Applicable disc
DVD-ROM Drive specifications
Cache buffer
Specification information in Device Manager
Windows
Backing up your information
Performing a system recovery
Select Start All Programs Maintenance Backup and Restore
Using the Windows recovery tools
Using a Windows 7 operating system DVD purchased separately
Windows Vista
Performing a recovery
Using f11 recovery tools
Follow the on-screen instructions Windows Vista
Power cord set requirements
Requirements for all countries and regions
Requirements for specific countries and regions
Country/region Accredited agency Applicable note number
Battery
Recycling
Page
Page
Page
Page
Page
Index
Jacks