Smart Phone
Copyright Information
Please Read Before Proceeding
Electrical Safety
Important Health Information and Safety Precautions
Prevention of Hearing Loss
Safety in AIR Crafts
Safety Precautions for RF Exposure
Damage requiring service
Heed service markings
Avoid wet areas
Never use the product in a wet location
Adjust the volume
Mounting Accessories
Cleaning
Avoid pushing objects into product
Contents
Getting Connected
Up E-mail Security
Managing your Phone
Experiencing Multimedia
Exchanging Messages and Using Outlook
Index 165
Using Other Applications 147
Appendix 155
Chapter
Getting to Know Your Phone and Its Accessories
Speaker Display Screen Left Soft KEY
LED Indicators
Qwerty Keyboard Microphone Back END Right Soft KEY
Function
19 20 21
Manager, and enable/disable key lock and enable/disable
Press and quickly release the Power button to display
Press to turn on more than 1 second and off the phone. Or
Quick List, which allows you to change profiles, open Comm
Bottom LED Status
LED indicator lights
Top LED Status
Following accessories are provided with the phone
Accessories
Accessory Function
AC adaptor Recharge the phone battery USB cable
Inserting the SIM Card
Open the cover and remove the battery
Insert the SIM card
Insert SIM card
To install the Micro SD card
Replace the battery
Press the bottom part of the battery into place
Getting Started
Icon Description
Icon Program Description
Games
Settings
Internet
Explorer
Voice Speed
To see the available programs in the Start menu
Press the corresponding
To access the Quick List
Battery Information
On the Home screen, click Start Settings Power Management
To check the battery power
To optimize the power performance
To manage a low battery
Getting Started
Using Phone Features
Phone screen
Using the Phone
Enter your PIN
Set ring tones
Phone Screen
Make a call from the Home screen
Make a call from Call History
Make a call from Contacts
To specify the number to dial
To customize calls
Make a call from SIM Manager
Make a call from Speed Dial
Delete List
Contacts
To end a call
To answer or ignore an incoming call
Press END
To answer another call
To set up a conference call
To switch between calls
Click Menu Conference
To turn on and off the Speakerphone
Make an international call
Make an emergency call
Insert a pause in a dialing sequence
Click Menu Edit
Click Menu Insert Wait
Insert a longer pause in a dialing sequence
Using Phone Features
Synchronizing Information and Setting Up E-mail Security
About ActiveSync
To install and set up ActiveSync on the computer
Synchronizing Information and Setting Up E-mail Security
Synchronizing Information and Setting Up E-mail Security
To manually start and stop synchronization
Location New state
Synchronize Outlook information with the computer
To change which information is synchronized
Synchronize Outlook information with Exchange Server
Next
To synchronize directly with Exchange Server
Do one of the following
Using ActiveSync
Using Comm Manager Click Start Comm Manager
Schedule synchronization with Exchange Server
ActiveSync on your phone, click Menu Schedule
Select a longer interval in the Off-peak times box
To synchronize with a PC via Bluetooth
To schedule synchronization at regular time intervals
Click Sync
When finished, click Menu Disconnect Bluetooth
Click Set up Sync
Change Media synchronization settings
To set up a sync relationship with a storage card
Click Menu Options
Digitally sign and encrypt all messages
Synchronizing Information and Setting Up E-mail Security
Managing your Phone
Set date, time, language, and other regional options
Set up the Home screen
Personalizing your Phone
To set the date and time
Choose how to be notified about events or actions
To change the current profile
To edit a profile
To specify the sound for an event
To set an alarm
To set sound for the keyboard
To copy a sound to your phone
On the Home screen, click Start Settings Owner Information
Set performance and maintenance options
To change accessibility settings
Set personal information
Adjust the following
To change power management settings
To turn on and off error reporting
To find the operating system version number
To add programs
To remove a program
Use Task Manager
To see how much memory is available
To start Task Manager
Option Allows you to
To copy a file using ActiveSync
To start File Explorer
Use File Explorer
To send a file as an e-mail attachment
File Explorer menu contains the following options
File Explorer, select a file
Click Menu Send
To disable the SIM PIN
To enable the SIM personal Identification number PIN
To change the SIM PIN
To lock the keyboard
To disable the phone lock
To enable the phone lock
Restarting your Phone
To unlock the keyboard
Click Start Expert Clear Storage
Resetting your Phone
To reset your phone
Getting Connected
Set up a Gprs connection
Connecting to the Internet
To set up a Gprs connection
Set up a Dial-up connection
On the Home screen, click Start Settings Connections Gprs
Click Menu Add Description, enter a name for the connection
To set up a dial-up connection to your corporate network
To set up a dial-up connection for browsing the Internet
Explorer
Connects to, select Work
Add a URL exception
Advanced options
Click Menu Advanced
Click Menu Advanced Click Menu Work URL Exceptions
To go to a link
To open Internet Explorer
To go to a Web
To change Web page display options
To add a Web page to the Favorites list
To view a page in full-screen mode
To view a favorite
To move a favorite to a folder
To set up the phone as a USB modem
Set up the phone as a modem
To send a link via e-mail
To end the Internet connection
To open Comm Manager
To set up the phone as a Bluetooth modem
Bluetooth modes
To turn on or off Bluetooth on your phone
Bluetooth partnerships
Bluetooth
To make your phone visible
Bluetooth Click Menu Devices
To create a Bluetooth partnership
To accept a Bluetooth partnership
Passcode must be between 1 and 16 characters
To change the display name of a Bluetooth device
Connect a Bluetooth hands-free or stereo headset
To delete a Bluetooth partnership
Click Menu Delete
To connect a Bluetooth hands-free or stereo headset
To beam information from your phone to a computer
Beam information using Bluetooth
Click Menu Beam type of item
On the computer, click Finish to exit the wizard
Use the phone as a Bluetooth modem
To connect to an existing Wi-Fi network
Enter the Network name and Network type and click Next
Click Done on the Wi-Fi screen
To create a new Wi-Fi connection
Select an Authentication Type
To increase security on the Wi-Fi network
Exchanging Messages and Using Outlook
Click Start ActiveSync
Using E-mail and Text Messages
Set up Outlook E-mail
Set up a POP3/IMAP4 e-mail account
Setting Description
To compose and send an e-mail or text message
Send and receive messages
On the Home screen, click Start Messaging
To reply to or forward a message
To add an attachment to an e-mail message
To exclude your e-mail address when replying to all
Voice Note
To download attachments
To download messages from the server
Download messages
Individually sign and encrypt a message
Click Menu Check Certificate
To digitally sign and encrypt a new message
Message list, select Outlook E-mail Click New
View Certificate
Manage folders
To access MMS
To access MMS message folders
Edit MMS settings
To configure MMS settings
Click Start Messaging MMS, then click Menu Folders
Exchanging Messages and Using Outlook
To start composing an MMS message
Create and send MMS messages
Message
To create an MMS message from a template
To insert a photo or video clip into an MMS message
To add emoticons or Favorites URLs to an MMS message
To add predefined text to an MMS message
Add emoticons or Favorites URLs to your messages
To add an audio clip to an MMS message
To set options for an MMS message
View, reply, and block MMS messages
To receive MMS messages
To view an MMS message
To block a phone number from sending you MMS messages
To reply to an MMS message
To sign in or out
To start MSN Messenger
To add or delete contacts
To send an instant message
To change your display name
To change your own Messenger status
To schedule an appointment
To make an appointment recurring
To create a new contact on your phone
To send a calendar appointment
Send
Enter information for the new contact then click Done
To create a new contact on your SIM card
To view and edit a contact information
To call a contact from the contact list
To find a contact online
To send a text message to a contact
To find a contact
Do either of the following Contacts, click Menu Find
Click Start Contacts Menu View By Name
Online
A new message, in the To box, click Menu Add Recipient
Click a category to filter
To filter the contact list
Click Menu Filter
To assign a picture to a contact
To assign a ring tone to a contact
Click Menu Edit Click Picture
To send a contact’s details
To delete a task
To create a task
To locate a task
To mark a task as completed
To delete a voice note
To create a voice note
Click Yes
To listen to a voice note
Exchanging Messages and Using Outlook
Experiencing Multimedia
Capture modes
Using Camera and Video Recorder
Capture type Format
Capture mode
Available capture modes are as follows
Camera Photo screen
Camera mode icons and indicators
Capture mode. Indicates the current capture mode
Camera Picture Theme screen
Camera Video screen
Progress
Icon Function
Review screen
Use Still Image capture modes
Use Video capture mode
Use MMS Video capture mode
Use zooming
Use the Camera Menu
Capture mode Resolution Zoom range
Cool to apply to your photos or video clips
Advanced settings of the Camera Menu
About. Displays information about the Camera program
To view pictures
To copy a picture or video clip to your phone
To play videos
To play GIF animation files
To view slide shows
To start the camera from Pictures & Videos
To send pictures and video clips via e-mail
To set a picture as the Home screen background
Select the display area and click Next
Click Menu Beam
To beam pictures
To assign pictures to contacts
Click Menu Save to Contact
To open Windows Media Player, click Start Windows Media
About the screens and menus
About the controls
Now Playing screen menu
Playback screen menu
Menu
Library screen menu
Copy files to your phone
To synchronize content to your phone automatically
About licenses and protected files
List
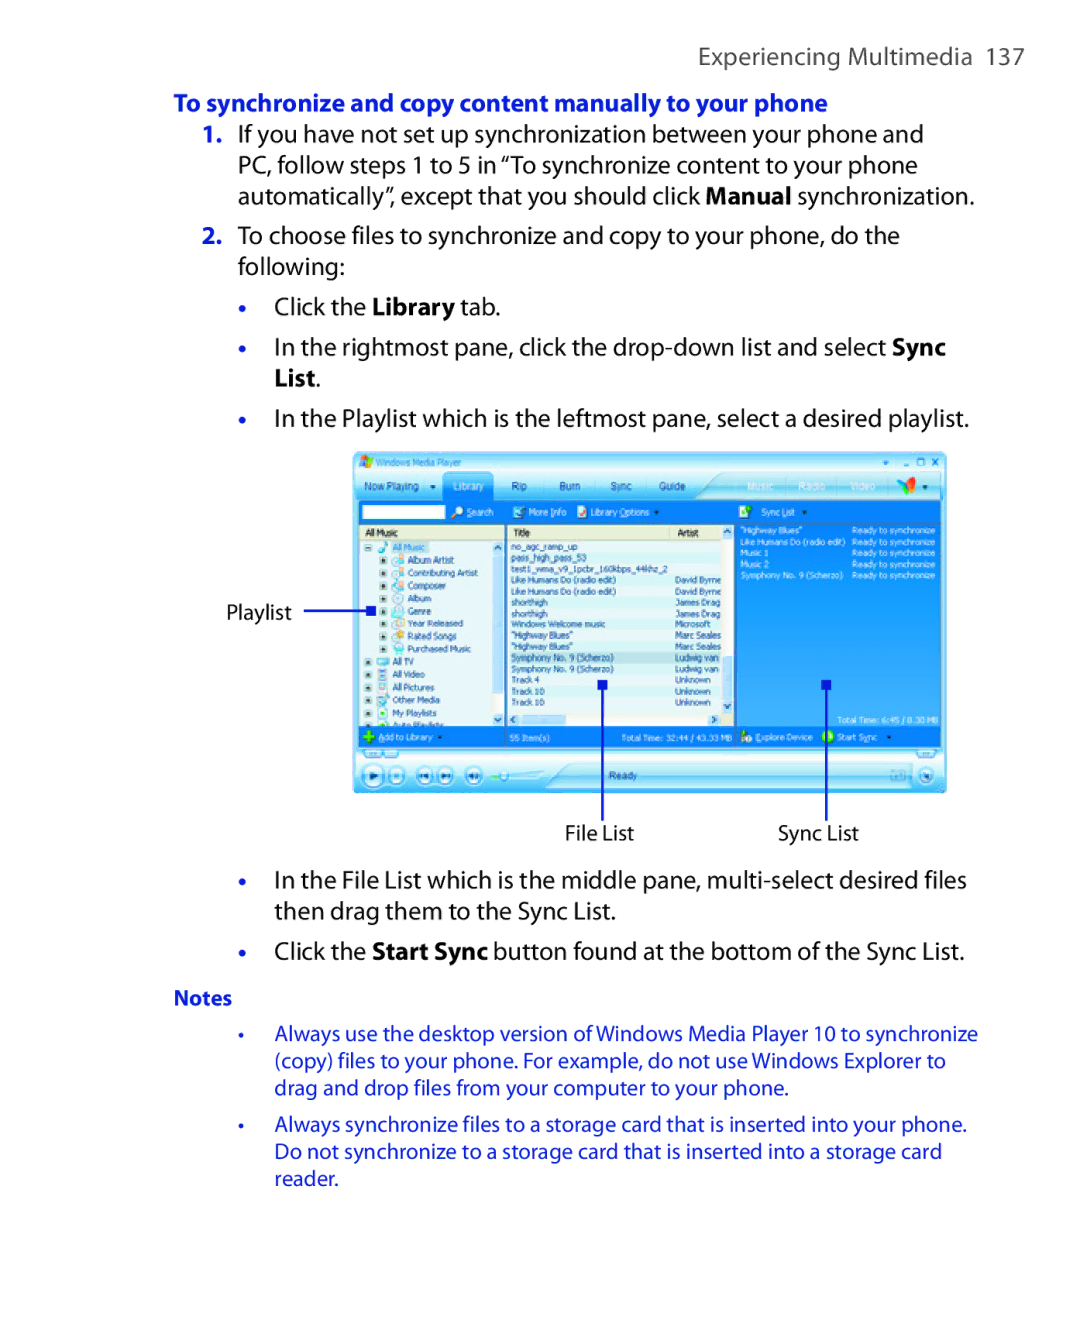
To synchronize and copy content manually to your phone
To play media on your phone
Play media
To play media on a network
Change Player appearance
Click Menu Open URL
Click Menu Options Skins
To install MIDlets from a PC
Troubleshooting
To install MIDlets from the Internet
Click Yes to install Click Done to confirm the installation
To install MIDlets from a local folder
Click Menu Install
Manage MIDlets
To customize the display settings
To run MIDlets on your phone
To view the MIDlets currently running
To change the display name of a MIDlet
To uninstall a MIDlet
To check storage space
To select a network type
Security Option Description
To configure MIDlet security
Click Menu Manage Security
System Network out There is no network connection available
Error messages
Error Message Description
Experiencing Multimedia
Using Voice Speed Dial
Using Other Applications
ClearVue Presentation
Using ClearVue Suite
To open a presentation file
To change the view
To set up your presentation show
To change the zoom ratio of the view mode
To set up a custom show
To view your presentation
ClearVue Document
ClearVue Worksheet
Cancel
Using Speed Dial
To create a speed dial entry for a contact
Dial
Click Menu Add Speed Dial
To make a call or launch a program using Speed Dial
To retrieve a voice mail message
To delete a speed dial entry
To create a voice tag for a program
Click Menu Add Voice Tag
To edit, delete, and play voice tags
To make a call or launch a program using the voice tag
Click Start Voice Speed Dial
Appendix
Federal Communications Commission Notice
Regulatory Notices
Regulatory Agency Identifications
49 mW/g 1g
Safety precautions for RF exposure
SAR Information
Hearing Aids
Pacemakers
Other Medical Devices
Other tips and cautions
RoHS Compliance
Weee Notice
PC Requirement to Run ActiveSync
Display
System information
GSM/GPRS/EDGE Quad-band module
Camera module
Audio
Connection
Physical
Controls and lights
Expansion slot
Power supply
Appendix
Index
Index
Gprs
Owner information 5
Joggr 1
Index
Sounds 5 7 Speakerphone 3 7 Speed Dial 25 3 5 15
Index