INSTALLATION

47 COMMISSIONING AND TESTING

The Benchmark Log Section of this book or equivalent self certification should be completed and signed to demonstrate compliance with Building Regulations.

A. ELECTRICAL INSTALLATION

1.Checks to ensure electrical safety should be carried out by a competent person.

2.ALWAYS carry out preliminary electrical system checks, i.e. earth continuity, polarity, resistance to earth and short circuit using a suitable test meter.

B. GAS INSTALLATION

1.The whole of the gas installation, including the meter, MUST be inspected and tested for soundness, and purged in accordance with the recommendations of BS. 6891.

In IE refer to I.S.813:2002.

2.Purging air from the gas installation may be expedited by loosening the union on the gas service cock on the boiler and purging until gas is detected.

3.Retighten the union and check for gas soundness.

WARNING. Whilst effecting the required gas soundness test and purging air from the gas installation open all windows and doors, extinguish naked lights and DO NOT SMOKE.

INSTALLATION

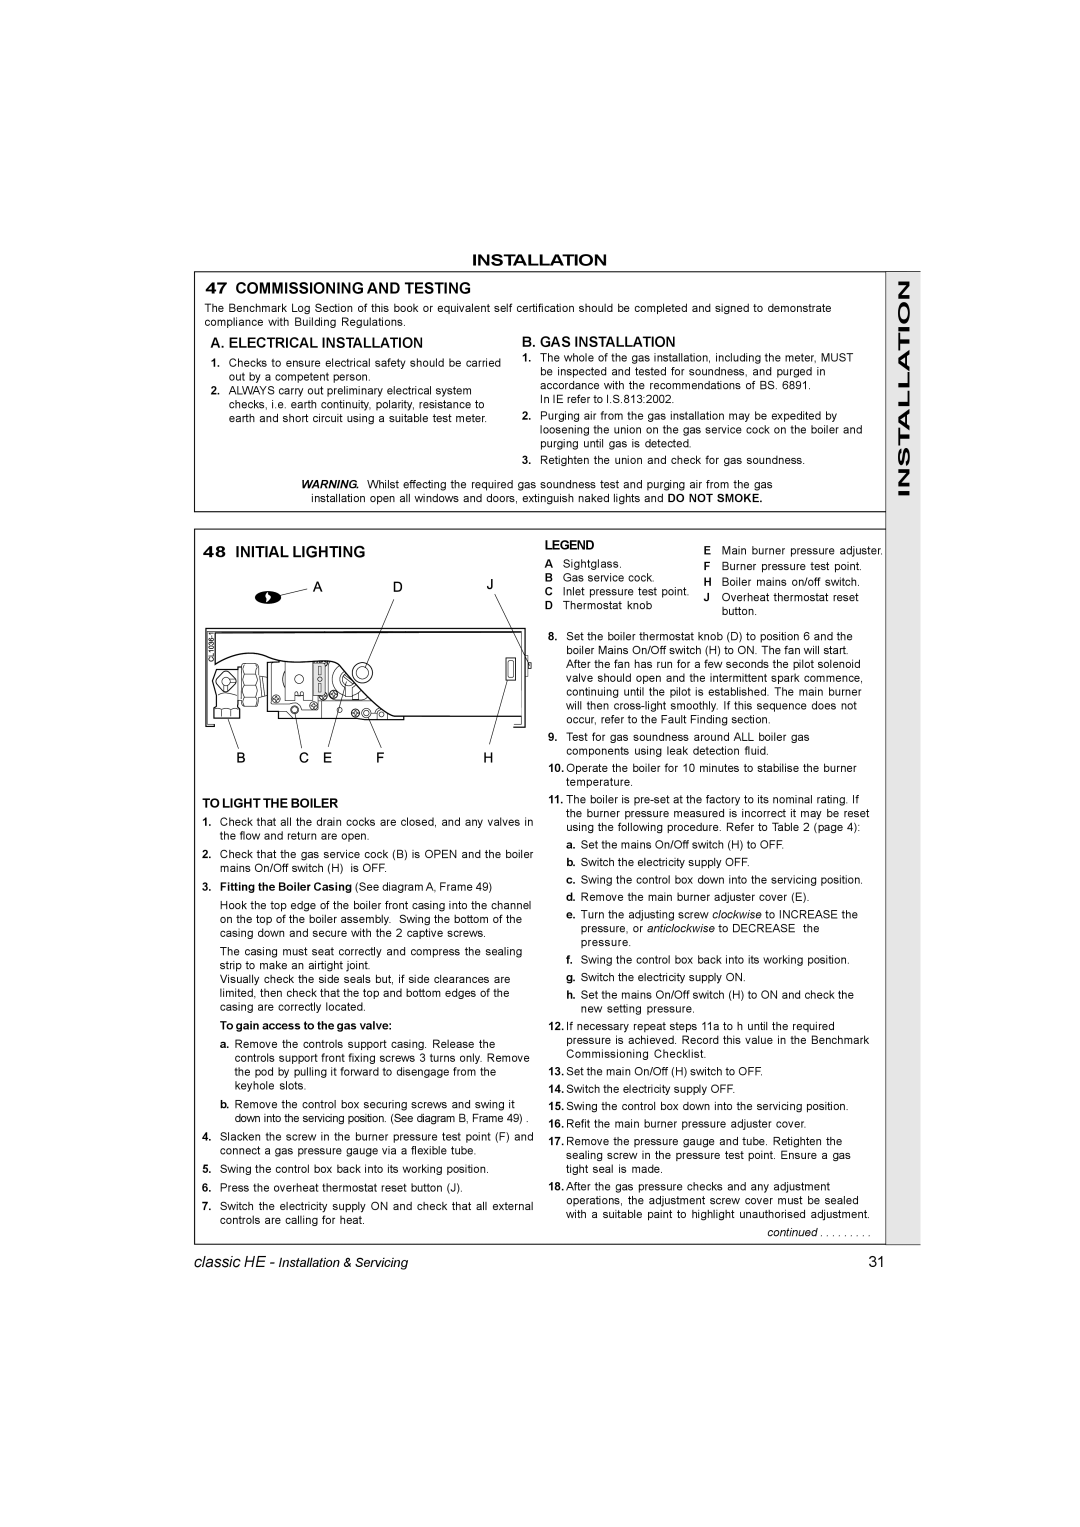
48 INITIAL LIGHTING

TO LIGHT THE BOILER

1.Check that all the drain cocks are closed, and any valves in the flow and return are open.

2.Check that the gas service cock (B) is OPEN and the boiler mains On/Off switch (H) is OFF.

3.Fitting the Boiler Casing (See diagram A, Frame 49)

Hook the top edge of the boiler front casing into the channel on the top of the boiler assembly. Swing the bottom of the casing down and secure with the 2 captive screws.

The casing must seat correctly and compress the sealing strip to make an airtight joint.

Visually check the side seals but, if side clearances are limited, then check that the top and bottom edges of the casing are correctly located.

To gain access to the gas valve:

a.Remove the controls support casing. Release the controls support front fixing screws 3 turns only. Remove the pod by pulling it forward to disengage from the keyhole slots.

b.Remove the control box securing screws and swing it down into the servicing position. (See diagram B, Frame 49) .

4.Slacken the screw in the burner pressure test point (F) and connect a gas pressure gauge via a flexible tube.

5.Swing the control box back into its working position.

6.Press the overheat thermostat reset button (J).

7.Switch the electricity supply ON and check that all external controls are calling for heat.

LEGEND

E

Main burner pressure adjuster.

A

Sightglass.

F

Burner pressure test point.

B

Gas service cock.

H

Boiler mains on/off switch.

C Inlet pressure test point.

J

Overheat thermostat reset

D

Thermostat knob


button.


8.Set the boiler thermostat knob (D) to position 6 and the boiler Mains On/Off switch (H) to ON. The fan will start. After the fan has run for a few seconds the pilot solenoid valve should open and the intermittent spark commence, continuing until the pilot is established. The main burner will then cross-light smoothly. If this sequence does not occur, refer to the Fault Finding section.

9.Test for gas soundness around ALL boiler gas components using leak detection fluid.

10.Operate the boiler for 10 minutes to stabilise the burner temperature.

11.The boiler is pre-set at the factory to its nominal rating. If the burner pressure measured is incorrect it may be reset using the following procedure. Refer to Table 2 (page 4):

a.Set the mains On/Off switch (H) to OFF.

b.Switch the electricity supply OFF.

c.Swing the control box down into the servicing position.

d.Remove the main burner adjuster cover (E).

e.Turn the adjusting screw clockwise to INCREASE the pressure, or anticlockwise to DECREASE the pressure.

f.Swing the control box back into its working position.

g.Switch the electricity supply ON.

h.Set the mains On/Off switch (H) to ON and check the new setting pressure.

12.If necessary repeat steps 11a to h until the required pressure is achieved. Record this value in the Benchmark Commissioning Checklist.

13.Set the main On/Off (H) switch to OFF.

14.Switch the electricity supply OFF.

15.Swing the control box down into the servicing position.

16.Refit the main burner pressure adjuster cover.

17.Remove the pressure gauge and tube. Retighten the sealing screw in the pressure test point. Ensure a gas tight seal is made.

18.After the gas pressure checks and any adjustment operations, the adjustment screw cover must be sealed with a suitable paint to highlight unauthorised adjustment.

continued . . . . . . . . .

classic HE - Installation & Servicing

31

Page 31
Image 31
IDEAL INDUSTRIES HE15, HE9, HE18 Installation Commissioning and Testing, Initial Lighting, To gain access to the gas valve

HE12, HE15, HE18, HE9 specifications

The IDEAL INDUSTRIES HE series, comprising the HE24, HE18, HE15, and HE12 models, represents a significant advancement in the field of electrical testing and measurement tools. These versatile testers stand out in professional environments for their high accuracy, user-friendly interfaces, and advanced features designed to enhance efficiency and reliability in electrical inspections.

The HE24 is the flagship model, boasting an extensive range of functionalities. It includes advanced digital multimeter capabilities, allowing for precise measurements of voltage, current, and resistance. Its True RMS feature ensures accurate readings, even with non-linear loads. The HE24 also incorporates advanced connectivity options, including Bluetooth technology, enabling users to transfer data wirelessly to smartphones or tablets for further analysis. The large, backlit display enhances visibility in various lighting conditions, making it an ideal tool for both indoor and outdoor use.

The HE18 model, while slightly more streamlined than the HE24, still offers robust capabilities. It features multiple testing modes, including continuity and diode testing, catering to a wide range of electrical tasks. The HE18 also utilizes a user-friendly interface, allowing technicians to navigate easily through various functions. Equipped with a protective rubber housing, this model is durable and built to withstand the rigors of frequent use on job sites.

The HE15 and HE12 models represent the compact, entry-level offerings in the HE series. Designed for the budget-conscious user, these models retain essential functionalities such as basic voltage and current measuring capabilities while prioritizing ease of use. The HE15 includes a simple LED indicator to signal when measurements are being taken, promoting straightforward operation. Additionally, the HE12 features a lightweight design, making it the perfect tool for on-the-go technicians.

All models in the IDEAL INDUSTRIES HE series are engineered with safety in mind, adhering to stringent international testing standards. They provide superior insulation resistance and a high degree of accuracy, mitigating the risks associated with electrical work. Furthermore, their IP-rated enclosures ensure protection against dust and moisture, enhancing longevity.

In conclusion, the IDEAL INDUSTRIES HE24, HE18, HE15, and HE12 series represent a comprehensive range of electrical testing tools that cater to professionals' varied needs. With their combination of advanced features, user-friendly designs, and safety compliance, these models are excellent choices for any electrical technician aiming for accuracy and efficiency in their work.