Installation Instructions |
|
|
|
| ||||
Adjustments |
|
|
|
|
|
|
| |
Height Adjustment | 2 |
|
|
|
|
|
| |
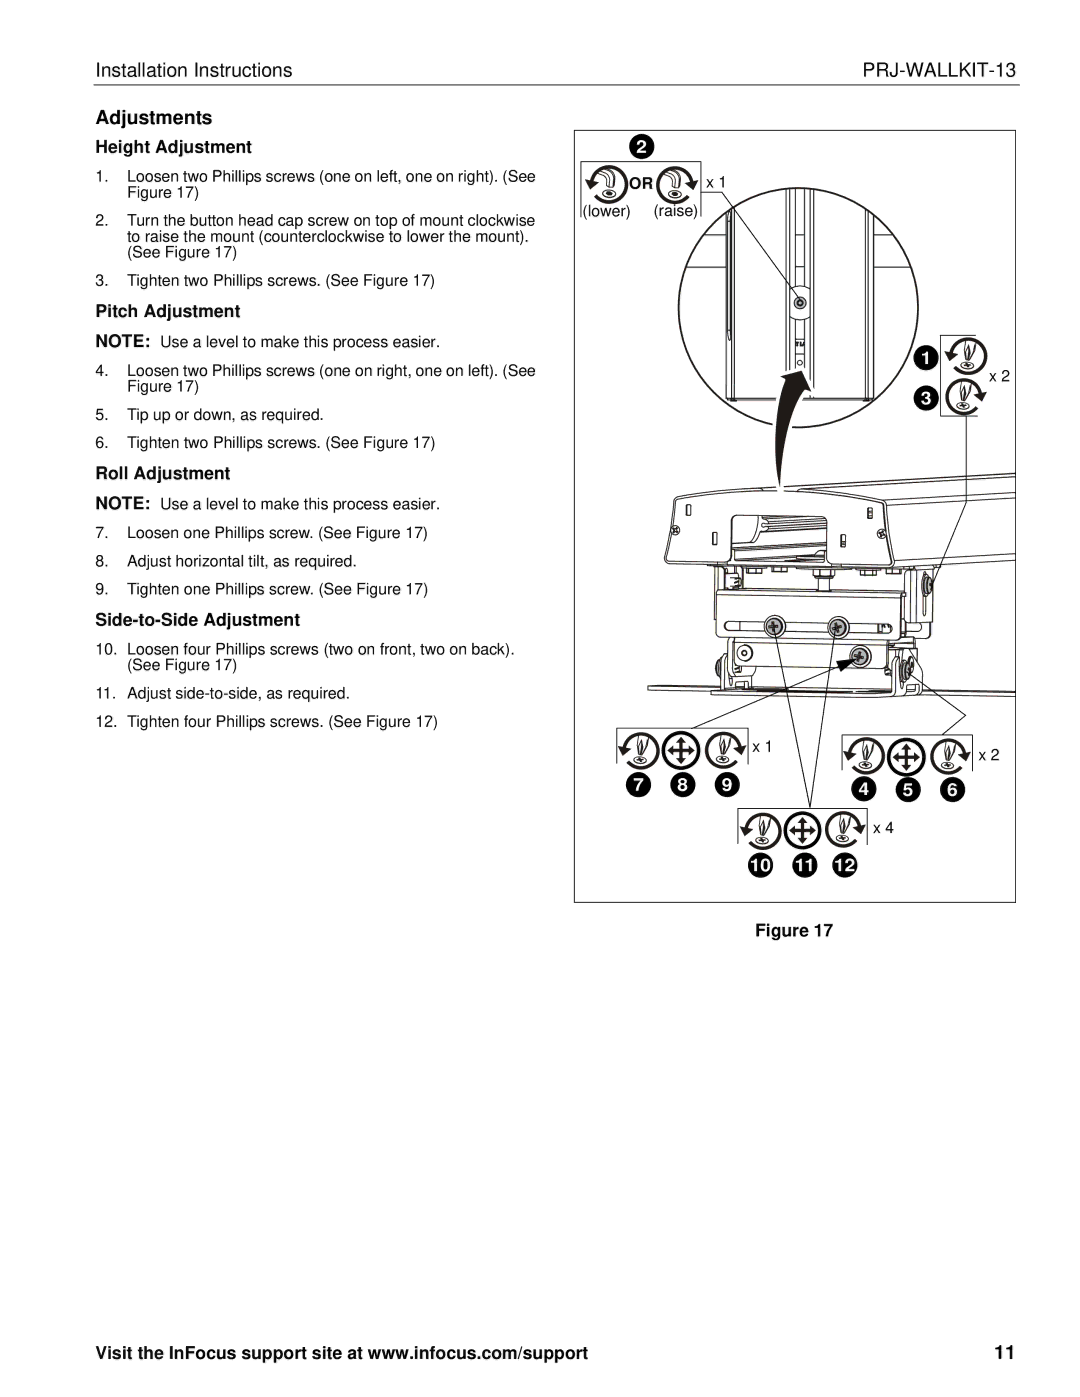
1. | Loosen two Phillips screws (one on left, one on right). (See | OR |
| x 1 |
|
|
|
|
| Figure 17) |
|
|
|
|
| ||
| (lower) | (raise) |
|
|
|
|
| |
2. | Turn the button head cap screw on top of mount clockwise |
|
|
|
|
| ||
|
|
|
|
|
|
| ||
| to raise the mount (counterclockwise to lower the mount). |
|
|
|
|
|
|
|
| (See Figure 17) |
|
|
|
|
|
|
|
3. | Tighten two Phillips screws. (See Figure 17) |
|
|
|
|
|
|
|
Pitch Adjustment |
|
|
|
|
|
|
| |
NOTE: Use a level to make this process easier. |
|
|
|
|
|
| 1 | |
4. | Loosen two Phillips screws (one on right, one on left). (See |
|
|
|
|
|
| |
|
|
|
|
|
| x 2 | ||
| Figure 17) |
|
|
|
|
|
| |
|
|
|
|
|
|
| 3 | |
5. | Tip up or down, as required. |
|
|
|
|
|
| |
|
|
|
|
|
|
| ||
6. | Tighten two Phillips screws. (See Figure 17) |
|
|
|
|
|
|
|
Roll Adjustment |
|
|
|
|
|
|
| |
NOTE: Use a level to make this process easier. |
|
|
|
|
|
|
| |
7. | Loosen one Phillips screw. (See Figure 17) |
|
|
|
|
|
|
|
8. | Adjust horizontal tilt, as required. |
|
|
|
|
|
|
|
9. | Tighten one Phillips screw. (See Figure 17) |
|
|
|
|
|
|
|
|
|
|
|
|
|
|
| |
10. | Loosen four Phillips screws (two on front, two on back). |
|
|
|
|
|
|
|
| (See Figure 17) |
|
|
|
|
|
|
|
11. | Adjust |
|
|
|
|
|
|
|
12. | Tighten four Phillips screws. (See Figure 17) |
|
|
|
|
|
|
|
|
|
|
| x 1 |
|
|
| x 2 |
|
|
|
|
|
|
|
| |
|
| 7 | 8 | 9 |
| 4 | 5 | 6 |
|
|
|
|
|
|
| x 4 |
|
|
|
|
| 10 | 11 | 12 |
|
|
Figure 17
Visit the InFocus support site at www.infocus.com/support | 11 |
