REPLACING SPARTAN CANES AND BRAKES
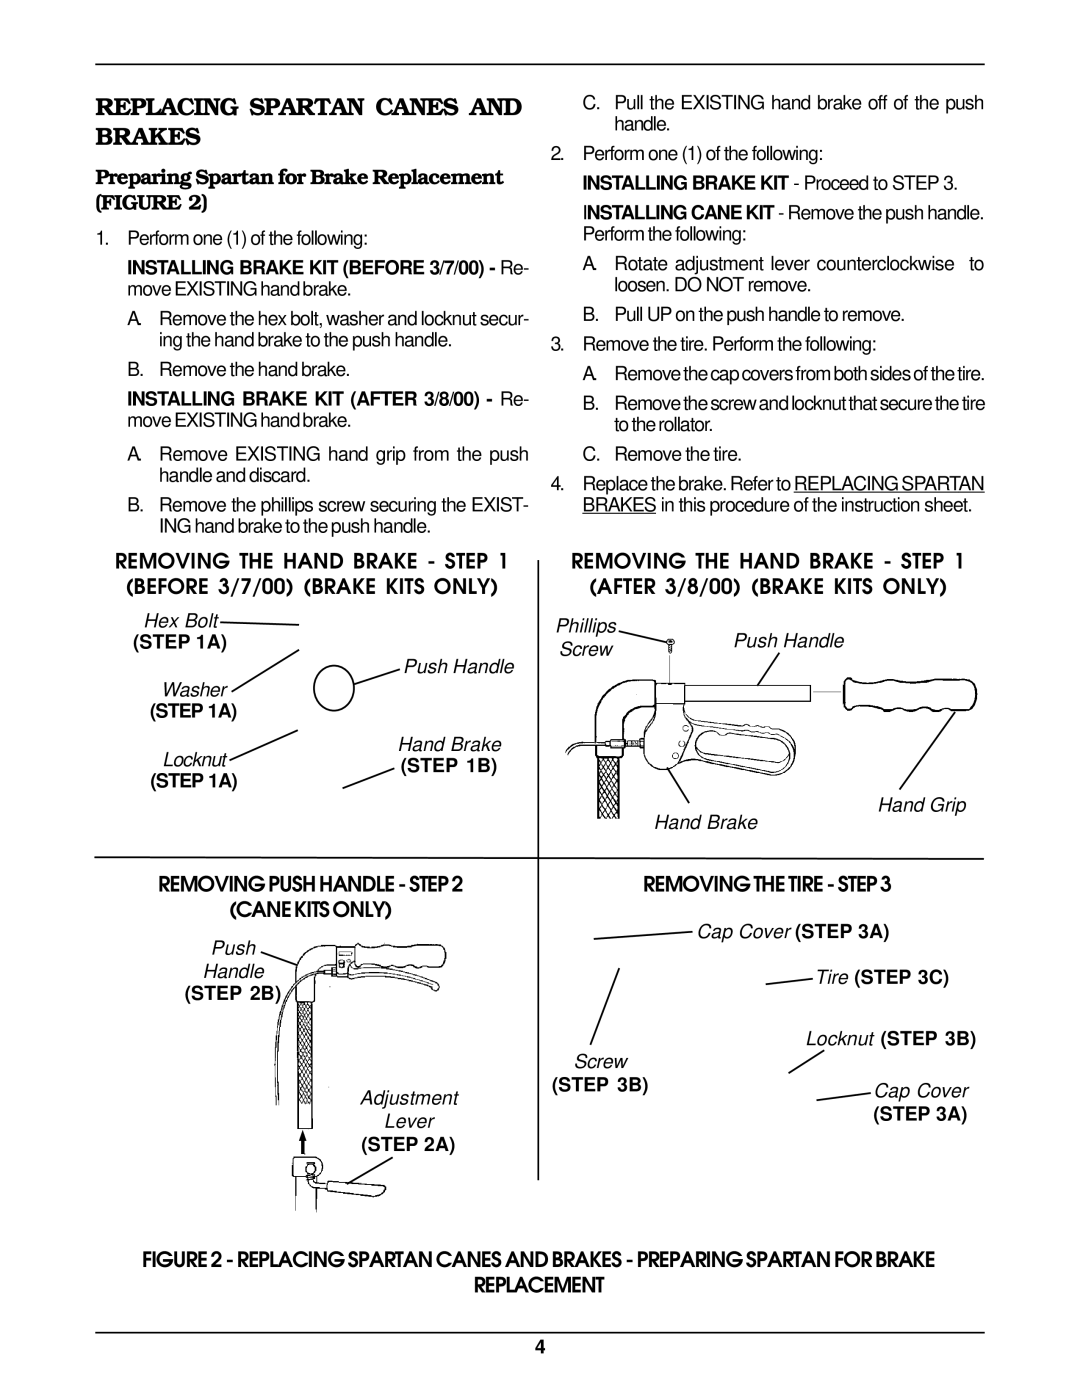
Preparing Spartan for Brake Replacement (FIGURE 2)
1.Perform one (1) of the following:
INSTALLING BRAKE KIT (BEFORE 3/7/00) - Re- move EXISTING hand brake.
A.Remove the hex bolt, washer and locknut secur- ing the hand brake to the push handle.
B.Remove the hand brake.
INSTALLING BRAKE KIT (AFTER 3/8/00) - Re- move EXISTING hand brake.
A.Remove EXISTING hand grip from the push handle and discard.
B.Remove the phillips screw securing the EXIST- ING hand brake to the push handle.
C.Pull the EXISTING hand brake off of the push handle.
2.Perform one (1) of the following:
INSTALLING BRAKE KIT - Proceed to STEP 3.
INSTALLING CANE KIT - Remove the push handle. Perform the following:
A.Rotate adjustment lever counterclockwise to loosen. DO NOT remove.
B.Pull UP on the push handle to remove.
3.Remove the tire. Perform the following:
A.Remove the cap covers from both sides of the tire.
B.Remove the screw and locknut that secure the tire to the rollator.
C.Remove the tire.
4.Replace the brake. Refer to REPLACING SPARTAN BRAKES in this procedure of the instruction sheet.
REMOVING THE HAND BRAKE - STEP 1 (BEFORE 3/7/00) (BRAKE KITS ONLY)
REMOVING THE HAND BRAKE - STEP 1 (AFTER 3/8/00) (BRAKE KITS ONLY)
Hex Bolt
(STEP 1A)
Washer
(STEP 1A)
Locknut
(STEP 1A)
Push Handle
Hand Brake
(STEP 1B)
Phillips | Push Handle | |
Screw | ||
|
Hand Grip
Hand Brake
REMOVING PUSH HANDLE - STEP 2REMOVING THE TIRE - STEP 3 (CANE KITS ONLY)
Push |
|
| Cap Cover (STEP 3A) |
|
|
| |
Handle |
|
| Tire (STEP 3C) |
(STEP 2B) |
|
|
|
|
|
| Locknut (STEP 3B) |
|
| Screw |
|
| Adjustment | (STEP 3B) | Cap Cover |
|
| ||
|
| (STEP 3A) | |
| Lever |
| |
|
|
| |
| (STEP 2A) |
|
|
|
|
|
FIGURE 2 - REPLACING SPARTAN CANES AND BRAKES - PREPARING SPARTAN FOR BRAKE
REPLACEMENT
4
