Power Failure

Surface Burners

In case of prolonged power failure, the surface burners can be lit manually. Hold a lit match near a burner and turn knob counterclockwise to ignite. After burner lights, turn knob to desired setting.

1.Remove the burner cap from the burner base and clean according to “General Cleaning” section.

2.Clean the gas tube opening with a damp cloth.

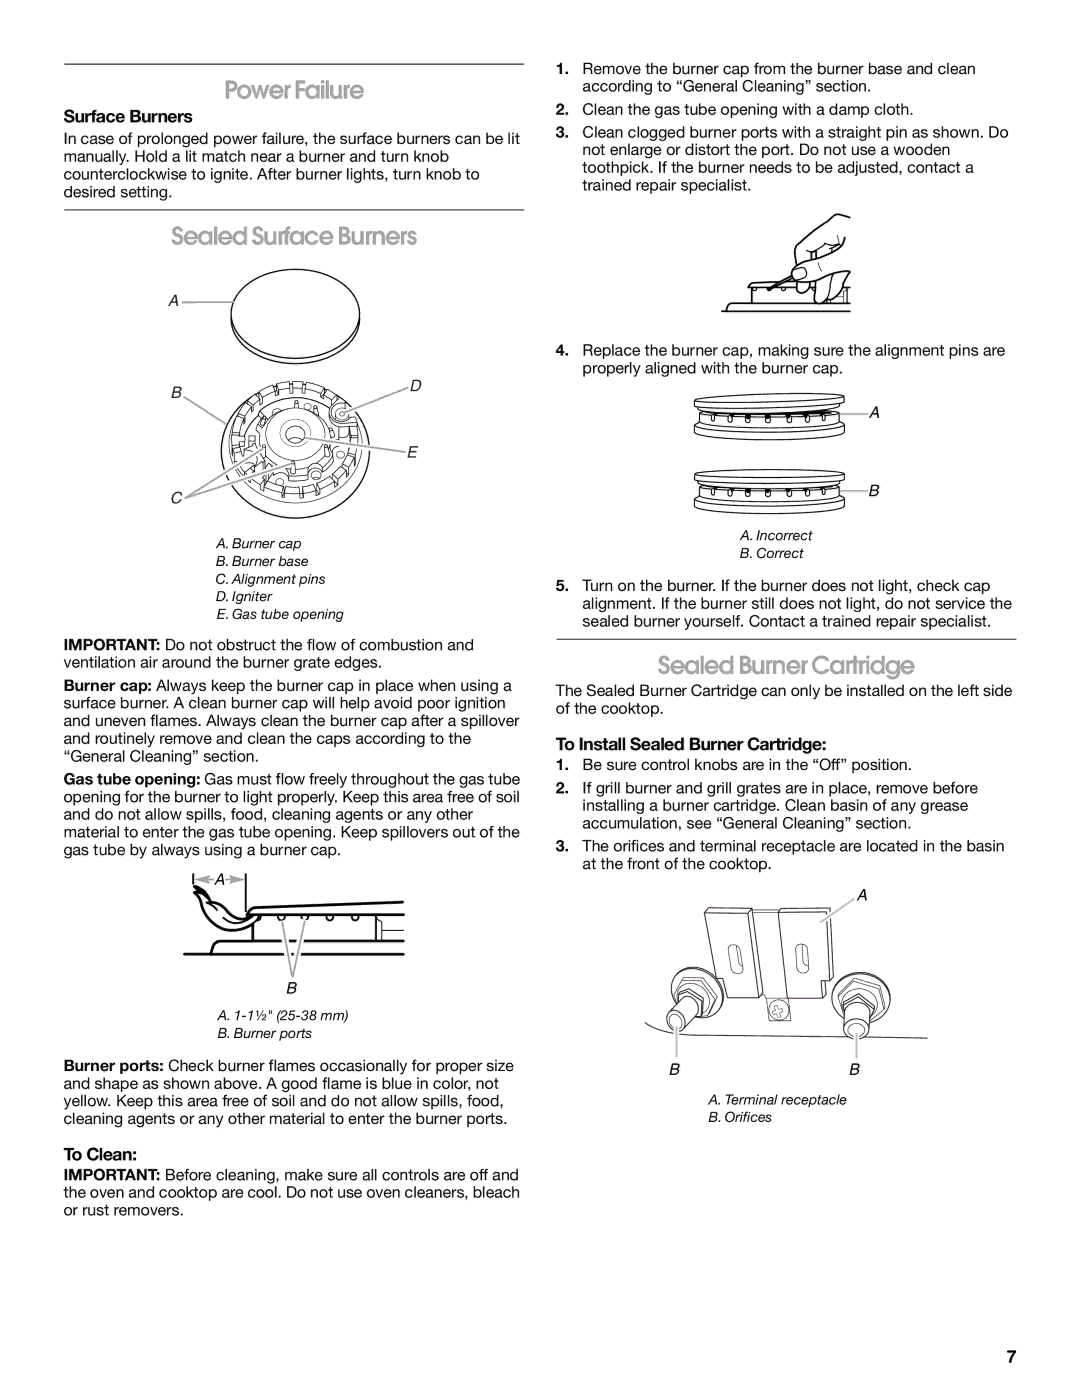
3.Clean clogged burner ports with a straight pin as shown. Do not enlarge or distort the port. Do not use a wooden toothpick. If the burner needs to be adjusted, contact a trained repair specialist.

Sealed Surface Burners

A

B D

E

C

A. Burner cap

B. Burner base

C. Alignment pins

D.Igniter

E.Gas tube opening

IMPORTANT: Do not obstruct the flow of combustion and ventilation air around the burner grate edges.

Burner cap: Always keep the burner cap in place when using a surface burner. A clean burner cap will help avoid poor ignition and uneven flames. Always clean the burner cap after a spillover and routinely remove and clean the caps according to the “General Cleaning” section.

Gas tube opening: Gas must flow freely throughout the gas tube opening for the burner to light properly. Keep this area free of soil and do not allow spills, food, cleaning agents or any other material to enter the gas tube opening. Keep spillovers out of the gas tube by always using a burner cap.

A

B

A.1-1¹⁄₂" (25-38 mm)

B.Burner ports

Burner ports: Check burner flames occasionally for proper size and shape as shown above. A good flame is blue in color, not yellow. Keep this area free of soil and do not allow spills, food, cleaning agents or any other material to enter the burner ports.

To Clean:

IMPORTANT: Before cleaning, make sure all controls are off and the oven and cooktop are cool. Do not use oven cleaners, bleach or rust removers.

4.Replace the burner cap, making sure the alignment pins are properly aligned with the burner cap.

A

B

A.Incorrect

B.Correct

5.Turn on the burner. If the burner does not light, check cap alignment. If the burner still does not light, do not service the sealed burner yourself. Contact a trained repair specialist.

Sealed Burner Cartridge

The Sealed Burner Cartridge can only be installed on the left side of the cooktop.

To Install Sealed Burner Cartridge:

1.Be sure control knobs are in the “Off” position.

2.If grill burner and grill grates are in place, remove before installing a burner cartridge. Clean basin of any grease accumulation, see “General Cleaning” section.

3.The orifices and terminal receptacle are located in the basin at the front of the cooktop.

A

BB

A. Terminal receptacle

B. Orifices

7

Page 7
Image 7
Jenn-Air JDS9865 manual Power Failure, Sealed Surface Burners, Sealed Burner Cartridge

JDS9865 specifications

The Jenn-Air JDS9865 is a sophisticated and versatile double oven range designed to elevate your cooking experience. This high-end appliance combines advanced features with sleek aesthetics, making it an excellent addition to any modern kitchen. Catering to both amateur chefs and culinary enthusiasts alike, the JDS9865 is praised for its performance, functionality, and innovative technologies.

At the heart of the JDS9865 lies its dual oven design, providing ample space for cooking multiple dishes simultaneously. With a total capacity of 6.7 cubic feet, this range allows users to prepare large meals with ease. The upper oven is particularly useful for baking and broiling, while the lower oven excels in roasting and slow-cooking, providing flexibility for holiday gatherings or family dinners.

One of the standout features of the Jenn-Air JDS9865 is its powerful Pro-Select® cooking system. This advanced technology ensures precise temperature control for both ovens, allowing for consistent cooking results. Additionally, the range is equipped with a powerful convection fan that circulates hot air, ensuring evenly cooked food, whether baking cookies or roasting meats.

The JDS9865 also incorporates the innovative Dual-Fuel system, which combines the benefits of a gas cooktop with an electric oven. The gas burners provide immediate heat and superior temperature control, while the electric oven delivers even baking results. With five burners, including a high-output burner for rapid boiling and a simmer burner for delicate sauces, this range accommodates various cooking styles and techniques.

Another notable characteristic of the Jenn-Air JDS9865 is its sleek design, featuring a stainless-steel finish that adds a touch of sophistication to any kitchen. The easy-to-clean ceramic glass cooktop complements the elegant appearance while providing a seamless surface for cooking and cleaning.

User-friendly features include a touch-control panel for seamless operation and an integrated oven light for easy monitoring of dishes. The range also features a self-cleaning mode, simplifying maintenance and ensuring that your appliance remains in pristine condition.

In summary, the Jenn-Air JDS9865 double oven range is an exceptional appliance that combines style, advanced cooking technologies, and user-friendly features. Its versatility and powerful performance make it a top choice for anyone looking to enhance their culinary capabilities. With its sleek design and innovative solutions, the JDS9865 stands as a testament to Jenn-Air's commitment to quality and functionality in kitchen appliances.