VENT SYSTEM CARE

Surface of Downdraft Vent

To avoid damaging the finish, clean downdraft vent with soap and water. Do not use scouring powder or abrasive solutions.

Exterior Surfaces:

To avoid damage to the exterior surface, do not use steel wool or soap-filled scouring pads.

Always wipe dry to avoid water marks.

Cleaning Method:

Liquid detergent soap and water, or all-purpose cleanser

Wipe with damp soft cloth or nonabrasive sponge, then rinse with clean water and wipe dry.

Glass

To Remove:

1.The vent hood must be in the raised position. See the “Downdraft Vent System Use” section.

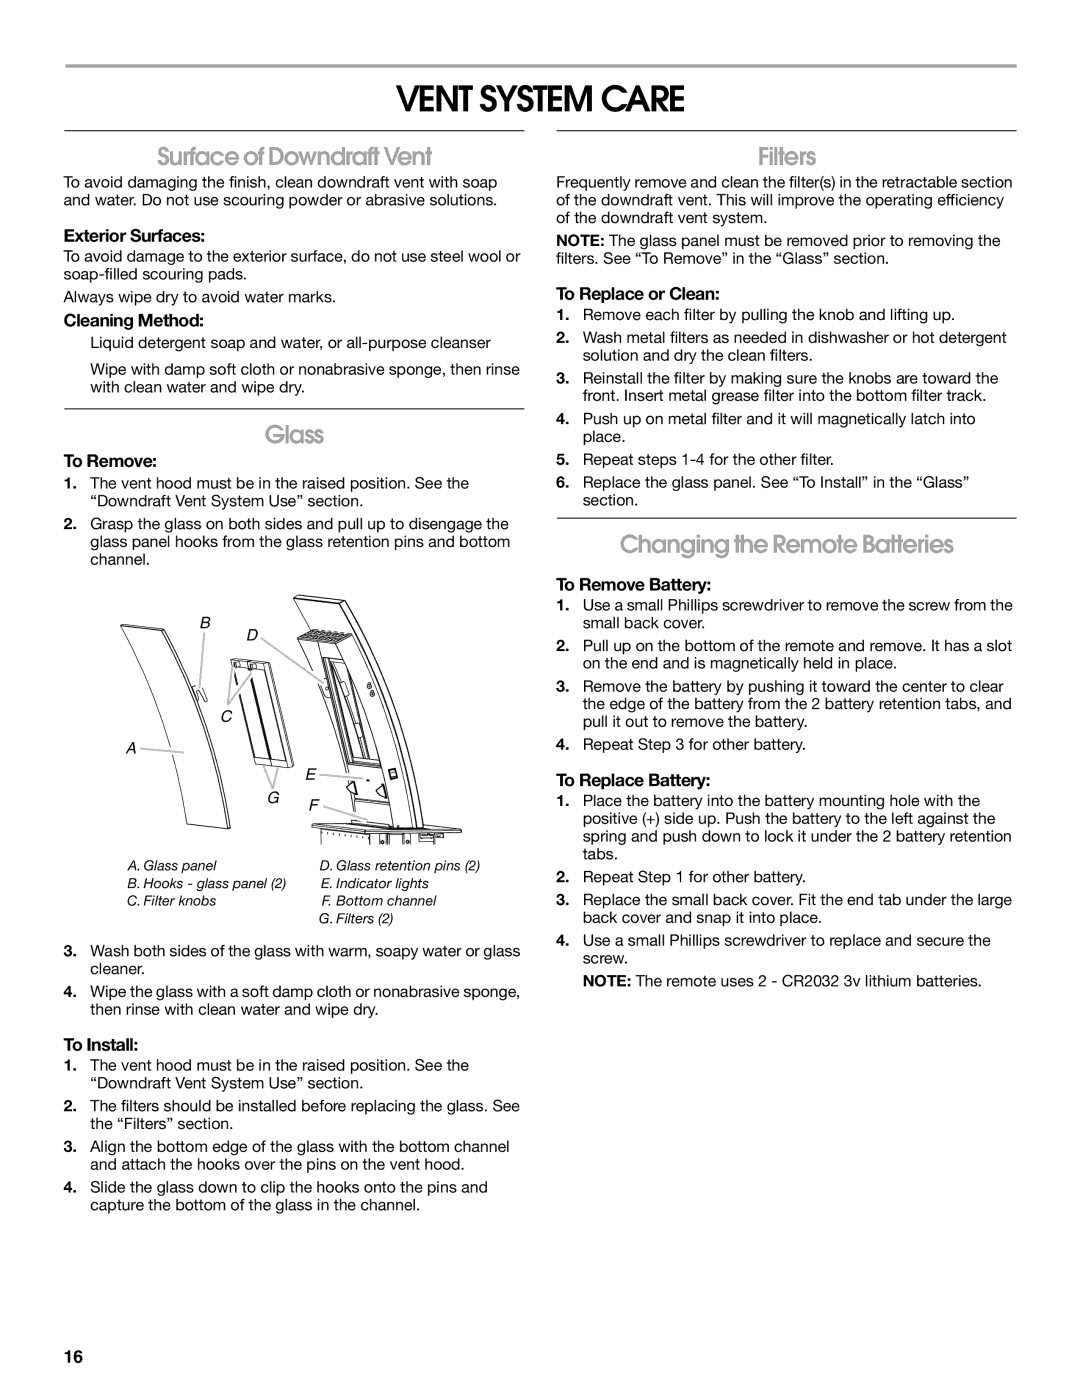
2.Grasp the glass on both sides and pull up to disengage the glass panel hooks from the glass retention pins and bottom channel.

B

D

C


A


E

G

F


A. Glass panel

D. Glass retention pins (2)

B. Hooks - glass panel (2)

E. Indicator lights

C. Filter knobs

F. Bottom channel


G. Filters (2)

3.Wash both sides of the glass with warm, soapy water or glass cleaner.

4.Wipe the glass with a soft damp cloth or nonabrasive sponge, then rinse with clean water and wipe dry.

To Install:

1.The vent hood must be in the raised position. See the “Downdraft Vent System Use” section.

2.The filters should be installed before replacing the glass. See the “Filters” section.

3.Align the bottom edge of the glass with the bottom channel and attach the hooks over the pins on the vent hood.

4.Slide the glass down to clip the hooks onto the pins and capture the bottom of the glass in the channel.

Filters

Frequently remove and clean the filter(s) in the retractable section of the downdraft vent. This will improve the operating efficiency of the downdraft vent system.

NOTE: The glass panel must be removed prior to removing the filters. See “To Remove” in the “Glass” section.

To Replace or Clean:

1.Remove each filter by pulling the knob and lifting up.

2.Wash metal filters as needed in dishwasher or hot detergent solution and dry the clean filters.

3.Reinstall the filter by making sure the knobs are toward the front. Insert metal grease filter into the bottom filter track.

4.Push up on metal filter and it will magnetically latch into place.

5.Repeat steps 1-4 for the other filter.

6.Replace the glass panel. See “To Install” in the “Glass” section.

Changing the Remote Batteries

To Remove Battery:

1.Use a small Phillips screwdriver to remove the screw from the small back cover.

2.Pull up on the bottom of the remote and remove. It has a slot on the end and is magnetically held in place.

3.Remove the battery by pushing it toward the center to clear the edge of the battery from the 2 battery retention tabs, and pull it out to remove the battery.

4.Repeat Step 3 for other battery.

To Replace Battery:

1.Place the battery into the battery mounting hole with the positive (+) side up. Push the battery to the left against the spring and push down to lock it under the 2 battery retention tabs.

2.Repeat Step 1 for other battery.

3.Replace the small back cover. Fit the end tab under the large back cover and snap it into place.

4.Use a small Phillips screwdriver to replace and secure the screw.

NOTE: The remote uses 2 - CR2032 3v lithium batteries.

16

Page 16
Image 16
Jenn-Air W10526413C, LIB0057678 Vent System Care, Surface of Downdraft Vent, Glass, Filters, Changing the Remote Batteries

LIB0057678, W10526413C specifications

The Jenn-Air W10526413C, LIB0057678 is a high-performance kitchen appliance designed to elevate culinary experiences and enhance kitchen aesthetics. This premium model is part of the renowned Jenn-Air brand, celebrated for its commitment to innovation, quality, and luxury in home appliances.

One of the standout features of the Jenn-Air W10526413C is its sophisticated design, seamlessly integrating into modern kitchens. With a sleek, stainless steel finish and elegant lines, it complements a variety of decors and adds a touch of sophistication to any cooking space. The appliance’s user-friendly interface includes intuitive controls, making it easy for home chefs to access a multitude of settings and features.

Key technologies incorporated in the Jenn-Air W10526413C include Smart Temperature Management, which ensures precise control over cooking temperatures, enabling users to achieve optimal results for a range of dishes. This technology also helps maintain consistent temperature levels, reducing cooking time and improving energy efficiency. Additionally, the appliance features advanced cooking modes such as convection baking, broiling, and roasting, allowing for versatility in meal preparation.

One of the highlights of this model is its powerful ventilation system, which efficiently eliminates smoke, steam, and odors from the kitchen. The integrated hood provides effective airflow, ensuring a clean and comfortable cooking environment. This is complemented by the appliance's quiet operation, which minimizes disruptions during meal prep and family gatherings.

The Jenn-Air W10526413C is designed with practicality in mind; it includes ample cooking space and adjustable racks that can accommodate various dish sizes and cooking methods. The appliance's durable construction guarantees longevity, making it a worthwhile investment for any home cook or culinary enthusiast.

Moreover, the Jenn-Air W10526413C supports Wi-Fi connectivity, enabling users to control and monitor the appliance remotely through their smartphones or smart home systems. This feature not only enhances convenience but also allows for seamless integration into modern smart kitchens.

Overall, the Jenn-Air W10526413C, LIB0057678 is a remarkable addition to any kitchen, combining cutting-edge technology, elegant design, and versatility. Whether you are preparing a simple weeknight dinner or hosting an elaborate gathering, this appliance is engineered to meet the demands of any culinary endeavor while adding a touch of luxury to your cooking experience.